The pursuit of a perfect, gloss white finish on an airliner model is often ruined by a single speck of dust, negating countless hours of work. The solution is not merely a cleaner workspace, but adopting the clinical mindset of a luxury automotive painter. This involves a systematic process focused on superior material chemistry, absolute environmental control, and a precise, multi-stage polishing sequence to achieve a true, archival-quality mirror shine that is physically impervious to dust and yellowing.
For the discerning modeler of commercial aircraft, there is no greater challenge nor a more profound satisfaction than a flawless, pure white fuselage. It’s a finish that appears simple but is mercilessly unforgiving. A single stray fiber, a microscopic dust particle, or a subtle “orange peel” texture can transform a masterpiece into a source of immense frustration. Many builders focus on the common advice: work in a clean space, use an airbrush, and apply thin coats. While not incorrect, this advice barely scratches the surface of what is required.
The real secret does not lie in hobby-grade techniques but in the uncompromising world of high-end automotive refinishing. The path to a glass-like surface is a clinical procedure, a science where the chemistry of your paint and the physics of your polishing process are as critical as your airbrush skills. It’s a fundamental shift in perspective: you are not just painting a model; you are engineering a perfect, stable, and permanent surface layer.
This guide deconstructs that professional methodology. We will move beyond the platitudes to explore the non-negotiable role of the correct primer, the techniques for creating seamless window surfaces, the science behind paint selection to prevent yellowing, and the meticulous sequences for polishing and masking. This is the blueprint for transforming your white fuselages from simply ‘painted’ to immaculately finished.
Summary: Achieving a Flawless White Airliner Finish: A Masterclass in Dust-Free Painting
- Base coat selection: why you need a white primer to cover grey plastic?
- Clear resin or Decals: how to handle cabin windows on solid fuselages?
- Compounds and cloths: the polishing sequence for a mirror shine
- Why enamel white yellows over time and why you should use automotive acrylics?
- Painting the metallic wing centers: how to mask metallic areas on gloss wings?
- Military vs Civil Aircraft Models: Which Collection Retains Value Better?
- How to Choose an Acrylic Case That Protects Your Models from UV Yellowing?
- Why Die-Cast Metal Models Are Outperforming Plastic in Investment Portfolios?
Base coat selection: why you need a white primer to cover grey plastic?
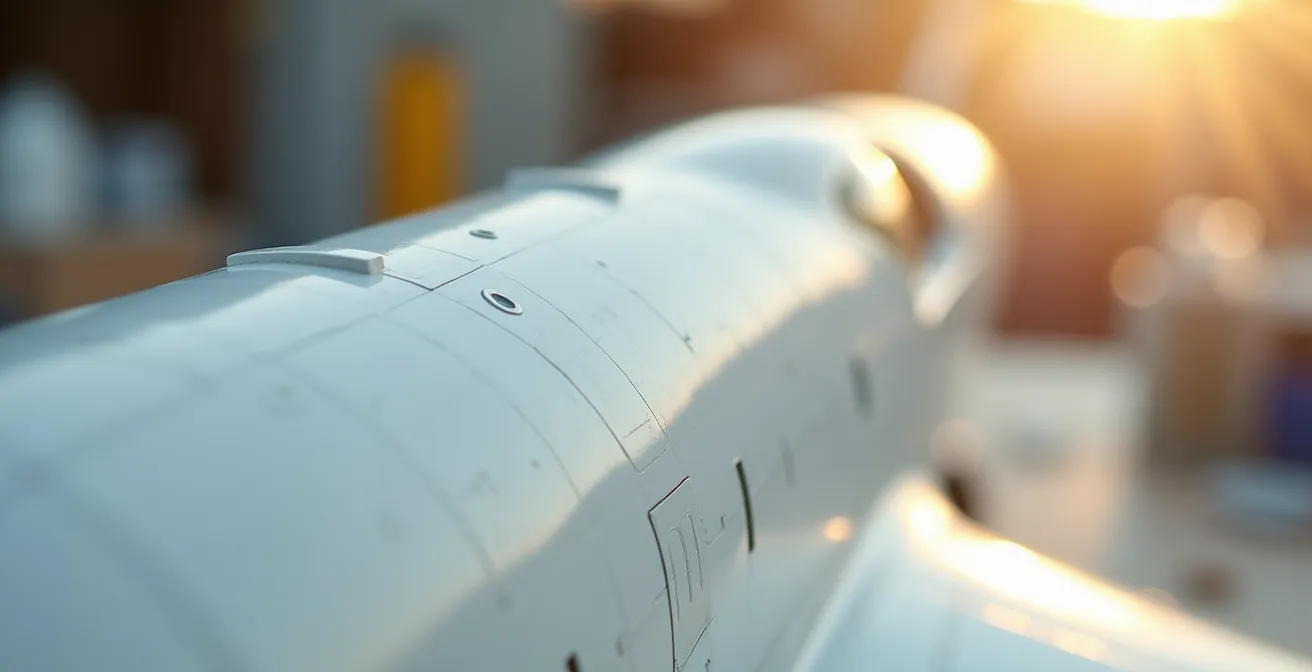
The foundation of a luminous white finish is not the topcoat, but the primer. Attempting to apply white paint directly over the typical grey styrene plastic is a fundamental error that compromises the final result. Grey plastic has a low color value that optically “cools” and dulls the white laid over it. This forces the builder to apply excessively thick layers of the topcoat to achieve opacity, dramatically increasing the risk of “orange peel” texture, hiding fine surface details, and extending drying times, which provides a larger window for dust contamination.
A high-quality white primer is non-negotiable. Its purpose is twofold. First, it creates a chemically inert and uniform barrier that ensures the topcoat’s solvent doesn’t react with the plastic. Second, and more importantly, it establishes a neutral, high-value color base. This allows your white topcoat to achieve its true, brilliant hue with a minimum number of thin, controlled layers. The process requires patience and precision.
A correct application is systematic:
- First, the model must be immaculately cleaned with soap and water to remove any trace of mold release agents, then allowed to dry for a full 24 hours.
- Apply the white primer in very thin mist coats, using an airbrush set at a low pressure of 15-18 PSI to build coverage gradually rather than flooding the surface.
- Allow each coat to dry for at least 30 minutes before applying the next. This prevents solvent trapping and ensures a stable layer.
- After a few coats, inspect the surface under a bright, raking light. This will reveal any areas where the grey plastic is still faintly visible, indicating the need for additional targeted coats.
- Finally, allow the primer to cure completely for 24-48 hours. This hardening period is critical for creating a stable foundation that won’t react with the subsequent topcoats.
Skipping or rushing this stage guarantees a compromised finish. The perfect white begins here, with an uncompromising approach to preparation.
Clear resin or Decals: how to handle cabin windows on solid fuselages?
For airliners with solid fuselages, the treatment of cabin windows presents a critical juncture that separates a good model from a truly exceptional one. The common method is to use window decals. While convenient, decals are a surface-level application. They will always have a visible edge, no matter how thin, which disrupts the seamless, monolithic surface you are trying to achieve. Furthermore, they can silver, yellow, or peel over time, compromising the model’s archival quality.
The professional, superior technique is to treat the windows as an integral part of the fuselage’s surface. This is achieved with UV-curing clear resin. This method creates the illusion of real, deep windows with a dark cabin behind them, resulting in a finish with unparalleled realism and perfect surface integrity. The process involves filling the molded window indentations with resin, curing it instantly with a UV light, and then sanding and polishing the resin plugs flush with the surrounding fuselage. The result is a single, uninterrupted surface that can be polished to a perfect mirror shine.
This approach delivers a level of finish that decals can never replicate, as the following comparison shows.
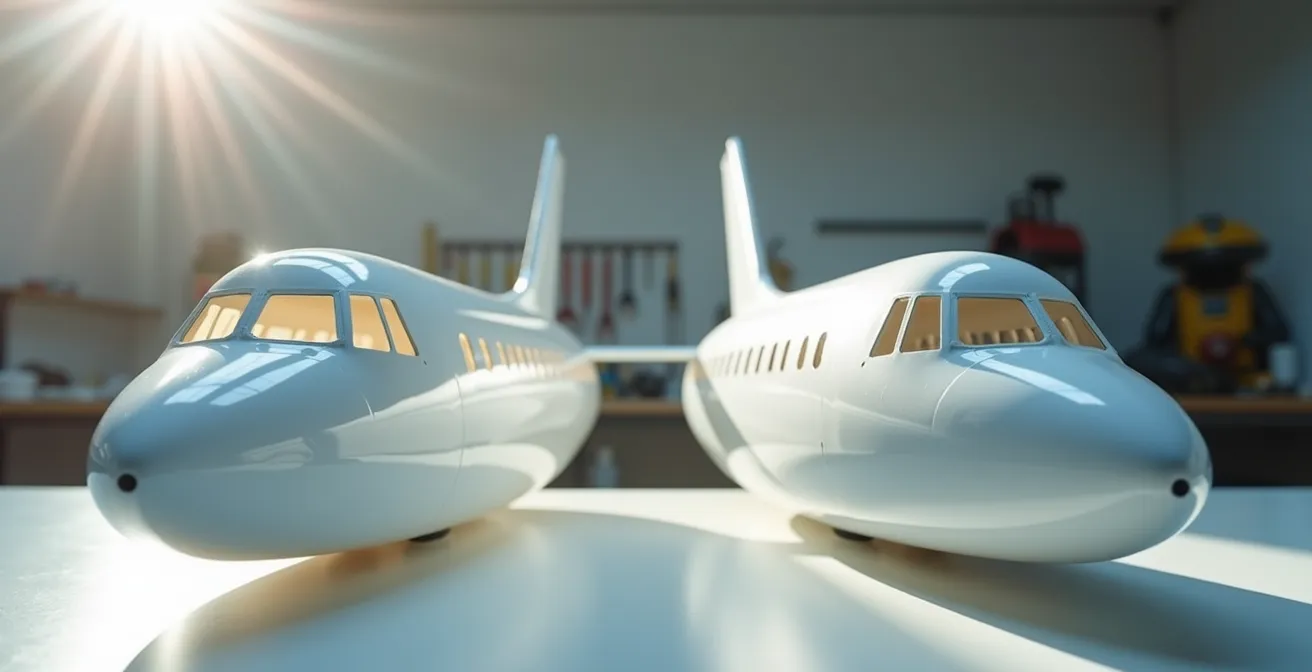
As the illustration demonstrates, the resin-filled windows become part of the fuselage itself, catching light like polished glass. In contrast, the decal edges, however subtle, break the reflection and betray their nature as an addition. Advanced modelers confirm that using UV resin creates a superior depth illusion and a seamless surface, eliminating the visible edges that are the primary drawback of decal application.
While more labor-intensive, the UV resin method is the only way to achieve a truly monolithic and flawless surface, a hallmark of a master-level build.
Compounds and cloths: the polishing sequence for a mirror shine
Once the final white topcoat and clear coat have fully cured (a process that can take days or even weeks for some paints), the true artistry begins. A sprayed finish, no matter how skillfully applied, will have a microscopic “orange peel” texture. Eliminating this and achieving a true, flat, mirror-like surface requires a systematic, multi-stage polishing sequence borrowed directly from the automotive world. This is not simple “sanding”; it is a process of progressive abrasion, where each step uses a finer grit to remove the scratches from the previous one.
The key is to work meticulously from a coarse-grit abrasive to an ultra-fine one, using water as a lubricant to prevent heat buildup and carry away debris. Rushing this sequence or skipping a step will leave microscopic scratches that will be impossible to remove later, forever dulling the final shine. The goal is to create a surface so flat and smooth that light reflects from it perfectly, without distortion.
The following checklist outlines the uncompromising sequence required to turn a standard gloss coat into a flawless mirror finish. Each step must be completed across the entire surface before moving to the next, with thorough cleaning in between to remove all abrasive particles from the previous stage.
Checklist for a Mirror Finish: The Polishing Sequence
- Initial Leveling: Start with 3000 grit wet sanding. Use a soft sanding pad and light pressure to gently remove the high spots of the orange peel texture until the entire surface has a uniform, dull sheen.
- Scratch Refinement: Progress to 5000 grit. This step’s sole purpose is to remove the 3000-grit sanding marks, replacing them with a much finer scratch pattern. The surface will begin to show a faint reflectivity.
- Pre-Polish: Move to 8000 grit abrasive. This stage begins the true polishing process, further refining the surface and bringing out a significant amount of gloss.
- Final Polish: Apply 12000 grit abrasive or a dedicated finishing compound. This is the final step in the abrasion sequence, creating the deep, liquid-like shine of a true mirror finish.
- Inspection and Buffing: Between each step, clean the surface and inspect it under a strong, raking light to reveal any remaining imperfections. Use a clean, high-quality microfiber cloth with a swirl-remover polishing compound for the final buffing, using gentle, circular motions.
It is a laborious but essential ritual. The deep, liquid shine of a perfectly polished white fuselage is the ultimate reward for this disciplined approach.
Why enamel white yellows over time and why you should use automotive acrylics?
A brilliant white finish is not only difficult to achieve but also to preserve. One of the most common long-term failures is yellowing, a frustrating degradation that turns a pristine model into a discolored relic. This issue is almost exclusively linked to the use of traditional hobby-grade enamel paints. The chemistry of these paints contains the seed of their own destruction. To achieve an archival-quality finish that remains pure white for decades, one must turn to modern automotive paint technology.
The fundamental problem lies in the paint’s binder—the clear medium that holds the pigment. As a leading paint chemistry expert explains, the process is an unavoidable chemical reaction. According to a technical expert from the Fusion Scale Hobbies Paint Guide 2025, “Enamel yellowing is caused by the oxidation of its oil-based binder (alkyds), a process accelerated by UV light. In contrast, pure acrylic polymer binders in automotive paints are inherently UV-resistant.” This means that every time an enamel-painted model is exposed to light, a slow, irreversible yellowing process is taking place at a molecular level.
The definitive solution is to use automotive-grade acrylic lacquers or, for the ultimate in durability, a 2K (two-component) urethane system. These paints use a completely different chemistry that is inherently stable and resistant to UV degradation. Professional painters report that 2K automotive clear coats, which consist of a base paint and a chemical hardener, create a cross-linked protective shell that is virtually impervious to yellowing. A study of these systems confirms that this catalyzed process provides superior scratch resistance and an archival quality that hobby enamels simply cannot match. However, these professional-grade materials require strict safety protocols, including vented spray booths and isocyanate-rated respirators.
For the perfectionist, the choice is clear: the short-term convenience of enamels is a poor trade-off for the long-term, uncompromising stability of modern acrylic and urethane systems.
Painting the metallic wing centers: how to mask metallic areas on gloss wings?
One of the signature features of many modern airliners is the grey or metallic center section of the wing, known as the wing box. Masking this area over a freshly polished, high-gloss white wing is one of the most nerve-wracking steps in the entire process. A poorly executed mask can lead to paint bleed, a “paint ledge” where the metallic coat sits proud of the white, or even lifting the underlying clear coat upon removal. Achieving a razor-sharp demarcation line without damaging the flawless white finish requires a specific, professional technique.
The key is to create a “soft edge” with the tape and a “hard edge” with a sealing medium. Standard masking tape, even high-quality brands, can allow microscopic amounts of paint to creep underneath via capillary action. Furthermore, its adhesive can be too strong for a delicate gloss finish. The professional sequence mitigates these risks at every step, ensuring a perfect result.
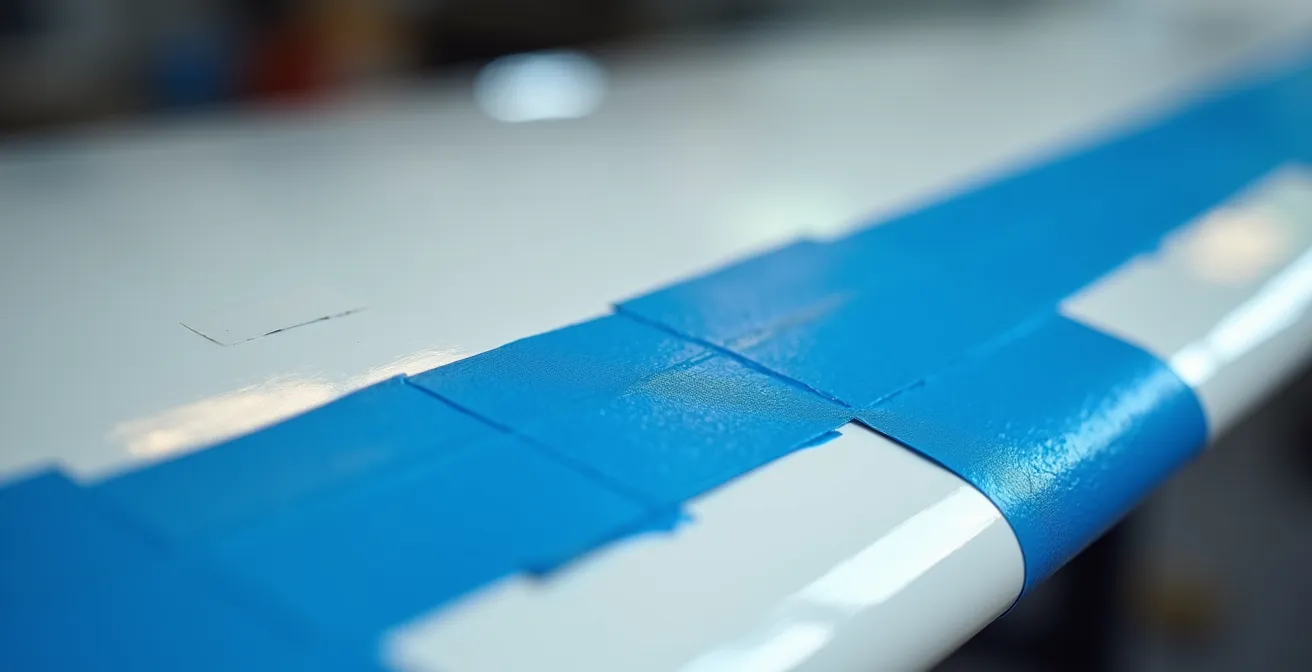
The process demands absolute precision, as shown in the close-up above. The goal is to create an impermeable barrier that results in a line so clean it appears to be part of the wing’s original molding.
- First, de-tack the masking tape by applying it to a clean surface (like the back of your hand) a few times to reduce its adhesive strength.
- Apply the tape approximately 1mm outside the final paint line you wish to create. This small gap is crucial.
- Bridge this 1mm gap with a thin, precise line of liquid masking fluid. This fluid will seal the edge of the tape perfectly, creating an impenetrable barrier.
- Burnish the edge of the tape (where it meets the liquid mask) with a plastic toothpick or a dedicated tool to ensure a perfect seal with no air gaps.
- Apply the metallic paint in thin coats. It is critical to apply this metallic color before the final overall gloss coats. This encapsulates the metallic paint within the clear coat, eliminating any perceptible paint ledge.
- Remove the masking tape while the metallic paint is still slightly tacky, pulling it back on itself at a low angle. This ensures the cleanest possible line without chipping the fresh paint.
It is a sequence that replaces hope with certainty, delivering a crisp, professional demarcation line every time.
Military vs Civil Aircraft Models: Which Collection Retains Value Better?
Within the modeling community, a frequent debate arises regarding the long-term investment value of different subjects. Do collections of popular military jets like the F-14 Tomcat appreciate more than a fleet of civilian airliners? When considering unbuilt kits, market trends for rare or discontinued items dictate value. However, when it comes to professionally built models, the subject matter becomes secondary to a far more important factor: the quality of execution.
A flawlessly finished and weathered model, regardless of its subject, is a piece of art. Its value is derived from the skill, time, and artistry invested in it. A poorly assembled and painted model of a popular fighter will always be worth less than a perfectly executed model of a less “exciting” subject, like a regional commuter jet. As one professional model appraiser noted, “For built models, the retention value is less about the subject and more about the quality of execution. A flawlessly finished airliner will be far more valuable than an average-built F-14.”
This places the focus squarely on the techniques discussed throughout this guide. The ability to produce a mirror-shine, dust-free finish is what creates tangible value. This is reflected in the commission market, where clients pay a premium for master-level work. Recent analysis of the market shows the average cost is between $100 and $140 per professionally painted model, with high-end, large-scale projects commanding significantly more. This price is a direct reflection of the builder’s ability to deliver a perfect finish, not the inherent popularity of the aircraft itself.
Therefore, the most valuable collection is not one of military or civil aircraft, but one where every single piece demonstrates an uncompromising commitment to perfection.
How to Choose an Acrylic Case That Protects Your Models from UV Yellowing?
After investing hundreds of hours into creating a perfect, archival-quality finish, leaving the model exposed on a shelf is an act of negligence. The same environmental factors you fought during painting—dust, humidity, and UV light—will immediately begin their work of degrading the finish. A high-quality display case is not a luxury; it is the final, essential component of your preservation system. However, not all clear cases are created equal.
The material of the case is the most critical factor. Inexpensive cases made from styrene or standard-grade plastic offer little to no protection from the primary enemy of color stability: ultraviolet (UV) light. As established, UV radiation is the main catalyst for the chemical reaction that causes white paints to yellow over time. Furthermore, these lower-grade plastics often carry a static charge, actively attracting the very dust you worked so hard to eliminate. They can also have poor optical clarity and may even yellow themselves over time, distorting the view of your model.
For true, long-term preservation, the only acceptable choice is museum-grade acrylic. This material is specifically engineered for archival purposes. The key difference lies in its formulation, which includes UV-filtering agents and anti-static properties. Museum-grade cases create a sealed, stable micro-environment that guarantees the long-term preservation of your work. They provide 99%+ UV filtering, feature an anti-static coating to repel dust, and offer superior optical clarity with no color cast or distortion, protecting the builder’s investment of time and effort indefinitely.
The differences between materials are stark, as this comparison of common display case options shows.
| Case Type | UV Protection | Anti-Static | Optical Clarity | Price Range |
|---|---|---|---|---|
| Museum Grade Acrylic | 99%+ filtering | Yes | No distortion | Premium |
| Standard Acrylic | 85-90% | Limited | Good | Moderate |
| Styrene/Plastic | 50-70% | No | Yellow tint possible | Budget |
Choosing a museum-grade case is the final expression of the perfectionist’s mindset, ensuring that a flawless finish remains flawless for a lifetime.
Key Takeaways
- A white primer is a non-negotiable foundation; it neutralizes the base color and reduces the number of topcoats needed, minimizing the risk of dust.
- For long-term color stability, automotive-grade acrylics are chemically superior to hobby enamels, which are prone to UV-induced yellowing.
- The true monetary and artistic value of a built model is determined by the quality of its execution, not its subject matter. A flawless finish is the primary driver of value.
Why Die-Cast Metal Models Are Outperforming Plastic in Investment Portfolios?
In the broader collectibles market, there’s often discussion about the investment potential of die-cast metal models versus plastic kits. Die-cast models, produced in limited runs, often have a clear and established secondary market. Plastic kits, being mass-produced, seem less of an “investment.” However, this entire debate misses the most crucial point for a true craftsman. The focus on the finished object, whether metal or plastic, is a misdirection.
The most valuable asset you are building is not the model on your shelf; it is the skillset within you. The techniques required to take a simple plastic kit and transform it into a piece with an archival-quality, mirror-shine finish are the true appreciating asset. This mastery of process—surface preparation, dust control, chemical selection, and precision polishing—is a form of capital that transcends any single project. It can be applied again and again, with each application further honing your ability and increasing the value of your future work.
The investment portfolio for hobbyists is not the finished model, but the skills acquired. The techniques to achieve a perfect finish are the true appreciating asset.
– Master Modeler, Model Aircraft Investment Guide
From this perspective, the choice between military or civil, or die-cast versus plastic, becomes irrelevant. The real work is in the pursuit of perfection itself. Each model is a training ground, and each challenge overcome—a dust-free finish, a razor-sharp mask, a stable white—is a dividend paid into your portfolio of skills.
Embrace this mindset. Your next project is not just another model; it is an opportunity to refine your most valuable asset. Apply these clinical techniques, aim for an uncompromising standard, and invest in your own mastery.