The secret to realistic heavy wear isn’t removing more paint, but mastering artistic control over when, where, and how every chip tells a story.
- Timing is everything: Chipping fluids work best within a precise “curing window” after painting, which varies by paint type.
- Location dictates realism: Concentrate chips on high-traffic areas like access panels and leading edges, following the logic of physics and maintenance.
- Technique creates narrative: Use a combination of sponges, brushes, and pencils to create layers of varied wear, from fine scratches to deep gouges.
Recommendation: Start by mapping out a “wear story” for your model based on its operational history before applying a single drop of chipping fluid.
There’s a moment of terror every scale modeler faces. You have a pristine Japanese Zero on your bench, and the goal is to depict a war-weary veteran of the Pacific campaign. You reach for the chipping fluid, filled with visions of authentic, battle-hardened paintwork. But in the back of your mind lurks a powerful fear: the fear of going too far. One wrong move, one minute too long, and your masterpiece transforms from a realistic replica into an unrecognizable, over-weathered wreck that looks like it was pulled from a scrapyard.
The common advice often revolves around generic techniques like the “hairspray method” or simply “scrubbing with a brush.” While these methods are the foundation, they miss the most critical element that separates an artist from a destroyer: control. The internet is filled with tutorials that show the spectacular removal of paint, but few delve into the subtleties of stopping, of creating a narrative of wear rather than a cacophony of damage. The real challenge isn’t making paint chip; it’s making it chip believably and with intention.
But what if the key wasn’t in the act of destruction, but in the art of storytelling? This guide shifts the focus from aggressive weathering to controlled artistry. We will explore how to think like a maintenance crewman and a physicist to place every chip with purpose. You’ll learn not just how to use the tools, but when to use them, where to apply them, and most importantly, when to stop. It’s about transforming weathering from a gamble into a deliberate process that adds depth, history, and a soul to your model.
This article will guide you through the essential philosophies and advanced techniques for achieving this control. We’ll start by understanding why weathering is crucial, then dive into the precise timing of water activation, the use of different tools for varied effects, the logic behind chip location, and even how to create convincing multi-layered wear.
Summary: How to Control Chipping Fluid to Avoid the “Wrecked Junkyard” Look?
- Why Clean Models Look like Toys: Adding Authentic Weathering to Scale Aircraft?
- Warm water scrubbing: knowing exactly when the paint is ready to chip
- Micro-sponging: how to use packing foam for random, small chips?
- Control freak: using a prismacolor pencil for precise edge wear
- Why chips should concentrate on access panels and leading edges only?
- Two-layer chipping: showing the primer underneath the topcoat before the metal
- How to Install Fine Antennae Rigging Without Snapping Them Instantly?
- How to Choose an Acrylic Case That Protects Your Models from UV Yellowing?
Why Clean Models Look like Toys: Adding Authentic Weathering to Scale Aircraft?
A factory-fresh, perfectly clean scale model possesses a certain clinical beauty, but it often lacks a soul. Without the subtle cues of use, it can look more like a high-quality toy than a miniature replica of a functional machine. Weathering is the art of breaking this pristine illusion. It’s the process of adding a visual history to the model, telling the story of its operational life. Every scratch, fluid stain, and paint chip speaks to missions flown, maintenance performed, and the harsh environment in which the aircraft operated. A clean model exists in a vacuum; a weathered model exists in a world.
The human brain is incredibly adept at spotting artificiality. When we look at a real-world object, we subconsciously register the infinite imperfections that define its reality: the way light reflects off a scuffed surface differently than a smooth one, the accumulation of grime in crevices, the fading of paint under the sun. By replicating these effects in miniature, you are providing the viewer’s brain with the very same cues it uses to recognize authenticity. This is why a skillfully weathered model feels “right” and commands attention in a way a clean one rarely can.
For an aircraft like the Mitsubishi A6M Zero, operating from island airstrips in the corrosive salt air of the Pacific, a clean finish is not just unrealistic; it’s anachronistic. The story of these aircraft is one of intense use and exposure to the elements. Therefore, weathering isn’t an optional step to “make it look cool”—it is a fundamental part of the historical representation. It conveys the narrative of a specific time and place. The goal isn’t to make the model dirty, but to make it believable and alive.
Ultimately, a model without weathering is a representation of an idea. A model with weathering is a snapshot of a life lived, transforming it from a static object into a piece of dynamic storytelling.
Warm water scrubbing: knowing exactly when the paint is ready to chip
The most common point of failure when using chipping fluids (or the hairspray technique) is not the application, but the timing. Activating the chipping layer is a delicate dance that happens within a specific “curing window.” This is the period after the topcoat of paint has been applied where it is firm enough not to dissolve into a mess, but has not yet fully cured and bonded, which would render the chipping fluid underneath inert. Miss this window, and you’ll either strip off huge, uncontrollable flakes of paint or struggle to make any mark at all.
The duration of this window varies significantly based on the type of paint used. Water-based acrylics like Vallejo have a longer window, while hotter, solvent-based acrylics from Tamiya or Mr. Hobby cure much faster. A critical part of an experiment on timing revealed that some manufacturers even claim a window as short as 10-20 minutes to begin the chipping process. The key is to test. Before committing to your model, always test your paint and chipping fluid combination on a spare part to understand its unique behavior. A gentle press with a soft silicone clay shaper can be a great indicator: if the paint shows a slight “give” without leaving a permanent mark, you are likely in the sweet spot.
The application of warm water is your activation tool, and its delivery method is a key element of control. Instead of flooding the surface, which leads to widespread, chaotic chipping, you must be strategic. Different tools create different effects, allowing you to “paint” the wear onto your model.
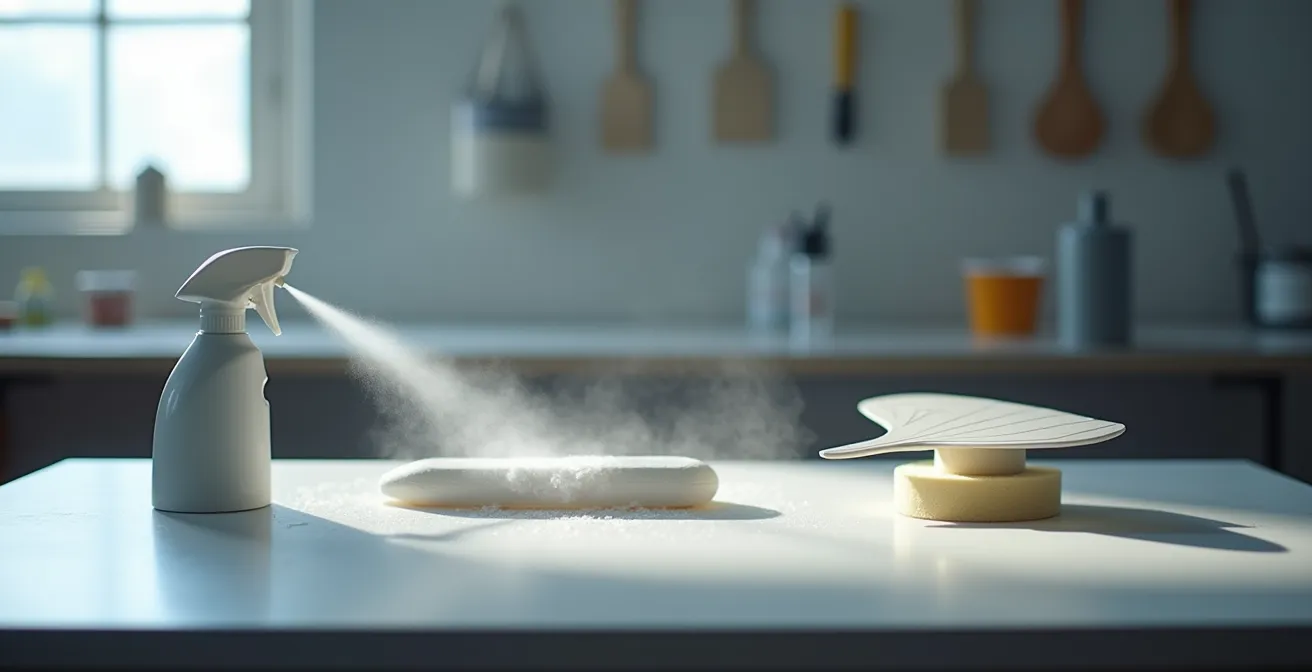
As the image demonstrates, your approach to water application should be varied and deliberate. Use a fine atomizer for a gentle mist to test the paint’s reaction or to create very fine, subtle wear. For more targeted chipping along a panel line or an edge, use a fine-tipped brush loaded with water. This allows for selective activation, giving you pinpoint control over exactly where the chipping will occur. A dampened sponge can be used to create random patterns over a slightly larger area. This methodical approach turns a potentially destructive step into a controlled, artistic process.
By understanding your materials and applying water with surgical precision, you move from being a passenger in the weathering process to being the pilot, guiding every effect to its intended destination.
Micro-sponging: how to use packing foam for random, small chips?
While a brush and water give you targeted control, the sponge is your tool for creating “controlled chaos.” Sponging is perfect for simulating the clusters of small, random chips that appear in high-traffic areas or on surfaces exposed to debris. The secret to avoiding a repetitive, unnatural pattern is to vary the type of sponge you use. Not all foam is created equal. The coarse, open-cell foam from electronics packaging is ideal for producing larger, more sporadic chips, perfect for areas of heavy stress like wing roots where mechanics might walk.
Conversely, a fine-pore cosmetic sponge, torn into an irregular shape, will produce much smaller, denser patterns. This is excellent for representing the “sandblasted” or “sandpaper” effect seen on leading edges or around latches and fasteners. By using multiple sponge densities on the same model, you begin to build a wear narrative, suggesting that different types of wear have occurred in different locations. This simple variation adds a significant layer of visual complexity and realism that a single sponge type cannot achieve.
The technique itself can be divided into two primary methods: the “loaded” sponge and the “unloaded” sponge. Understanding the difference is crucial for controlling the final look. A loaded sponge is dipped directly into paint, whereas an unloaded sponge is used to activate an underlying chipping fluid layer.
This comparative table, based on insights from modeling experts, breaks down the application and results of each technique. A common practice is to use a mix of both methods to build up layers of detail.
| Technique | Application Method | Best Used For | Result Type |
|---|---|---|---|
| Loaded Sponge | Dipped in metallic paint | Adding small chips directly | Sharp, defined chips |
| Unloaded Sponge | Dampened with water only | Activating chipping fluid | Organic, random patterns |
| Multi-color Loading | Dark grey, steel, primer colors | Creating depth in single pass | Instant visual history |
For the ultimate level of control, always dab the loaded sponge onto a paper towel before applying it to the model. You want the sponge to be almost dry, depositing pigment rather than wet paint. This prevents large, unsightly blobs and gives you the fine, speckled effect you’re looking for. Remember the mantra of all expert weatherers: it is always easier to add more chips than it is to take them away.
By combining sponge densities and alternating between loaded and unloaded techniques, you can create a symphony of wear that is both random and believable, elevating your model from a simple replica to a miniature historical document.
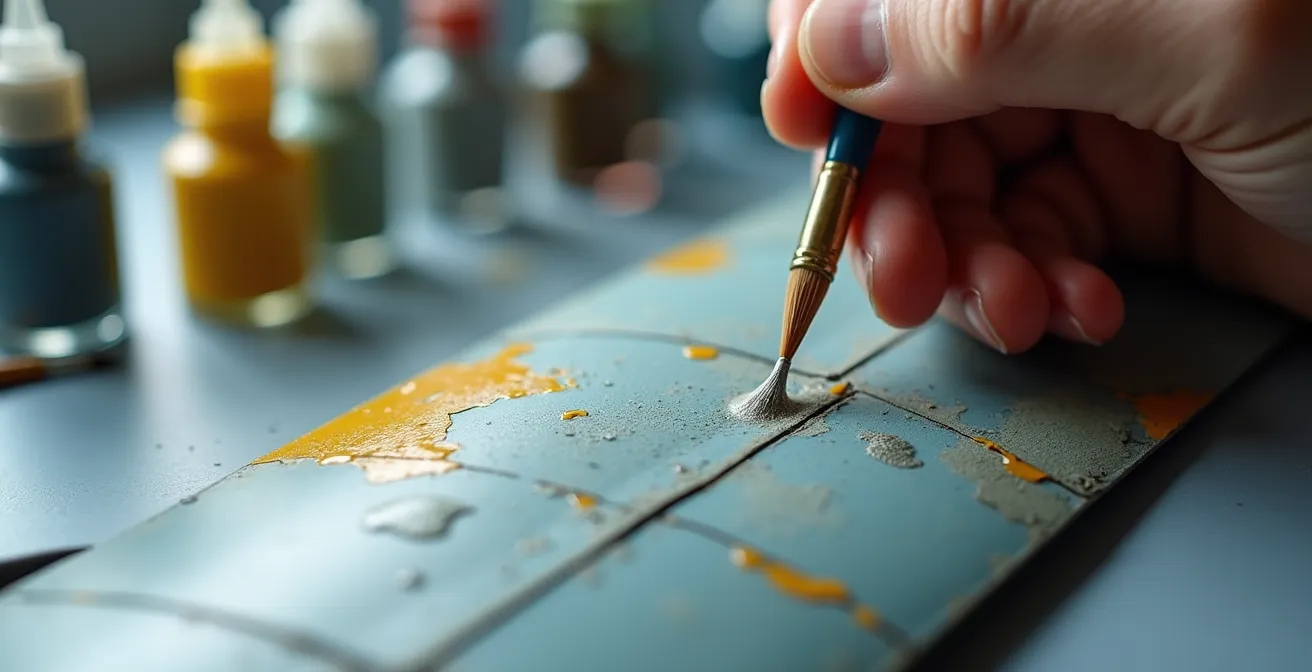
Control freak: using a prismacolor pencil for precise edge wear
When the goal is absolute precision, no tool offers more control than a colored pencil. While sponges and brushes are excellent for creating fields of random chips, a sharply pointed artist’s pencil, such as a Prismacolor, allows you to place individual scratches and wear marks with surgical accuracy. This is the technique for the control freak, the modeler who wants to dictate the exact location, size, and direction of every single imperfection. It’s perfect for adding the final 10% of detail that sells the entire effect.
The primary use for pencils is replicating the fine, linear scratches and worn edges that occur on canopies, panel lines, and fasteners. Unlike paint, which can be difficult to apply in a perfectly fine line, a pencil deposits a dry, controllable pigment. A silver or dark grey pencil can be used to simulate wear down to the bare metal on the edges of cockpit sills or along the track of a sliding canopy. A key advantage is its reversibility; if you make a mistake, a pencil mark on a matte surface can often be gently removed with an eraser before it’s sealed in.
The true artistry of the pencil technique lies in blending and layering. Applying the pencil marks is only the first step. To make them look like authentic wear rather than drawn-on lines, they need to be integrated into the surface. Some expert analysis has found that while different brands perform similarly, Prismacolor pencils have a slight edge in how the pigment initially “grips” a matte surface. This grip is essential for the subsequent blending process.
To move from basic marks to a truly convincing effect, you need a clear plan of action for how to apply and treat the pencil marks at different stages of the finishing process.
Action Plan: Mastering Pencil Chipping
- Apply Initial Marks: Use a sharp pencil to apply marks to edges and panel lines where wear would naturally occur, focusing on logic and realism.
- Soften and Blend: Use a small brush, lightly dampened with mineral spirits or an acrylic blending agent, to gently soften the edges of the pencil marks, feathering them into the paint.
- Seal Faded Wear: Apply light, subtle pencil chips *before* the final flat coat. The varnish will slightly fade them, creating the look of older, sealed-in wear.
- Add Fresh Damage: Apply sharp, bright metallic pencil chips *after* the final flat coat to represent very recent scratches and scuffs that haven’t had time to oxidize.
- Create Directional Scratches: Utilize the sharp point of the pencil to draw fine, directional scratches, such as those made by a sliding canopy or tools being dragged across a surface.
By thinking in terms of “old” and “new” wear and using the final varnish coat as a separating layer, you can use a simple pencil to create a complex and convincing timeline of damage on your model’s surface.
Why chips should concentrate on access panels and leading edges only?
The most common mistake that leads to the “junkyard look” is random, evenly distributed chipping. On a real aircraft, wear and tear is not democratic; it is governed by the unyielding laws of physics and the practicalities of human operation. To create believable weathering, you must abandon randomness and embrace logic. Chips and scratches appear in specific places for specific reasons. The two most important areas are, without question, leading edges and access panels.
Leading edges of wings, stabilizers, and air intakes are the aircraft’s first point of contact with the atmosphere. At hundreds of miles per hour, even microscopic particles of dust, rain, and ice act like a sandblaster, eroding the paint in a predictable pattern. This wear is most intense at the very front and streaks backward, following the path of the airflow. It is a direct result of the physics of wear. Chipping on the middle of a wing panel, away from any edge, simply makes no physical sense and immediately signals artificiality to the observer.
Access panels, meanwhile, are the epicenters of human-caused wear. These are the areas opened repeatedly by maintenance crews for inspections, refueling, and re-arming. Boots scuff the paint, tools are dropped, and hands grip edges for leverage. This creates a concentrated zone of heavy chipping, scratches, and grime. A heavily worn panel next to a relatively clean section of fuselage tells a story: “This part is important and gets a lot of attention.” To achieve this realism, you must create a “wear story map” for your model before you even begin chipping.
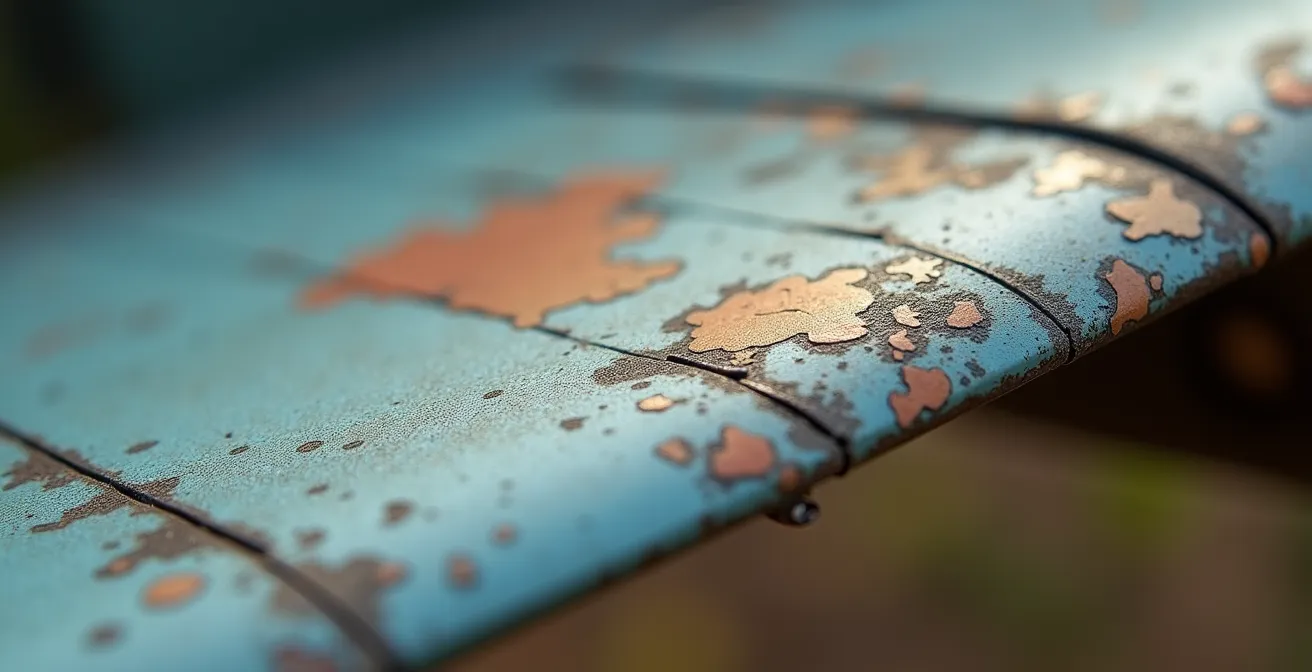
This macro view illustrates the principle perfectly. The wear is not random; it follows the leading edge and is concentrated around panel lines where maintenance would occur. It has direction and intensity. Thinking this way is critical. Ask yourself: Where do the pilots and crew board? Where are the fuel and oil fillers? Where are the ammunition bays? According to experts, a key step is to map out these crew traffic and maintenance zones to justify your weathering choices. This logical approach is the absolute foundation of believable weathering.
By concentrating your efforts on these logical locations, you ensure that every chip, no matter how small, contributes to the model’s story and reinforces its realism, rather than detracting from it.
Two-layer chipping: showing the primer underneath the topcoat before the metal
For the ultimate level of realism, especially on heavily used aircraft like a Pacific-based Zero, single-layer chipping isn’t enough. A deep scratch or worn area on a real aircraft doesn’t always go straight to the bare metal. It often reveals an intermediate layer of primer first. Replicating this two-layer chipping effect—showing the topcoat worn away to reveal primer, and the primer itself worn away to reveal metal—adds incredible visual depth and a convincing sense of history to your model.
This technique is a masterclass in controlled layering. The process involves painting your model in reverse order of wear: first the metallic base, then a protective layer, then the primer color, another protective layer, and finally the top camouflage color. The protective layers are your chipping fluid or hairspray. The magic happens during the activation stage, where you use different tools and varying amounts of pressure to control the depth of your chips. A gentle scrub with a soft brush might only remove the topcoat to reveal the primer, while a more aggressive attack with a stiff brush or a wooden toothpick in the same area can push through the primer to the “metal” beneath.
Case Study: Multi-Layer Chipping on an F4U Corsair
In a project to replicate the heavy wear on a naval F4U Corsair, a modeler set out to achieve this precise two-layer effect. Reference photos were crucial, revealing that the exterior was primed in a distinctive zinc chromate yellow. As detailed in the project log, the modeler first applied a metallic base, then used the hairspray technique before painting the Tamiya XF-4 Yellow Green primer color. After chipping this primer layer, it was sealed, and the process was repeated for the final blue topcoat. A key challenge discovered was that masking tape could pull up the delicate layers. The solution was to brush-paint the chipping fluid only in the specific areas intended for weathering, avoiding any zones that would later be masked.
The key to keeping these layers distinct is the use of an isolation varnish. After you have finished chipping one layer (e.g., the primer), you must seal it with a clear coat before applying the next chipping fluid layer and topcoat. This varnish acts as a firewall, ensuring that when you activate the top chipping layer, you don’t accidentally reactivate and strip away the primer layer underneath. An incompatible varnish (e.g., an acrylic gloss over a lacquer-based primer) works best as it creates a stronger barrier between the paint layers.
By carefully planning your layers and controlling the depth of your chipping, you can create a miniature surface that has a tangible sense of thickness and history, truly capturing the look of paint that has been worn away over time.
How to Install Fine Antennae Rigging Without Snapping Them Instantly?
After hours spent perfecting the subtle art of paint chipping, the final details can be the most daunting. Fine antennae rigging is one such detail—a feature that adds immense realism but is fraught with peril. The classic method of using stretched sprue or fine monofilament often ends in frustration: a slight tremor of the hand, a bit too much tension, and the delicate mast or anchor point snaps. The secret to success, much like with weathering, lies in control and choosing the right material for the job.
The game-changer for modern modelers is elastic rigging thread. Products like EZ-Line or Uschi van der Rosten’s rigging thread are made from a lycra-like material that can stretch to several times its original length and will always return to a perfectly straight, taut line without placing any significant stress on the plastic anchor points. This elasticity is its superpower. It is incredibly forgiving of accidental bumps and makes the installation process far less nerve-wracking. You can attach one end, stretch the thread to the other anchor point, and secure it with a tiny drop of CA (cyanoacrylate) glue and accelerator, all without fear of breaking your model’s delicate mast.
The installation process itself requires a steady hand and a clear plan. First, drill micro-holes (using a #80 or smaller drill bit) at your anchor points before painting and final assembly. This gives you a secure socket for the rigging. When it’s time to rig, anchor the thread in one hole with a small drop of thin CA glue. Once set, stretch the line to the next anchor point, apply a dab of CA accelerator (kicker) to the hole, then touch the stretched line to the hole with a tiny amount of glue on its tip. The accelerator will set the glue almost instantly, locking the line in place. You can then trim the excess with a sharp hobby blade. This method provides a strong, durable, and perfectly tensioned antenna line every time.
By switching to modern elastic materials and following a methodical process, you can transform one of the most feared steps in aircraft modeling into a satisfying finishing touch.
Key Takeaways
- Realistic weathering is a controlled, artistic process of storytelling, not random destruction.
- The timing of chipping fluid activation—the “curing window”—is the most critical factor for success and varies by paint type.
- Weathering must be logical, concentrated in high-wear areas like leading edges and access panels, governed by physics and operational use.
How to Choose an Acrylic Case That Protects Your Models from UV Yellowing?
After pouring dozens, if not hundreds, of hours into weathering your Japanese Zero to perfection, the final act of preservation is as crucial as any paint or glue. A display case does more than just keep dust off; it protects your work from the invisible threats of UV radiation and physical damage. However, not all acrylic cases are created equal. Choosing the right one is the final step in safeguarding your artistic investment.
The single most important feature to look for is UV protection. Standard acrylic offers little to no defense against ultraviolet light, which is present in both sunlight and many forms of indoor lighting. Over time, UV radiation can cause paints to fade, decals to yellow and become brittle, and plastic to become discolored. Look for cases specifically advertised as “UV-blocking” or “museum-grade” acrylic. These products contain additives that can block over 98% of harmful UV rays, drastically extending the life and vibrancy of your model’s finish. While they may cost more, the price is a small insurance policy on your hard work.
Beyond UV protection, consider the construction and clarity of the case. Opt for a case with optically clear, non-glare acrylic to ensure your model can be viewed from any angle without distracting reflections. The thickness of the acrylic also matters; a 3mm to 5mm thickness provides rigidity and a feeling of quality. Finally, consider the base. A solid wood or polished acrylic base not only provides a stable platform but also frames your model, elevating it from a simple replica to a true display piece. Ensure the case is well-sealed to be as airtight as possible, providing the best defense against dust accumulation.
By investing in a high-quality, UV-protective case, you are ensuring that the intricate story you’ve told through weathering will remain vibrant and intact for many years to come, allowing you and others to appreciate the artistry involved.