
The key to a convincing fluid leak isn’t just making it shiny; it’s telling a story about the aircraft’s recent history by layering texture, color, and direction based on real-world physics.
- Fluid appearance depends on its type (color), age (viscosity), and interaction with the environment (dirt).
- Streaks have an “aerodynamic memory” from flight and a different direction from gravity when parked.
- The effect must be artistically scaled down—a true-to-scale leak would be nearly invisible.
Recommendation: Stop thinking about making a “wet spot.” Instead, build a narrative by combining faint horizontal stains with fresh, vertical, three-dimensional drips at key mechanical points.
Out on the line, you learn that an aircraft talks. It doesn’t use words, but it tells you everything you need to know through the textures on its skin. A film of soot, a scuff mark by a panel, and especially, the fluid leaks. Most modelers see a leak and reach for the gloss varnish, creating a shiny streak that looks more like a decal than a fluid. They might dab on some brown paint, because “oil is brown.” This approach misses the entire story.
The truth is, every leak has a biography. It has a source, a reason, and a history written by wind, heat, and gravity. A fresh hydraulic leak from a landing gear actuator looks nothing like a slow, grimy seep from an engine cowling that’s baked on over dozens of flight hours. The former is a sharp, glossy, and often tinted event; the latter is a dull, matte stain that’s a magnet for dust. The real art isn’t in just adding shine to a matte surface; it’s in understanding the physics of that fluid and translating its story into your build.
This guide isn’t just about applying gloss. It’s about learning to read the machine. We’ll look at how to give your leaks authentic volume and viscosity. We’ll decode the language of color to distinguish engine oil from hydraulic fluid. We’ll explore how to represent the dual forces of in-flight airflow and on-the-ground gravity. Finally, we’ll see how these fluids interact with the grime of the real world, turning a simple model into a snapshot of an operational aircraft.
By understanding the “why” behind each stain and streak, you can move from generic weathering to creating a convincing fluid narrative. This article breaks down the observational approach used by professionals to bring that textured reality to a model’s surface.
Summary: A Mechanic’s Guide to Realistic Aircraft Fluid Leaks
- Spot application: how to use gloss varnish to simulate wet oil?
- Red vs Brown: choosing the right color for hydraulic vs engine oil leaks?
- Wind vs Gravity: which way should the oil streak run on a parked plane?
- How to Keep Fluid Streaks Thin Enough for Small Scales?
- Where does dirt collect? Focusing on hinges and actuator rods
- How to Strengthen Plastic Landing Gear Legs for Heavy Resin Conversions?
- Airbrush or Pigments: Which Creates the Most Realistic Exhaust Stains?
- How to Install Resin Engines Without Destroying the Plastic Cowling?
Spot application: how to use gloss varnish to simulate wet oil?
The first mistake is thinking of gloss varnish as a simple top coat. To simulate a fresh, wet fluid, it’s not about shine; it’s about creating viscosity and volume. A fresh leak isn’t a flat, painted-on sheen. It’s a three-dimensional body of liquid with surface tension. The secret is to build this volume in layers. Before you apply any gloss, you must seal the area with an ultra-matte varnish. This creates a non-porous barrier, preventing the gloss from “bleeding” into the surrounding paint and creating an ugly, undefined tide mark.
Once the matte barrier is cured, you can begin building the leak. The goal is to apply multiple, thick layers of gloss varnish, letting each one become tacky before adding the next. This method creates a tangible, raised effect that catches the light like a real glob of oil. Different varnishes serve different purposes in this process. An acrylic gloss is perfect for building this 3D volume quickly, while a slower-drying enamel gloss can be feathered at the edges for more subtle, seeping stains.
To add another layer of realism, tint the final gloss layer. A minuscule drop of clear yellow or smoke-colored ink mixed into the varnish replicates the way light refracts through real oil, giving it a convincing amber depth. It’s a subtle effect, but it’s the difference between a spot that is merely shiny and one that looks like a deep, wet fluid.
Choosing the right varnish is crucial for controlling these effects. The drying time directly impacts how you can manipulate the fluid on the surface, as shown by a recent comparison of weathering products.
| Varnish Type | Drying Time | Best Use | Manipulation Method |
|---|---|---|---|
| Acrylic Gloss | Fast (15-30 min) | Building thick 3D volume | Apply in multiple layers |
| Enamel Gloss | Slow (2-4 hours) | Feathered subtle effects | Blend with thinners while wet |
| Lacquer Gloss | Very Fast (5-10 min) | Final sealing coat | Single application only |
Red vs Brown: choosing the right color for hydraulic vs engine oil leaks?
Not all leaks are the same color, and on the flight line, color is a critical diagnostic tool. Using the right shade on your model tells a more specific and accurate story. The generic “dark brown” or “black” is a good starting point for engine oil, but it’s far from the whole picture. Fresh engine oil is often a light amber or honey color, only darkening to brown and black as it gets old, burned, and contaminated with combustion byproducts.
The most commonly misidentified fluid is hydraulic fluid. On many aircraft, particularly those with complex landing gear and flight control systems, the hydraulic fluid is red. This isn’t just a suggestion; it’s a standard for fluids like Skydrol. When this fluid leaks, it appears as a bright, translucent red or even slightly purple as it spreads thinly over a surface. Placing a reddish, glossy leak near a brake line or landing gear actuator instantly tells a specific story of a hydraulic system under pressure. According to aviation maintenance forums, there are at least 5 distinct fluid colors commonly found on aircraft, each pointing to a different system.
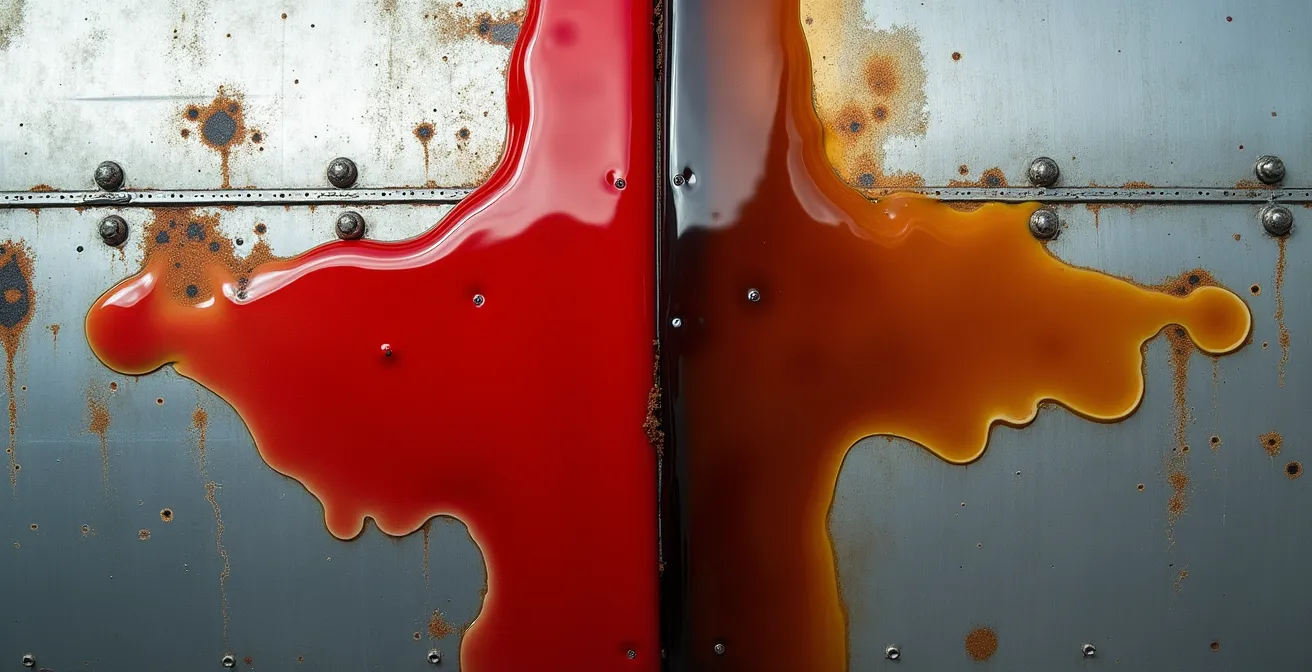
This visual distinction is crucial. An amber-brown engine oil leak under the cowling suggests a completely different operational issue than a cherry-red hydraulic fluid weeping from a wing spoiler actuator. Other fluids include the bright green of coolant in some liquid-cooled engines, the clear or straw color of fresh fuel (which often leaves only a faint stain as it evaporates), and the deep blue of lavatory fluids. Choosing the right color is the first step in writing your model’s fluid narrative.
Wind vs Gravity: which way should the oil streak run on a parked plane?
A parked aircraft sits still, but its surfaces hold the memory of motion. This is the concept of aerodynamic memory, and it’s essential for creating believable fluid streaks. A common error is to apply all streaks vertically, following the pull of gravity. While this is accurate for a fresh leak on a stationary plane, it ignores the powerful horizontal force of airflow during flight. A leak that occurs in the air is blown back across the fuselage or wing at hundreds of miles per hour, creating a faint, soft-edged horizontal stain.
Professional modelers tell a more complete story by layering both effects. They first create the “ghost” of in-flight streaking. This is typically done with highly thinned oil paints or an airbrush, creating a subtle, almost transparent stain that follows the path of the airflow. After this layer is sealed, they add the fresh, on-the-ground leak. This new leak originates from the same source but now follows gravity, running vertically downwards. This dual-direction approach creates a historically accurate effect, showing a machine that has both flown and been parked.
Imagine a leak from a gear door hinge. The in-flight stain will be a faint streak running backward toward the tail. Once the plane is parked with the gear down, a fresh, glossy drip might form at that same hinge, but this time it will run straight down the gear door, possibly even over the older horizontal stain. This layering creates a convincing sense of time and operation. The direction isn’t a simple choice; it’s a reflection of the aircraft’s two states of being: dynamic in the air and static on the ground.
How to Keep Fluid Streaks Thin Enough for Small Scales?
What looks right on a real aircraft often looks clumsy and overdone on a model. This is the principle of scale reduction, and it’s especially true for fluid leaks. If you were to perfectly shrink a one-inch-wide oil stain from a real plane down to 1:72 scale, it would be less than half a millimeter wide—practically invisible. Therefore, our job isn’t to replicate, but to artistically interpret the effect so it looks convincing to the human eye.
The key to fine-scale streaks is control and using the right tools. Forget thick brushes. For 1:72 or 1:48 scale, you need precision. Products like oilbrushers, which have a fine, built-in brush tip, allow you to place a tiny dot of color exactly where you want it. From there, the most effective technique is using capillary action. After placing the dot, take a clean, flat brush barely dampened with odorless thinner and gently pull it downwards from the dot. The thinner will draw the oil paint down with it, creating an incredibly fine, translucent streak that fades naturally at its end.
Another advanced method is reverse streaking. Here, you apply a slightly larger fluid effect and let it set for a few minutes. Then, you use a thinner-dampened brush or cotton swab to wipe most of it away in the direction of the streak. The only pigment left will be the tiny amounts that have settled into panel lines and surface micro-textures, leaving an extremely subtle and in-scale effect. As one modeling expert notes, realism in modeling is about interpretation, stating that scale reduction is crucial when applying stains like fluid leaks and powder burns to avoid an oversized, toy-like appearance.
Where does dirt collect? Focusing on hinges and actuator rods
On a working aircraft, fluid and dirt are inseparable. A fresh oil leak is a magnet for dust, runway grit, and exhaust soot. This interaction follows a specific sequence, a “contamination chronology,” that adds incredible realism when replicated. The most logical places for this grime to build up are on and around moving parts: hinges, actuator rods, and gear oleos. These are the joints of the machine, and they are always lubricated.
The most realistic effect is achieved by building up the grime in layers, from oldest to newest. Start by applying a base layer of old, dried grime. This can be represented by matte-finish pigments or washes in dusty, earthy tones, concentrated in the crevices around hinges and mechanical components. This is the foundation of dust and old, dried lubricant that has been there for weeks. This is the history of the aircraft.
Only after this dried, matte layer is in place do you add the fresh leak. The fresh, glossy fluid should look like it is emerging *from* the hinge or actuator, flowing *over* the older, dried grime. A critical detail is how the fresh fluid interacts with dust. The very edges of the wet leak will trap a new layer of light-colored dust, while the center remains clean, dark, and glossy. This textural contrast between the gritty matte dirt and the sharp wet gloss of the new fluid is what truly sells the effect. It tells a story of a component that has been working for a long time but has just developed a fresh seep.
Action Plan: The Dirt Magnet Technique
- Apply Base Grime: Use matte pigments in brown and dust tones to create a foundation of old, dry dirt around a hinge or mechanical joint.
- Create Grime Paste: Mix a small amount of gloss varnish with dark brown and light dust pigments to create a thick, grimy hydraulic paste.
- Apply Fresh Leak: Using a fine-tipped brush, apply the glossy grime paste as if it is seeping from the joint, flowing over the dry dirt foundation.
- Edge with Dust: While the gloss is still tacky, apply a very light dusting of fresh, light-colored pigment only to the outer edges of the wet leak, leaving the center glossy.
- Add Textural Contrast: Ensure there is a clear visual difference between the matte, gritty texture of the old dirt and the sharp, wet sheen of the new fluid.
–
How to Strengthen Plastic Landing Gear Legs for Heavy Resin Conversions?
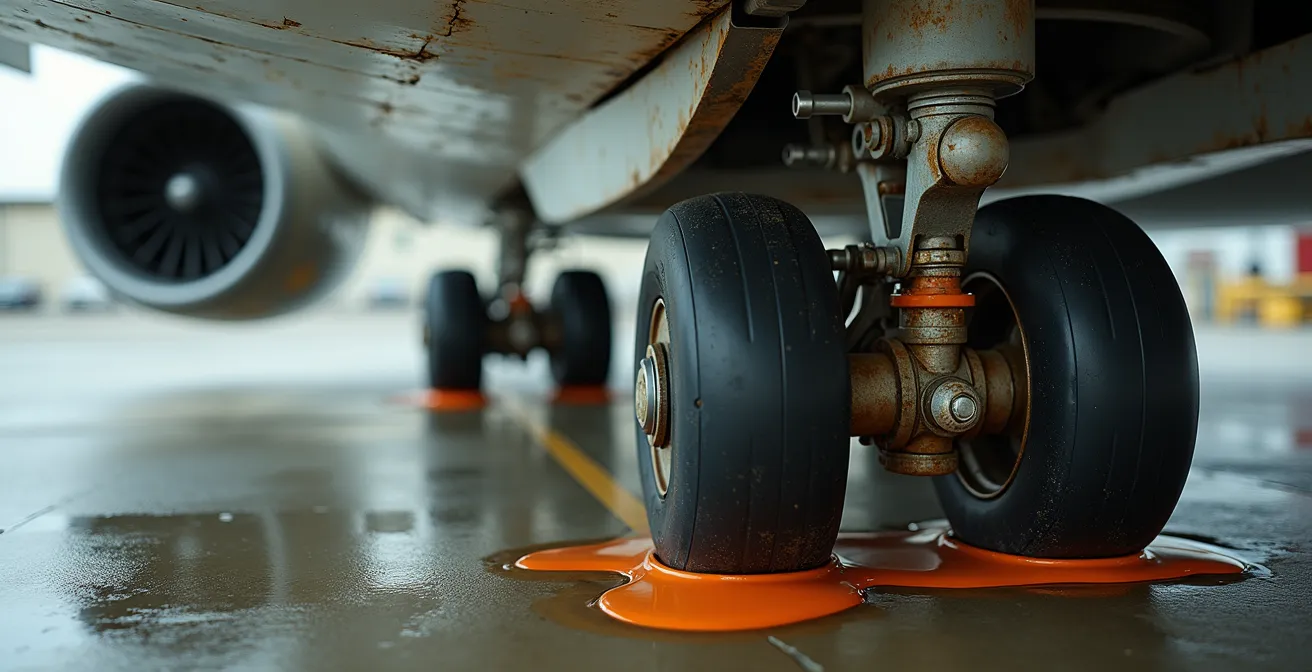
When you add a heavy resin conversion—a new cockpit, engine, or fuselage section—you’re increasing the stress on the airframe. The plastic landing gear is often the first part to feel this strain. While modelers focus on physically reinforcing the gear with metal pins, a true craftsman also tells the story of this added weight through weathering. A heavier aircraft means its systems, especially its hydraulics, are working harder. This is a perfect opportunity to use leaks as a narrative device.
The added weight puts more pressure on the entire landing gear assembly, from the oleo struts to the brake lines. This provides a logical reason for fresh fluid weeps. Aviation professionals on the ground often spot issues this way; as a guide on pre-flight checks mentions, one of the key things to look for is red stains beneath main wheels indicating hydraulic leaks from brake or gear systems. On your model, this translates to adding very fine, fresh, glossy streaks of red hydraulic fluid at the connectors for the brake lines. It suggests the system is straining under the load.
You can also show the effect on the oleo struts (the shiny, piston-like parts of the gear). Add a slightly thicker, greasier-looking fluid effect at the seal where the piston enters the main cylinder. This represents the lubricant being forced out under the higher static load. By placing these consequential leaks on your reinforced gear, you’re doing more than just weathering. You’re providing a visual reason for the model’s configuration. The heavy resin isn’t just sitting there; the model is visibly reacting to it, making the entire build more coherent and believable.
Key Takeaways
- A realistic leak has 3D volume, built with layered gloss varnish over a matte sealant.
- Fluid color tells a story: amber/brown for engine oil, red for hydraulics, each indicating a different system.
- Leaks have a dual direction: faint horizontal streaks from in-flight airflow and sharp vertical drips from on-ground gravity.
- Effects must be scaled down; use capillary action or reverse streaking for fine, believable lines on small-scale models.
Airbrush or Pigments: Which Creates the Most Realistic Exhaust Stains?
It’s important to understand the texture of what you’re creating. A fluid leak is a wet, liquid effect. An exhaust stain, on the other hand, is fundamentally a dry, particulate deposit. This distinction is critical and dictates your choice of tools. For the soft, sooty, and matte appearance of exhaust from a piston or jet engine, pigments and a light touch with an airbrush are the superior tools. They create a fine, powdery layer that looks like accumulated soot.
An airbrush, loaded with a highly thinned mix of tan, grey, and black, can build up a soft-edged, translucent stain that looks like hot exhaust gas has been scorching the paint. Pigments, applied with a soft brush and then manipulated, give a more textured, dusty matte finish. Neither of these, on their own, looks like a wet fluid. A fluid leak is sharp-edged and glossy; an exhaust stain is soft-edged and matte. The application methods are opposites: leaks are about building up a viscous liquid, while exhaust is about depositing a fine powder.
However, the two worlds can collide. Piston engines, especially older radial engines, are notorious for throwing oil along with their exhaust. This creates a complex, oily exhaust stain. The most realistic way to model this is with a hybrid technique. First, create the dry, sooty base stain with an airbrush using a color like Tamiya Deck Tan. Once that is sealed, you come back with oil paints or gloss-tinted washes to add dark, oily streaks running through the center of the dry soot stain. This layered approach, combining the matte texture of soot with the wet sheen of oil, is the pinnacle of realism for an engine that’s working hard and leaking a bit of everything.
How to Install Resin Engines Without Destroying the Plastic Cowling?
A detailed resin engine is a beautiful centerpiece, but it’s often treated as a static object locked away inside a cowling. To bring it to life, you have to think like a mechanic looking for problems. A real engine is a complex system of moving parts, gaskets, and fluids. After a flight, the first thing a mechanic does is look for the tell-tale signs of leaks. As one maintenance professional puts it, the process is straightforward.
For tracking down leaks after engine installation, the first effort should be to clean the engine compartment, then fly the plane around the pattern to see where leaks are coming from.
– Aviation Maintenance Professional, AVweb – Dealing with a Dirty Belly
This process of “clean, fly, inspect” tells us that leaks are dynamic and often specific. For example, on many Continental engines, the most common source of oil leaks is the pushrod tube seals. Applying a small, wet-looking seep at these exact locations on your resin engine adds a level of authenticity that goes far beyond just painting the engine black and silver. This is about showing the engine not just as it was built, but as it is *used*.
Don’t hide these details. Let the fluids escape the engine compartment. Model a small, dark streak of oil seeping from between the cowl flaps or running down from the bottom of the cowling. Add some greasy, semi-gloss fingerprints around the cowling fasteners, suggesting a mechanic has recently been working in that area. By creating a small “leak map” based on where that specific type of engine was known to have issues, you integrate the engine into the story of the entire aircraft. The leak becomes the evidence of the powerful machine working just beneath the skin.
The next logical step is to move from theory to practice. Begin observing real-world aircraft, noting not just the presence of leaks, but their color, texture, and location. This real-world library of observations is the single most valuable tool for creating truly convincing weathering on your models.