Achieving true historical accuracy from black-and-white photos requires treating the image not as a picture, but as a piece of forensic evidence.
- Orthochromatic film used in early WWII drastically alters how colors are rendered, turning yellows dark and reds nearly black.
- Factory application methods and evolving national insignia provide “chronological signatures” that are just as important as the colors themselves.
Recommendation: Shift your approach from artistic interpretation to methodical, evidence-based deduction to build replicas of verifiable fidelity.
For the serious aviation historian obsessed with replicating a specific pilot’s aircraft from WWII, a single black-and-white photograph is both a treasure and a torment. It’s a direct link to the past, a frozen moment capturing the machine in its operational environment. Yet, it withholds the most vital information for a modeler: its color. The common approach involves referencing general guidebooks or trusting the color call-outs in a kit’s instructions, but this often leads to perpetuating long-standing myths. We look at shades of gray and make educated guesses, but this is often a flawed process. The pursuit of high-fidelity replication demands a more rigorous methodology.
What if the key wasn’t to guess the colors, but to decode them? The truth is that the photograph itself contains a wealth of data, if you know how to read it. The type of film used, the presence of photographic filters, and the very way the paint was applied in the factory all leave behind subtle clues. This transforms the modeler from a painter into a visual detective, engaging in a form of photographic forensics to uncover the truth hidden within the grayscale image. It’s a process that goes far beyond color, touching upon the chronological integrity of markings and the specific manufacturing signature of an airframe.
This guide abandons approximation in favor of a methodical framework. We will explore the scientific reasons behind color distortion in period photography, learn to translate archaic paint codes, identify factory application techniques, and ensure every detail aligns with a specific moment in time. By embracing this forensic approach, you can build a replica that is not just a beautiful model, but a tangible piece of historical research.
This article provides a structured methodology for the historical modeler, breaking down the complex process of color research into distinct, manageable stages. The following sections will guide you through the forensic techniques required for a truly authentic build.
Summary: A Forensic Guide to Recreating Historical Liveries
- Why orthochromatic film makes yellow look black in WWII photos?
- RLM, FS, or BS: how to translate military color codes into modern hobby paint?
- Masking putty or freehand: which technique matches the original factory application?
- The decal error that places a 1945 insignia on a 1942 airframe
- How to cut your own masks for invasion stripes without bleed-under?
- What Defines a High-Fidelity Replica for Serious Aviation Collectors?
- Why Clean Models Look like Toys: Adding Authentic Weathering to Scale Aircraft?
- Military vs Civil Aircraft Models: Which Collection Retains Value Better?
Why orthochromatic film makes yellow look black in WWII photos?
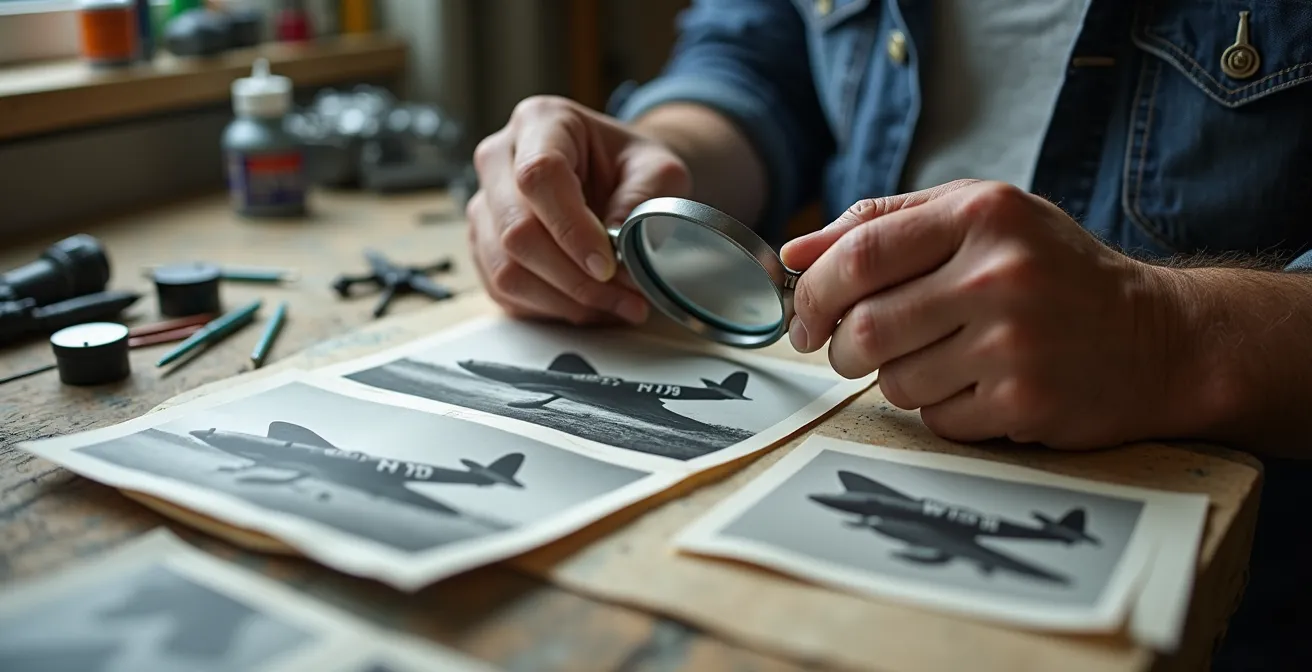
The single greatest source of error in interpreting WWII aircraft colors stems from a fundamental misunderstanding of period photographic technology. Most early-to-mid-war black-and-white photos were not shot on panchromatic film, which sees a spectrum of light similar to the human eye, but on orthochromatic film. This film type had a critical limitation: a drastically reduced sensitivity to certain colors. It was largely blind to red and orange light, rendering them as near-black, and was overly sensitive to blue and violet light, which appeared very light grey or white.
This spectral sensitivity is why the quintessential yellow noses of Luftwaffe Bf 109s on the Eastern Front often appear as a solid, dark black in photographs. The film simply could not “see” the yellow wavelength correctly. According to technical analyses, orthochromatic film could only capture wavelengths up to around 550 nanometers, completely missing the red part of the spectrum. This is not a matter of artistic effect; it is a physical limitation of the medium. Understanding this scientific basis is the first step in treating the photograph as a data source rather than a literal depiction.
Instead of guessing based on tonal value alone, the historian-modeler must perform a tonal analysis. This involves comparing the unknown color area to a known reference within the same photo, such as a national insignia. If the red in a roundel appears as the same dark gray as an unknown camouflage color, it provides a crucial data point for deduction. This process turns color research from a guessing game into a logical investigation.
Action Plan for Tonal Density Interpretation
- Identify known color references in the photo: Locate national insignia, warning stencils, or unit markings with documented colors.
- Measure tonal densities: Use the “Levels” or “Eyedropper” tool in digital imaging software like Photoshop or GIMP to assign a numerical gray value to different areas.
- Compare values: Confront the gray values of your known colors (e.g., the red in a roundel) against the gray values of the unknown camouflage areas.
- Create a reference chart: Correlate the observed gray values to a chart of probable colors based on the known behavior of orthochromatic film.
- Account for filters: Check for telltale contrast patterns, like unnaturally dark skies, which indicate the photographer used a colored filter (e.g., a yellow filter) that would further alter tonal values.
This forensic approach removes much of the ambiguity and grounds your color choices in verifiable evidence, a cornerstone of high-fidelity modeling.
RLM, FS, or BS: how to translate military color codes into modern hobby paint?
Once you have a strong hypothesis about a color’s identity, the next challenge is translating that knowledge into a physical paint for your model. During WWII, major powers used standardized color systems, but these were far from simple. Germany’s Reichsluftfahrtministerium (RLM), Great Britain’s British Standard (BS), and the later US Federal Standard (FS) were the official languages of color, but translating them is an exercise in historical research.
These systems were not static. Colors were revised, and documentation, especially for early-war or Soviet VVS colors, can be sparse. Furthermore, the original paint chemistry was different, and factors like wartime production shortages led to significant batch variations. An “RLM 76 Lichtblau” mixed in 1942 might have a visibly different hue from one produced in 1944. This is where the detective work intensifies. Cross-referencing multiple sources, including specialized websites, forums run by respected researchers, and modern color chip analysis, is mandatory.
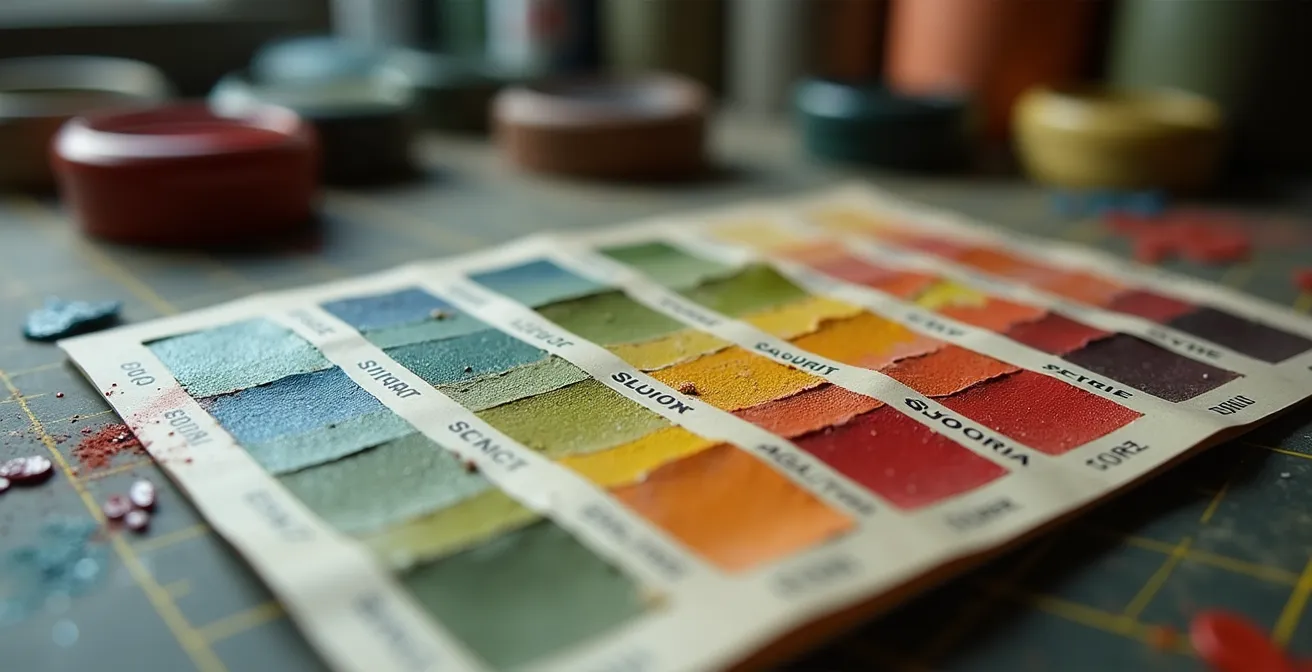
The goal is not to find a single “perfect” modern match, but to understand the likely range of a historical color. Many hobby paint manufacturers (like Tamiya, Vallejo, or AK Interactive) offer lines based on these historical standards, but even their interpretations can vary. The truly dedicated modeler will often acquire paints from several brands and compare them against documented color chips to select the one that best represents the specific aircraft and time period being modeled. This process of translation is a core skill in advanced scale modeling.
The following table provides a high-level overview of the primary color systems a WWII historian-modeler will encounter and the challenges associated with each.
| Standard System | Country | Era | Paint Match Challenge |
|---|---|---|---|
| RLM (Reichsluftfahrtministerium) | Germany | 1935-1945 | Batch variations common |
| FS (Federal Standard) | USA | 1956-present | Multiple revisions exist |
| BS (British Standard) | UK | 1930s-present | Pre-war colors poorly documented |
| VVS | Soviet Union | 1940s | Limited western documentation |
Ultimately, choosing a paint is not just a technical step; it’s an informed historical statement based on a careful evaluation of evidence.
Masking putty or freehand: which technique matches the original factory application?
A high-fidelity replica captures not just the *what* (color) but also the *how* (application). The distinction between a soft, feathered edge on a camouflage pattern and a hard, sharp line is a crucial piece of the aircraft’s manufacturing signature. Factories and even individual production lines often had distinct methods for applying camouflage, and replicating this is key to authenticity. The choice between using masking putty for a soft edge or tape for a hard one is not an artistic decision, but a historical one.
Luftwaffe aircraft are a prime example. Field-applied mottling was often done freehand with a spray gun, resulting in soft-edged, sometimes inconsistent patterns. However, factory-applied camouflage could be much tighter. Analyzing archival photos for clues like overspray near panel lines, the consistency of a pattern’s edge, and whether the pattern repeats across multiple aircraft can reveal the original technique. A repeating pattern suggests the use of stencils or masks, while organic variations point to a freehand application.
Your technique as a modeler should mirror the original. If evidence points to a freehand application, then you should attempt to replicate that with careful airbrush control. If the patterns have sharp edges, then meticulous masking with tape is required. This level of detail separates a good model from a true historical replica.
Case Study: Messerschmitt vs. Focke-Wulf Factory Painting
Historical analysis of surviving aircraft and archival evidence reveals that different German manufacturers had unique painting styles. For instance, the Messerschmitt factory in Regensburg was known for a distinctive ‘Wellenmuster’ wave pattern applied with a soft-edged, freehand spray technique. In contrast, many Focke-Wulf factories employed a much tighter, more defined mottling pattern, often created using partial masks or stencils to achieve a harder edge and more consistent shapes. Replicating a Bf 109 from Regensburg therefore requires a different airbrushing approach than replicating a Fw 190 from a different plant.
By studying the “handwriting” of the original factory painters, you are adding another layer of verifiable accuracy to your work, moving it closer to a museum-quality piece.
The decal error that places a 1945 insignia on a 1942 airframe
Perhaps the most common and easily avoidable error in scale modeling is anachronism. A model’s accuracy is instantly compromised if it wears markings that did not exist at the time it is meant to represent. This concept of chronological integrity is paramount. National insignia, in particular, evolved significantly throughout the war, with changes often mandated by official orders on specific dates. Placing a 1945-style US national insignia on an aircraft depicted as it was at the Battle of Midway in 1942 is a fundamental historical mistake.
The evolution of the US “Star and Bar” is a perfect case study. The design changed multiple times between 1942 and 1947, with variations in outlines and the addition of bars. These changes are well-documented and precisely dated. As historian Brian Coe noted in his work on color photography, these dated mandates are a critical tool for the researcher. As he states in Colour Photography: The First Hundred Years 1840-1940:
The 1942-1943 changes to the US Star and Bar were mandated by specific Technical Orders that can be precisely dated, making anachronistic markings one of the most common but avoidable errors in scale modeling.
– Brian Coe, Colour Photography: The First Hundred Years 1840-1940
This means that the decal sheet in a model kit, even from a reputable brand, should never be trusted blindly. The researcher must verify that the provided markings are correct for the aircraft’s serial number and the specific month and year being modeled. A P-51D Mustang from D-Day in June 1944 would have a different insignia outline than one from the spring of 1945. These are not minor details; they are defining historical markers.
The following table outlines the key changes to the standard US national insignia during the WWII period, highlighting how a few months could completely change an aircraft’s appearance.
| Date | Insignia Type | Key Changes | Theater Variations |
|---|---|---|---|
| May 1942 | Star only | White star, blue circle | Red dot removed June 1942 |
| June 1943 | Star and Bar | White bars added | Red outline briefly used |
| Sept 1943 | Blue bordered | Blue outline replaces red | Standardized globally |
| Jan 1947 | Red stripe | Red bar added to star | Post-war standard |
This commitment to chronological accuracy is a hallmark of a serious historical modeler, proving the build is a product of research, not just assembly.
How to cut your own masks for invasion stripes without bleed-under?
On the night of June 5-6, 1944, Allied ground crews hastily painted black and white “invasion stripes” on thousands of aircraft to prevent friendly-fire incidents during the D-Day landings. Replicating these is a rite of passage for modelers focusing on the European theater. While seemingly simple, achieving an authentic look is challenging. The key lies in balancing historical accuracy with modeling technique. The official Allied directives specified invasion stripes at a standard width of 18 inches, which translates to a specific dimension depending on your model’s scale.
The greatest technical hurdle is preventing paint from bleeding under the mask, which ruins the crisp lines. The secret is to “seal” the edge of the mask. After applying your masking tape (a high-quality tape like Tamiya’s is essential), spray a very light coat of the underlying base color (e.g., Olive Drab or Neutral Gray) along the tape’s edge. Any paint that bleeds under will be the base color, becoming invisible. Once this sealing coat is dry, you can spray the stripe color (white or black) with confidence, knowing the edge is protected. After removing the tape, you are left with a perfectly sharp line.
However, technical perfection must be tempered with historical reality. Archival analysis shows that the actual stripes applied on the eve of D-Day were often far from perfect. They were hand-brushed by exhausted crews in poor lighting, resulting in rough, uneven edges and visible brush strokes. An airbrushed, perfectly masked stripe is technically correct for later, more carefully applied versions, but historically inaccurate for an aircraft depicted on June 6th. The highest form of modeling is to use advanced techniques to replicate imperfection, perhaps by deliberately creating a slightly wavy edge or simulating brush marks with fine-grit sandpaper after painting.
This decision—to replicate the pristine directive or the messy reality—is a profound one, reflecting the modeler’s ultimate goal: to capture a specific moment in history.
What Defines a High-Fidelity Replica for Serious Aviation Collectors?
For a serious collector, a high-fidelity replica is more than just a well-assembled model with a neat paint job. It is a three-dimensional thesis statement. Its value and credibility are derived not just from the plastic and paint, but from the verifiable research that underpins every decision made during its construction. A model of a generic P-47 Thunderbolt is one thing; a model of Lieutenant Colonel Francis Gabreski’s P-47D, as it appeared on a specific date in March 1944, is a piece of history.
This is why a high-fidelity build is always accompanied by a documentation portfolio. This portfolio acts as the “provenance” of the model, detailing the entire research process. It should contain copies of the primary source photographs used, notes on color interpretation (citing the tonal analysis performed), a list of aftermarket parts used to correct kit inaccuracies, and a documented history of the specific aircraft’s serial number and service record. It notes where ambiguities existed and what educated assumptions were made, demonstrating transparency and intellectual honesty.
This level of documentation accomplishes two things. First, it elevates the model from a craft object to a research project, demonstrating a level of expertise that commands respect. Second, it makes the model’s accuracy falsifiable—that is, another expert could review the evidence and debate the conclusions. This is the standard in academic historical work, and it should be the standard for high-fidelity modeling. The components of this portfolio are the true measure of fidelity:
- A compilation of all primary source photographs used in the research.
- Documentation of the specific aircraft’s serial number, unit, and service history.
- A list of all color interpretation decisions with supporting evidence (e.g., film type analysis).
- Details of the production block and any modifications relevant to the timeline.
- An honest accounting of all ambiguities and the educated assumptions made to resolve them.
A model built this way is not just an object to be looked at; it’s an argument to be considered, inviting viewers to engage with the history it represents.
Why Clean Models Look like Toys: Adding Authentic Weathering to Scale Aircraft?
An aircraft rolling off the factory floor is pristine. An aircraft that has flown 50 combat missions is not. One of the most significant steps in elevating a model from a toy-like representation to a realistic replica is the application of authentic weathering. A clean, uniform paint job, no matter how accurate the colors, fails to tell the story of the aircraft’s operational life. Weathering—the simulation of wear, tear, and environmental effects—is what breathes life and history into the plastic.
Authentic weathering, like color research, is an evidence-based process. It is not random. The patterns of wear are dictated by the environment in which the aircraft operated. Wartime photographs reveal these distinct patterns: aircraft in the Pacific theater show severe sun-fading on upper surfaces and salt corrosion along panel lines, while those in North Africa exhibit paint abrasion from sand and dust. Aircraft on the brutal Eastern Front would be caked with mud and show extreme stress on the paint from temperature fluctuations. Replicating these specific effects is crucial.
The techniques for simulating this aging are varied and layered. Fading can be achieved by adding white or a buff color to the base paint and applying it in a non-uniform pattern. Paint chipping, most prominent in high-wear areas like wing roots (where pilots and crew walked) and around access panels, can be simulated using a fine brush or the “hairspray technique.” Finally, operational stains from engine exhaust, gun smoke, and hydraulic fluid leaks must be layered on top, following the airflow over the airframe. Each layer of weathering tells a part of the aircraft’s story, transforming it from a static object into a dynamic one.
- Cellulose dope: Simulate the subtle yellowing of early paint types with thin, transparent washes of ochre or light brown.
- Synthetic enamel: Create the characteristic chalky fade of later paints with dry brushing techniques using lighter shades of the base color.
- Metal panels: Add realistic paint chips at high-wear areas, paying close attention to wing roots, cockpit entry points, and frequently opened access panels.
- Fabric surfaces: Show the tension wrinkles on control surfaces and the effects of UV degradation with subtle color variations.
- Operational stains: Carefully layer exhaust, gun smoke, and fluid stains, ensuring they follow the direction of airflow as seen in reference photos.
By treating weathering as the final chapter in the aircraft’s biography, the modeler completes the illusion of a real, working machine captured in miniature.
Key Takeaways
- Interpreting B&W photos requires a forensic approach, understanding the limitations of orthochromatic film to decode colors rather than guess them.
- True fidelity goes beyond color to include chronological integrity, ensuring all markings and modifications are accurate for a specific date and serial number.
- Authenticity is found in the details of application, from replicating factory spray patterns to simulating the real-world imperfections of field-applied markings and operational weathering.
Military vs Civil Aircraft Models: Which Collection Retains Value Better?
For those who invest significant time and research into their craft, the long-term value of their collection can be a consideration. While the passion for the subject is the primary driver, the market for high-quality, built-up models shows clear trends. Historically, the military aircraft segment has dominated the hobby. The sheer drama, variety, and documented history of warplanes create compelling narratives that are highly attractive to both modelers and collectors. In fact, market analyses show that the military segment of plastic model kits was valued at an estimated $1,240 million in 2024, far outpacing the civilian market.
This market preference translates directly to the value of completed models. A well-executed model of a common airliner, while technically impressive, often lacks the unique story that commands higher value. In contrast, a military model tied to a specific, verifiable history—a famous ace’s aircraft, a decorated warbird, or a rare prototype—becomes a one-of-a-kind artifact. The value is not in the plastic, but in the story and the research that authenticates it. A perfectly researched and executed model of a lesser-known pilot’s aircraft, backed by a portfolio of documentation, can be more valuable than a generic model of a more famous plane because it represents new, tangible research.
Civil aircraft, however, can retain significant value in specific niches. Models of iconic, historically significant airliners like the Concorde or the Boeing 747, especially in early or defunct liveries, appeal to a strong sense of nostalgia and design history. Propliners from the “Golden Age” of air travel also have a dedicated following. The key, as with military models, is the story. A model of the specific DC-3 that flew “The Hump” during WWII has more historical weight and, therefore, potential value than a generic one.
Ultimately, value in this field is a direct proxy for research and narrative. A collection built on meticulously documented, story-rich models, regardless of subject, will always be more significant than one built on generic representation.