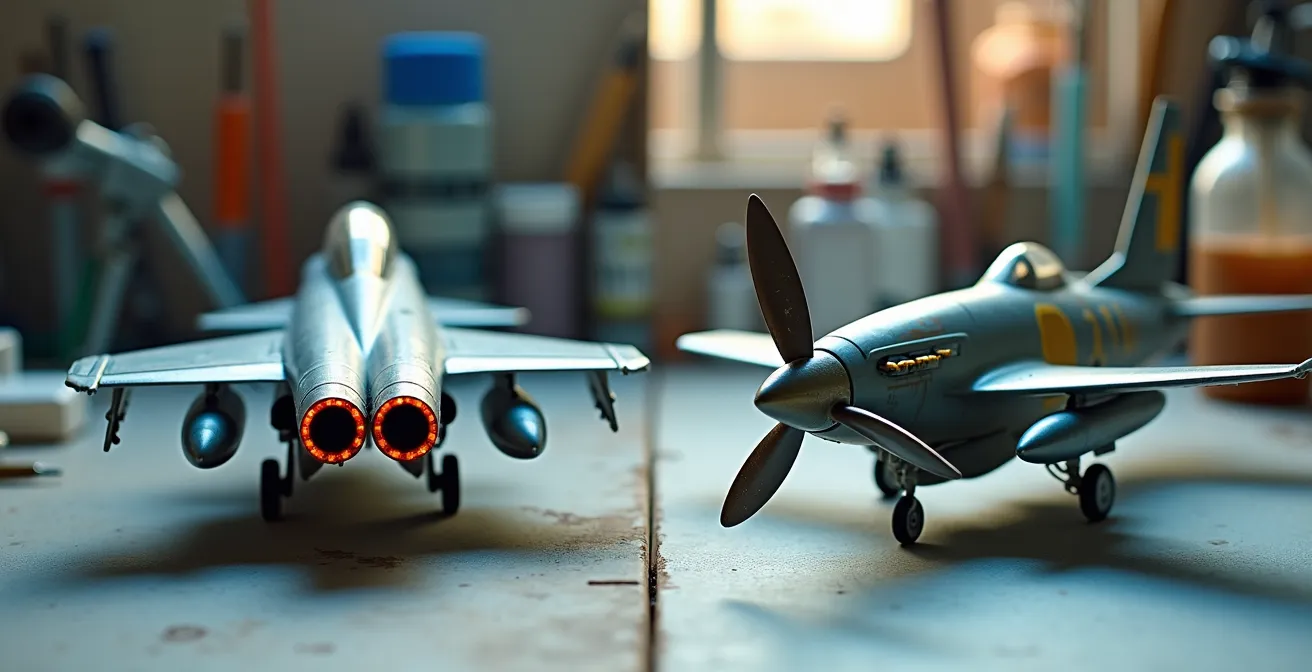
The secret to your first successful weathering project isn’t mastering complex techniques, but choosing an aircraft that’s designed to hide mistakes.
- Propeller-era aircraft with multi-color camouflage offer high “weathering forgiveness,” effectively masking minor construction and painting flaws.
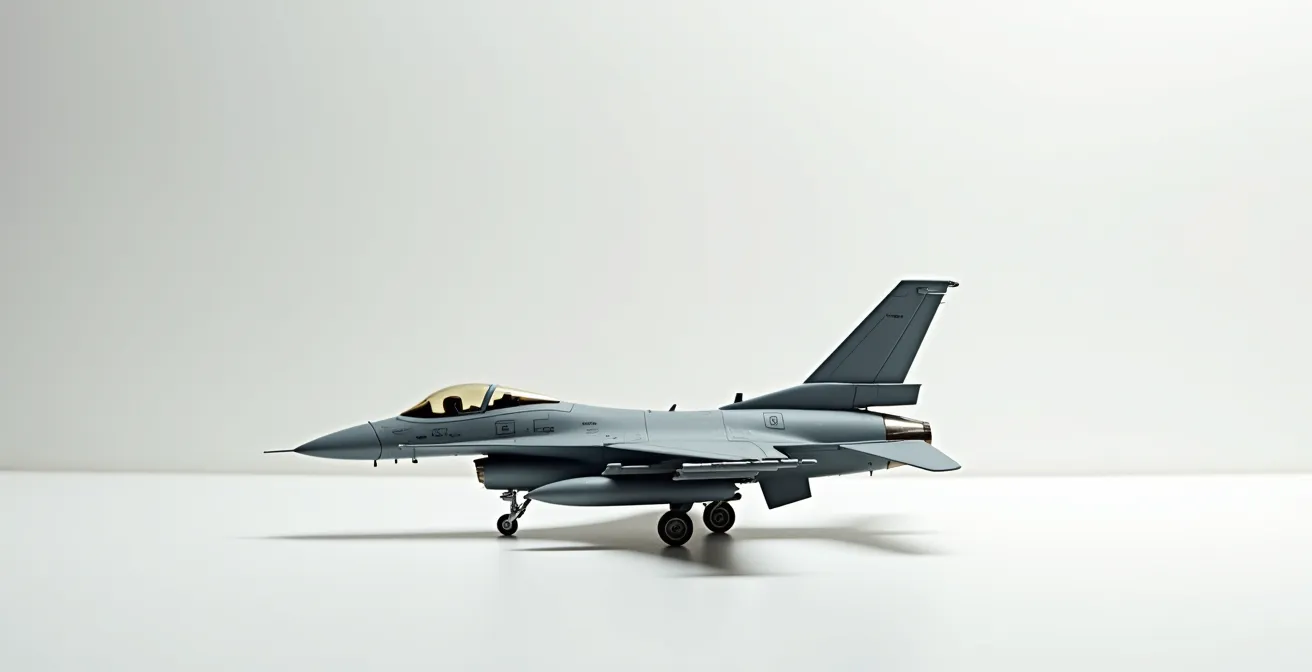
- Modern jets, with their clean lines and single-tone grey schemes, are surprisingly difficult as they highlight every imperfection.
Recommendation: Start with a WWII aircraft like a Spitfire or Bf 109. Their complex patterns and history of heavy use provide the perfect canvas for learning to weather without frustration.
The frustration is real. You’ve spent weeks assembling and painting your scale model, only for it to look like a pristine, factory-fresh toy. You know the secret is weathering, so you turn to the common advice: buy some oil paints, grab some powdered pigments, and start making it look “dirty.” While these tools are essential, they often lead beginners down a path of frustration. A clumsy wash can ruin a perfect paint job, and a misplaced streak can look more like a mistake than realistic wear and tear. This approach misses the most crucial first step in any weathering journey.
The conventional wisdom focuses on the “how”—the techniques and products. But what if the true key to success, especially for a beginner, lies in the “what”? What if the subject you choose to build is more important than the brand of oil paint you use? The truth is, not all aircraft are created equal when it comes to their potential as a learning canvas. Some subjects are incredibly forgiving of mistakes, while others are brutally punishing, highlighting every tiny flaw.
This guide takes a different approach. We will explore the concept of “Weathering Forgiveness”—the inherent ability of an aircraft’s design and paint scheme to absorb and even flatter a beginner’s attempts at creating a realistic finish. We will move beyond a simple list of techniques and instead build a strategic framework for choosing your subject. It’s time to stop fighting your model and start picking one that works with you.
By comparing the challenges and opportunities of propeller-driven aircraft from the WWII era against modern jet fighters, you will gain a new perspective. You will understand why a complex camouflage pattern is your best friend and why a sleek, “simple” grey jet can be your worst enemy. This article will equip you with the knowledge to select a model that not only looks fantastic when weathered but also makes the process enjoyable and encouraging.
This article will guide you through the key considerations, from the types of finishes that hide errors to the specific weathering challenges unique to each era. Follow along to discover how to make your next project a resounding success.
Contents: A Strategic Guide to Weathering Forgiveness
- Why complex mottling hides construction errors better than natural metal finishes?
- Heat staining: the specific challenge of painting burnt metal on jet engines
- Leading edge erosion: learning to chip paint on prop blades
- Why modern low-vis grey jets are actually harder to paint well than WWII planes?
- Spitfire vs F-16:Understanding Polystyrene Grades: Why Some Kits React Poorly to Lacquer Thinners?
- Avoiding the “Impossible Loadout” Error on Modern Jet Fighters
- Why Clean Models Look like Toys: Adding Authentic Weathering to Scale Aircraft?
- Airbrush or Pigments: Which Creates the Most Realistic Exhaust Stains?
Why Complex Mottling Hides Construction Errors Better Than Natural Metal Finishes?
For a beginner, the choice of paint scheme is the single most important factor for a successful weathering project. This is where the concept of “Error Absorption” comes into play. A complex, multi-color camouflage, like the mottling on a German WWII fighter or the disruptive patterns on a British Spitfire, has a high degree of visual density. This busy pattern naturally draws the eye away from the small imperfections that are inevitable in a first build. A slightly misaligned seam, a trace of putty, or a minor sanding scratch simply gets lost in the noise of the camouflage. The pattern works for you, actively hiding the very mistakes you’re trying to overcome.
Contrast this with a Natural Metal Finish (NMF), common on post-war and early jet aircraft. An NMF is the ultimate test of a modeler’s construction skills. Its highly reflective surface acts like a mirror, mercilessly highlighting every single flaw. Every speck of dust trapped in the paint, every sanding mark, and every fingerprint becomes glaringly obvious. For a beginner, attempting an NMF is like trying to run a marathon without any training—it’s an invitation for discouragement. The surface has zero forgiveness and demands a level of surface preparation that even experienced modelers find challenging.
Therefore, the strategic choice for a beginner is clear: select a subject with a busy, multi-tonal camouflage. You are not “cheating”; you are making an intelligent choice of canvas that allows you to focus on learning the art of weathering without being punished for fundamental construction errors. This choice builds confidence and makes the process far more enjoyable.
The difference in how various paint schemes conceal common modeling flaws is significant. A comparative analysis highlights why camouflage is a beginner’s best ally.
| Flaw Type | Natural Metal Finish | Mottled Camouflage | Winter Wash | Low-Vis Grey |
|---|---|---|---|---|
| Putty marks | Highly visible | Well concealed | Moderately concealed | Visible |
| Seam lines | Very visible | Mostly hidden | Well hidden | Moderately visible |
| Sanding scratches | Extremely visible | Invisible | Well concealed | Slightly visible |
| Glue residue | Reflects light | Absorbed in pattern | Hidden by texture | Shows as stain |
Heat Staining: The Specific Challenge of Painting Burnt Metal on Jet Engines
While propeller aircraft present their own weathering challenges, the jet age introduces entirely new and complex phenomena. One of the most prominent is the intense heat staining found on engine exhausts. This isn’t just a simple soot stain; it’s a complex metallurgical process that a modeler must replicate. Unlike the relatively straightforward exhaust streaks on a piston engine, replicating burnt metal on a jet exhaust requires a delicate and multi-layered approach. It’s a specific skill that can be tricky for beginners to master.
The colors are not random. The progression of tints is dictated by the type of metal used and the temperatures it reaches. For example, heat staining on jet engines often creates a distinct progression of colors. Titanium components will produce a sequence of straw, brown, purple, and blue hues as the heat increases, while stainless steel panels show amber, brown, and black patterns. This means you can’t just apply a “burnt metal” color; you have to understand the sequence to create a believable effect. This requires thin, transparent layers of paint, typically applied with an airbrush, to build up the effect gradually.
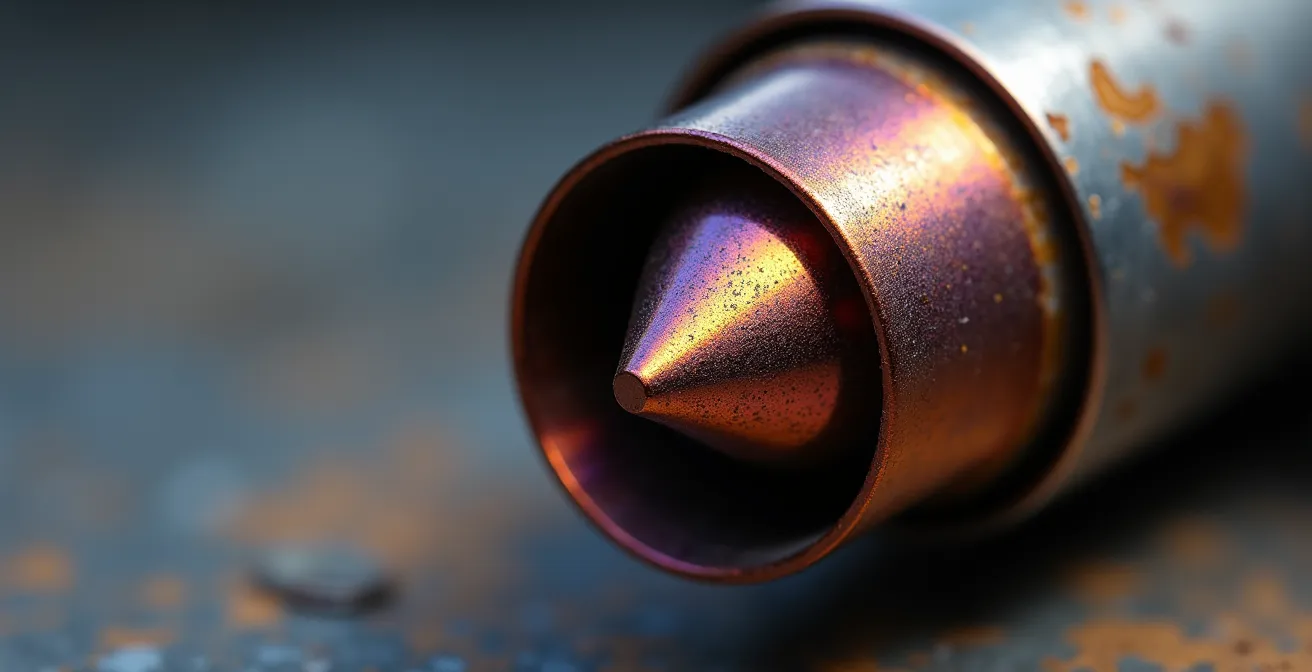
As seen in the intricate discoloration of a jet nozzle, this effect is subtle and requires a high degree of control. A heavy-handed application will look cartoonish and ruin the illusion of scale. For a beginner, this presents a significant hurdle. It demands a level of airbrush control that may not yet be developed and a knowledge of color theory to blend the transparent tints convincingly. While a beautifully executed heat stain is a hallmark of an expert modeler, it represents a high barrier to entry compared to the more forgiving weathering found on many WWII subjects.
Leading Edge Erosion: Learning to Chipping Paint on Prop Blades
If jet engines introduce complex heat staining, propeller aircraft offer a more accessible and intuitive weathering opportunity: chipping. The constant barrage of air, dust, insects, and runway debris took a heavy toll on the paint of WWII aircraft, particularly on the leading edges of wings, cowlings, and, most visibly, the propeller blades. This wear and tear provides a perfect entry point for a beginner to learn one of the most fundamental weathering techniques. Chipping tells a story of an aircraft’s operational life in a way that is both visually interesting and relatively easy to control.
Unlike the subtle gradients of heat staining, chipping is a more direct and tactile process. Techniques range from the simple use of a fine-tipped brush to apply silver or aluminum paint, to the “hairspray technique” where a water-soluble layer allows the top coat of paint to be physically scrubbed and chipped away. This process is forgiving because real-world chipping is often random and chaotic. A slightly oversized chip or an irregular pattern doesn’t look out of place; it often adds to the authenticity. It’s an area where a beginner can experiment with less risk of a catastrophic failure.
The logic of where chips appear is also intuitive. As a leading expert points out, the physics of airflow dictates the pattern of wear. According to Lyle Vasser in his guide for Model Airplane News:
On the leading edges of the cowl and wings, the paint will chip more with the airflow due to rocks, grit, bugs and so on that knock the paint loose
– Lyle Vasser, Model Airplane News – Scale Modeling Guide
This provides a clear and logical roadmap for the beginner. You aren’t guessing where to add wear; you’re following a logical pattern based on real-world physics. This makes the process less intimidating and helps build a foundational understanding of how to apply “narrative weathering”—creating effects that tell a believable story.
Why Modern Low-Vis Grey Jets Are Actually Harder to Paint Well Than WWII Planes?
At first glance, a modern jet fighter in a single-tone, low-visibility (“low-vis”) grey scheme seems like the easiest subject imaginable. One color, no complex camouflage—what could be simpler? This is one of the biggest traps for a beginner. In reality, these “monochromatic” schemes are incredibly challenging to paint and weather effectively. Their simplicity is deceptive; they lack the “Error Absorption” of a WWII camouflage and instead act as a massive, unforgiving canvas that highlights every single flaw.
The primary challenge is creating visual interest. On a mottled Spitfire, the pattern itself provides contrast and detail. On a grey F-16, there is nowhere for the eye to rest. Any weathering must be executed with extreme subtlety. The goal is not to make the aircraft look dirty, but to use faint streaks, panel line washes, and scuff marks to break up the monotony and accentuate the model’s surface detail. A heavy-handed panel line wash that would be acceptable on a dark green bomber will look stark and toy-like on a light grey jet. It requires a “less is more” approach that is often counter-intuitive for someone just starting to weather.
Furthermore, these modern jets are often meticulously maintained. Heavy, dramatic weathering is simply not realistic for most in-service aircraft. The challenge lies in restraint. You are replicating the subtle effects of rain marks, hydraulic fluid stains, and the scuffs of maintenance crew boots. Each effect must be applied with a light touch. This level of subtlety is a far more advanced skill than depicting the heavy mud and oil stains of a war-weary propeller plane. For a beginner, the risk of overdoing the weathering and ending up with a model that looks like a caricature is extremely high. The low-vis grey jet is a poor canvas choice for learning the ropes.
Spitfire vs F-16:Understanding Polystyrene Grades: Why Some Kits React Poorly to Lacquer Thinners?
When choosing between a classic like the Spitfire and a modern F-16, the decision goes beyond just the era. The very plastic the kit is made from can have a huge impact on your weathering experience, especially concerning the types of paints and thinners you use. Not all polystyrene is created equal. Some manufacturers use a harder, more robust plastic that stands up well to aggressive weathering products like enamel washes and strong lacquer thinners. Others use a softer plastic that can be “crazed” or even melted by these same solvents.
This is a critical consideration for a beginner. You might follow a tutorial perfectly, using the recommended lacquer-based panel liner, only to find it has permanently etched into the surface of your model, creating a web of fine cracks. This isn’t a failure of technique; it’s a chemistry problem. Lacquer thinners contain powerful solvents that can reactivate underlying layers of acrylic or enamel paint, creating a mess, or worse, attacking the plastic itself. Generally, kits from manufacturers like Tamiya or recent Eduard offerings are known for their high-quality, hard plastic that is more resilient to such disasters.
An F-16, often weathered with specialized panel liners that are enamel or lacquer-based, can be a minefield for a kit with soft plastic. A Spitfire, on the other hand, can be beautifully weathered using water-based acrylics and simple oil washes, which are much gentler on the plastic. Before you apply any new or aggressive weathering product to your masterpiece, it is absolutely essential to test it. This simple precaution can save you from a project-ending catastrophe.
Your Action Plan: Safe Plastic Testing Protocol for Weathering Products
- Test on a Hidden Area: Before committing, always test the new paint or weathering product on a small, inconspicuous part of the model, like the inside of a gear door or an unpainted pylon.
- Perform the “Spoon Test”: The best practice is to test your entire paint and weathering sequence on a cheap plastic spoon or, even better, a piece of the kit’s sprue (the plastic frame the parts come on) before touching the model.
- Check for Reactions: Be aware that the solvent base in lacquers can reactivate and lift underlying layers of acrylic and enamel paints, causing an untidy mess. Wait at least 24 hours after testing to be sure there are no delayed reactions.
- Choose Resilient Kits: As you gain experience, you’ll learn which brands use harder plastic. Starting with kits from manufacturers known for robust plastic, like Tamiya, acts as a form of insurance against solvent disasters.
- Use Matched Systems: The safest route is to use the correct, manufacturer-recommended thinner for each type of paint. Each modeling paint variant has a thinner formulated for compatibility, reducing the risk of adverse reactions.
Avoiding the “Impossible Loadout” Error on Modern Jet Fighters
The complexity of modern jets extends beyond their paint schemes and into their operational configurations. One of the most common and glaring errors a beginner can make is creating an “impossible loadout.” This refers to equipping a model with a combination of weapons, fuel tanks, and pods that would never be carried on a real mission. For example, loading an F/A-18 with both heavy air-to-ground bombs and long-range air-to-air missiles might look cool, but it may not represent a realistic configuration for any specific mission type. This is an authenticity trap that rarely exists for a typical WWII fighter.
More importantly, the mission dictates the weathering. A jet configured for a ferry flight (carrying only fuel tanks) will be relatively clean. An aircraft returning from a Close Air Support (CAS) mission, flying low and slow, will show significantly more grime, soot from its own gun, and wear on its weapon pylons. The loadout is the starting point for the story you are telling. Different mission loadouts create distinct weathering patterns, as access panels for specific systems are used more frequently and aluminum pieces coming together can fill with dark dirt and rubbings. Replicating that specific pattern based on the aircraft’s role is a mark of advanced modeling.
For a beginner, this adds another layer of mandatory research that can be overwhelming. You not only need to build and paint the model, but you also need to become an amateur ordnance expert to ensure your creation is plausible. A WWII Spitfire, by contrast, typically had a very limited set of configurations, making it a much more straightforward subject. The focus can remain on the fundamental painting and weathering, not on complex logistical research.
Understanding how the mission profile directly influences the level and location of weathering is key to creating a believable modern jet. The following table provides a simplified guide.
| Mission Type | Typical Loadout | Weathering Level | Key Areas Affected |
|---|---|---|---|
| Ferry Flight | Fuel tanks only | Minimal | Clean overall, light exhaust only |
| CAP (Combat Air Patrol) | Air-to-air missiles | Light | Missile rail wear, canopy area |
| SEAD | Anti-radiation missiles | Moderate | Electronics bay access panels |
| CAS (Close Air Support) | Bombs, rockets | Heavy | Weapon pylons, lower fuselage dirt |
Key Takeaways
- The key to a successful first weathering project is choosing a subject with high “Weathering Forgiveness,” like a WWII aircraft with mottled camouflage.
- Complex paint schemes actively hide construction and painting errors, while simple, single-color finishes like low-vis grey highlight every flaw.
- Jet-era subjects introduce complex, era-specific challenges like metallic heat staining and plausible weapons loadouts that can overwhelm a beginner.
Why Clean Models Look like Toys: Adding Authentic Weathering to Scale Aircraft?
At its core, weathering is the art of telling a story. A factory-fresh model, no matter how perfectly assembled and painted, lacks a soul. It exists in a vacuum, without history or context. Weathering is the process of breathing life into the plastic, transforming it from a mere replica into a believable, miniature version of a real, functional machine. It’s the subtle art of imperfection. The faint exhaust stains, the chipped paint on a wing root, the grime in the panel lines—these are the details that trick the viewer’s brain into perceiving the model not as a toy, but as a real aircraft that has been shrunk down.
This is what we call “Narrative Weathering.” Every effect you apply should have a reason. Why is there a dark streak behind that panel? It’s a hydraulic fluid leak. Why is the paint on the left wing root more worn than on the right? That’s the primary access point for the pilot. By thinking this way, weathering ceases to be about simply “adding dirt” and becomes a deliberate storytelling process. You are creating a history for your machine, and this narrative is what creates a convincing and engaging final result.
However, realism also depends on subtlety and an understanding of scale. What looks realistic on a large 1/32 scale model will appear overly dramatic and cartoonish on a smaller 1/72 scale model. This is known as the “scale effect.” The smaller the model, the less contrast and intensity your weathering should have to be believable to the human eye. In fact, modeling technique studies demonstrate that 1/72 scale models require 40% less contrast than 1/32 scale for a realistic appearance. This is a crucial concept for beginners to grasp. It’s easy to overdo it, and a light touch is always better than a heavy hand.
Airbrush or Pigments: Which Creates the Most Realistic Exhaust Stains?
One of the most common weathering tasks is replicating exhaust stains. Two popular methods dominate the hobby: using an airbrush to spray thinned paint, and applying dry weathering pigments (or powders) with a brush. Beginners often wonder which method is “best,” but like most things in modeling, the answer is nuanced. Each technique produces a different effect, and the most realistic results often come from a combination of both.
The airbrush method is ideal for creating the soft, diffuse, and large-scale discoloration that forms the base of an exhaust stain. By spraying highly thinned black, grey, or brown paint, you can build up a faint, transparent layer that follows the direction of the airflow. This technique excels at creating the broad, smoky stain that appears over a large area of the fuselage or wing. Its main advantage is speed and the creation of a very fine, smooth gradient that is difficult to achieve by hand. The downside is that it requires an airbrush and a certain level of control to avoid creating a hard, obvious line.
On the other hand, weathering pigments offer unparalleled control for creating texture and concentrated deposits. Pigments are perfect for representing the dense, sooty, and slightly gritty core of the stain, right where it exits the exhaust pipe. They can be applied dry and manipulated with a soft brush to create very subtle effects, or they can be fixed in place with a thinner to create thick, textured deposits, ideal for replicating the leaded fuel residue on some WWII aircraft. The main advantage is the tactile control and the ability to create texture. The most effective approach combines both methods: an airbrush creates the soft, large-scale discoloration, while weathering powders add the fine, dusty texture at the stain’s core.
The journey into weathering is one of the most rewarding aspects of scale modeling. Instead of jumping straight to advanced techniques on a punishing subject, make a strategic choice. Start your journey with a forgiving WWII aircraft. Embrace its complex camouflage as your ally, learn the basics of chipping and oil washes, and build your confidence. By choosing the right canvas, you set yourself up for a successful and enjoyable experience that will make you fall in love with the art of making models look real.