In summary:
- Paint spitting is rarely random; it’s a predictable failure in the air-paint sequence, not a faulty tool.
- Mastering the “Air-On, Paint-On, Paint-Off, Air-Off” sequence is the single most important skill to prevent splattering.
- The quality of your paint job is governed by the “Atomization Triangle”: the delicate balance between Pressure (PSI), Paint Viscosity, and Distance.
- Proper, gentle cleaning and reassembly (mechanical sympathy) are as crucial as painting technique to prevent damage that causes spitting.
It’s a moment every modeler dreads. You’re laying down a perfect, smooth coat of paint when, without warning, the airbrush coughs. A sudden, messy blotch of paint erupts onto your model, potentially ruining hours of careful preparation. The immediate reaction is to blame the tool, the paint, or the humidity. Many will tell you the solution is simple: “your paint is too thick,” or “your airbrush is dirty.” While sometimes true, this advice barely scratches the surface and misses the fundamental cause of the issue for most beginners: a lack of coordination and mechanical understanding.
The frustration of a sputtering airbrush is the number one reason aspiring modelers give up. But what if the problem isn’t a mystery to be solved, but a skill to be learned? The secret to a flawless finish isn’t found in a magic paint thinner or an expensive new airbrush. It’s found in developing trigger discipline and a true understanding of the fluid dynamics at play inside that small, precise tool. This isn’t just about cleaning; it’s about developing mechanical sympathy and a feel for the machine.
This guide will move beyond the generic advice. We will break down the core mechanics of why your double-action airbrush spits paint. We will establish the foundational muscle memory, explore the physics of paint atomization, and show you how to clean and maintain your tool like a professional, ensuring that you, not the airbrush, are always in control of the paint flow. Forget luck; this is about deliberate, repeatable skill.
For visual learners, the following video provides an excellent demonstration of the basic handling and principles of a double-action airbrush. While the narration is in Spanish, the clear visuals of trigger action and spray patterns are universally helpful for understanding the core mechanics we discuss.
To help you build this skill systematically, this guide is structured to address the most critical aspects of airbrush control, from foundational techniques to advanced applications. Follow these sections to transform your understanding and results.
Summary: A Beginner’s Guide to Eliminating Airbrush Splatter
- Why you must start air before paint to prevent splatter?
- How to deep clean the nozzle without splitting the delicate metal tip?
- Why grainy paint happens and how to fix it with distance adjustment?
- The $50 mistake: how to reassemble your airbrush without bending the needle?
- Where to apply grease to keep the trigger action smooth?
- How to Spray Soft-Edge Camouflage Freehand Without Splatter?
- How to Start Building Static Aircraft Models Without Spending Over $100?
- How to Build Visual Depth on Monotone Camouflage Schemes?
Why you must start air before paint to prevent splatter?
This is the golden rule of double-action airbrushing and the root cause of most initial splatters. A double-action trigger has two movements: pressing down controls airflow, and pulling back controls paint flow. The mistake every beginner makes is trying to do both at once, or worse, pulling back for paint before pressing down for air. This violates the basic physics of your tool and guarantees a messy start.
When you press down for air, a high-speed jet of air passes over the nozzle tip. This creates a low-pressure area, known as the Venturi effect, which siphons paint from the cup into the airstream where it is atomized. If you introduce paint into the nozzle *before* this stable airflow is established, the initial burst of air pressure has nowhere to go but to force the sitting puddle of paint out in a single, uncontrolled glob. It’s like trying to drink through a straw by blowing into it first.
To avoid this, you must develop the muscle memory for the correct sequence:
- Air On: Press the trigger straight down. You should hear the hiss of air.
- Paint On: While still holding down, begin to slowly pull the trigger back. Paint will start to flow.
- Paint Off: To stop painting, move the trigger forward first, cutting off the paint supply.
- Air Off: Only then do you release the downward pressure, stopping the airflow.
This sequence ensures the nozzle is clear of paint at the beginning and end of every pass, preventing the dreaded splatter. Practice this with just water in the cup until it becomes an unconscious, automatic action. This is the foundation of trigger discipline.
How to deep clean the nozzle without splitting the delicate metal tip?
A clean airbrush is a happy airbrush, but aggressive cleaning is the number one cause of permanent, costly damage. The nozzle is the heart of your airbrush. It’s a tiny, delicate component made of soft brass, with a tip that can be split or deformed by the slightest mishandling. Never use hard metal objects like a spare needle or a paperclip to clear a blockage; this will inevitably ruin the nozzle’s precise shape.
For most routine cleaning, full disassembly is not only unnecessary but also risky. Experienced modelers rely on the back-flush technique. By blocking the needle cap with a finger and pressing the trigger, you force air and cleaner back through the nozzle and into the paint cup. This reverse flow dislodges internal paint deposits far more effectively than a simple forward spray. This single method is reported to resolve the vast majority of spitting issues caused by internal buildup, all without the risk of damaging components during reassembly.
For a true deep clean, you must use the right tools. Soft, non-marring tools are essential. The image below demonstrates the correct technique using a soft interdental brush, which can gently scrub the inside of the nozzle without any metal-on-metal contact.
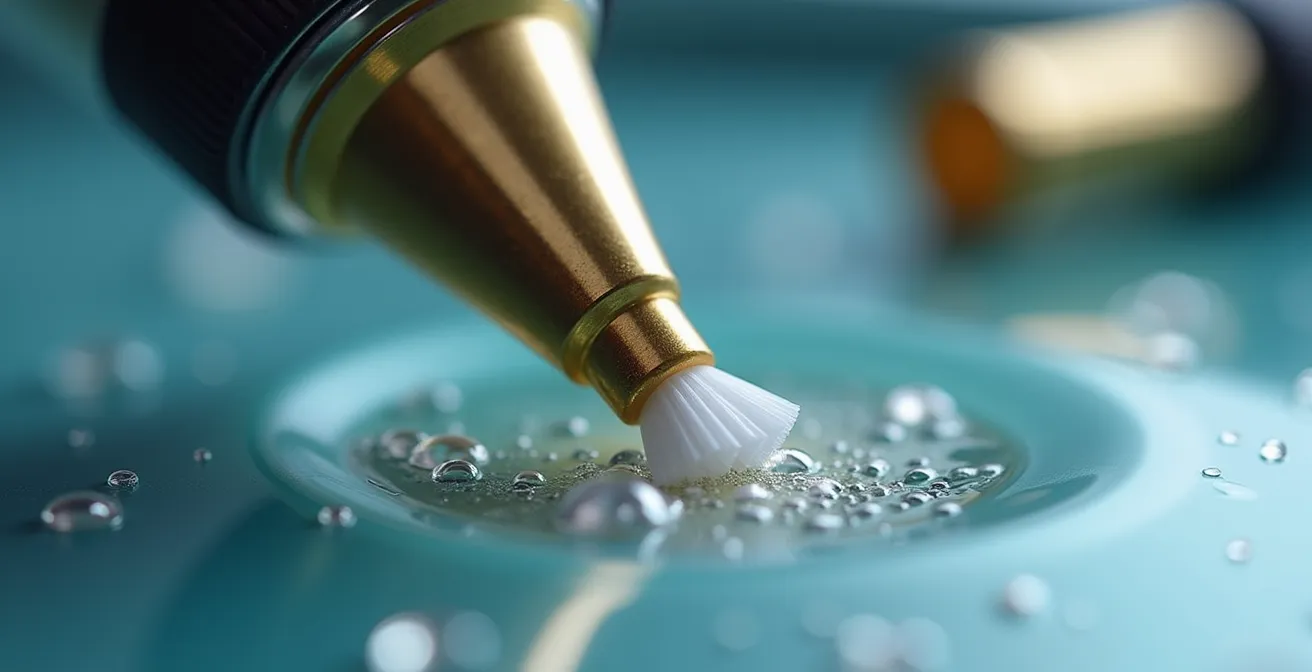
As you can see, the soft bristles conform to the nozzle’s interior, dissolving dried paint with an appropriate cleaning solution. Always soak the parts in airbrush cleaner first to soften the paint, then use gentle scrubbing motions. Patience is key. Rushing the cleaning process with brute force is a false economy that often leads to buying new parts.
Why grainy paint happens and how to fix it with distance adjustment?
If your paint finish feels like fine sandpaper, you’re experiencing “grainy” or “dry” spray. This happens when paint particles begin to dry in the air *before* they reach the model’s surface. Instead of landing as a wet, liquid layer that flows together smoothly, they arrive as semi-solid specks, creating a rough, textured finish. While paint thickness is a factor, the most common culprit is a breakdown in the relationship between your air pressure and your working distance.
To truly understand this, you must think in terms of the “Atomization Triangle”: a balance between three variables:
- Paint Viscosity: How thick or thin your paint is. The common wisdom of “the consistency of milk” is a good starting point.
- Air Pressure (PSI): The force that atomizes the paint. Too low, and it spits; too high, and it causes dry spray.
- Distance to Surface: How far your airbrush is from the model.
These three factors are intrinsically linked. Changing one requires adjusting the others. If you are spraying from too far away, even perfectly thinned paint will have time to dry mid-flight. If your pressure is too high for your distance, it will blast the paint onto the surface so aggressively that it dries on impact. The goal is a “wet” coat that has time to level itself out.
This comparative table, based on common modeling practices highlighted in a great guide for beginners from Tamiya, illustrates the relationship between these key variables.
| Variable | Too Low/Close | Optimal Range | Too High/Far |
|---|---|---|---|
| Distance | Paint runs, pooling | 4-6 inches | Grainy, dry spray |
| PSI Pressure | Poor atomization, spitting | 15-25 PSI | Overspray, dry particles |
| Paint Viscosity | Clogging, uneven flow | Milk-like consistency | Transparent, poor coverage |
If you see a grainy finish, your first instinct should not be to add more thinner. Instead, try moving closer to the surface or reducing your air pressure slightly. Finding the sweet spot in this triangle is a core skill for achieving a perfect finish.
The $50 mistake: how to reassemble your airbrush without bending the needle?
A bent needle is the most common and frustrating self-inflicted injury an airbrush owner can cause. The needle is a long, tapered, and extremely delicate rod. Its tip is precision-ground to form a perfect seal with the nozzle. Even a microscopic bend in this tip will prevent the seal from closing properly, leading to constant dripping, sputtering, and a complete loss of fine-line control. A replacement needle can cost anywhere from $10 to $50, making this a costly lesson in mechanical sympathy.
This damage almost always happens during reassembly. After cleaning, the temptation is to simply shove the needle back in from the rear. If the trigger is not depressed, or if there is any dried paint inside, the needle will meet resistance. Applying even a little force will cause the fine tip to collide with the internal trigger mechanism and bend instantly. The key is to create a clear, unobstructed path for the needle *before* you even begin to insert it.
The reassembly process must be deliberate and gentle. There should be absolutely no force involved. If you feel any resistance at all, stop immediately, pull back, and diagnose the problem. Do not try to push through it. Following a strict sequence of operations is the only way to guarantee the safety of your needle.
Your checklist for: Safe Needle Reassembly
- Clear the Path: Remove the handle and needle cap first before attempting needle insertion. This gives you a clear view and path.
- Open the Chuck: Depress the trigger fully. This pulls back the internal chuck mechanism, opening the channel for the needle.
- Gentle Insertion: Insert the needle from the back with a gentle, steady, and slow forward pressure. It should slide smoothly.
- Feel for Resistance: The moment you feel any friction or a hard stop, HALT. Do not force it. Remove the needle and check for obstructions.
- Secure the Needle: Once the needle is fully seated in the nozzle, secure the needle chucking nut. It only needs to be finger-tight. Over-tightening can damage the threads.
- Protect the Tip: Install the nozzle cap and handle LAST. This ensures the delicate needle tip is protected during the final steps.
Where to apply grease to keep the trigger action smooth?
A smooth, predictable trigger is essential for fine control. Over time, you may notice the trigger action becoming gritty, sticky, or resistant. The common assumption is that the airbrush simply needs lubrication. While this can be true, it’s crucial to correctly diagnose the problem first, as applying lubricant in the wrong place can make the situation worse by attracting and holding onto paint particles.
In fact, professional technicians have a simple diagnostic test. According to their findings, 75% of “gritty trigger” complaints stem from dried paint on the needle shaft, not a lack of lubrication. The test is simple: if the trigger feels gritty when you pull it back (the paint-flow action), the culprit is almost certainly dried paint buildup on the needle or inside the packing seal. This requires cleaning, not lubrication. If, however, the trigger is resistant when you press it down (the air-flow action), then it’s time to lubricate the air valve.
When lubrication is necessary, you must use a specialized, glycerin-based airbrush lubricant. Never use petroleum-based oils like WD-40, as they can degrade the rubber O-rings inside your airbrush. Only a tiny amount is needed, and it should only be applied to specific metal-on-metal friction points.
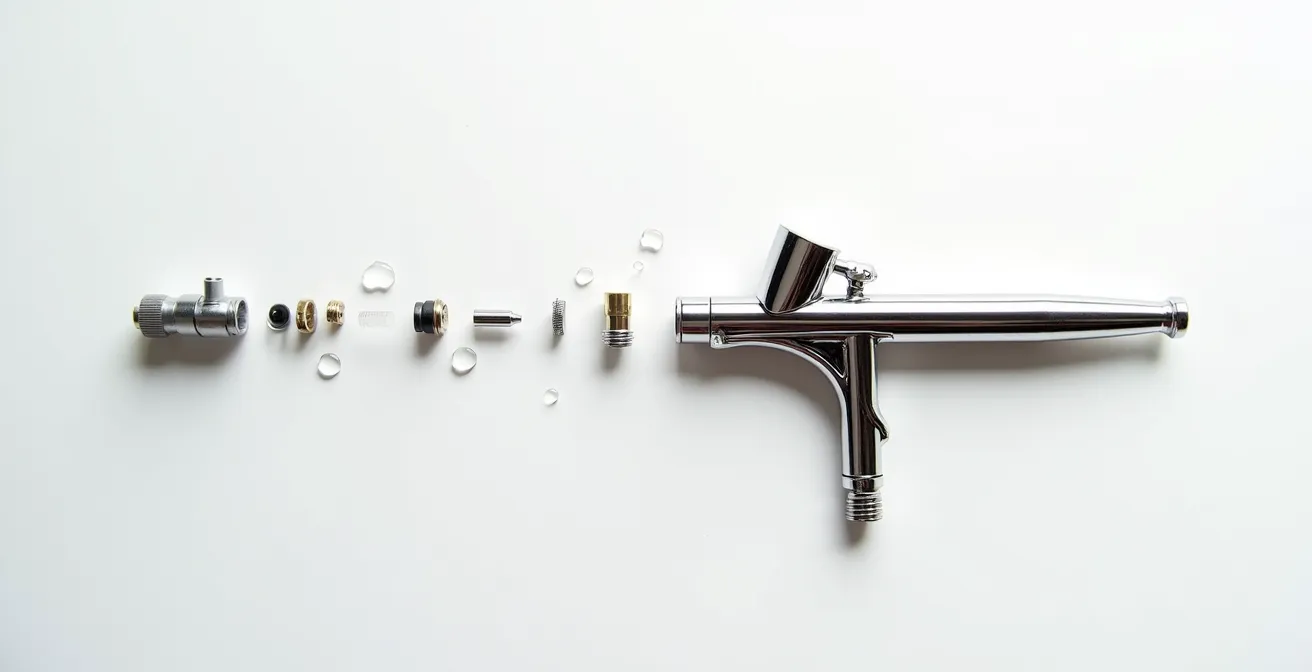
The image above highlights the three critical points for lubrication. A minuscule drop should be applied to the needle shaft (where it passes through the trigger mechanism), the trigger pivot point, and most importantly for a stiff downward press, the air valve stem. Applying lubricant here will restore the smooth, buttery feel of the trigger’s downward motion.
How to Spray Soft-Edge Camouflage Freehand Without Splatter?
Creating soft-edge camouflage patterns is a hallmark of a skilled airbrush user. Unlike hard-edge patterns achieved with masking tape, freehand camo requires immense trigger control, a steady hand, and a finely tuned airbrush. The goal is to create a soft, feathered transition between colors, but the low pressure and close distances required can easily lead to splattering if not done correctly.
The secret lies in lowering your air pressure significantly and thinning your paint properly. For this kind of close-up work, professional demonstrators recommend a low pressure of 10-15 PSI combined with a paint thinned to a 50% ratio, giving it a very fluid, ink-like consistency. This setup allows the paint to atomize and flow smoothly even with minimal trigger movement, giving you maximum control over the line width.
With the airbrush set up correctly, you can then practice the “dagger stroke” technique. This involves moving the airbrush in a specific way to create the feathered edge. It’s not just about pointing and spraying; it’s a coordinated dance of distance, angle, and trigger motion.
- Set your compressor to a low pressure, between 10 and 15 PSI, for maximum control.
- Thin your paint to a milk-like consistency to ensure it flows smoothly at this low pressure.
- Approach the surface at a 45-degree angle with the air on, but no paint flowing yet.
- As you move closer to the surface, pull the trigger back slightly to start a very fine line of paint.
- To create the soft edge or “fade,” maintain your trigger position while gradually pulling the airbrush away from the surface.
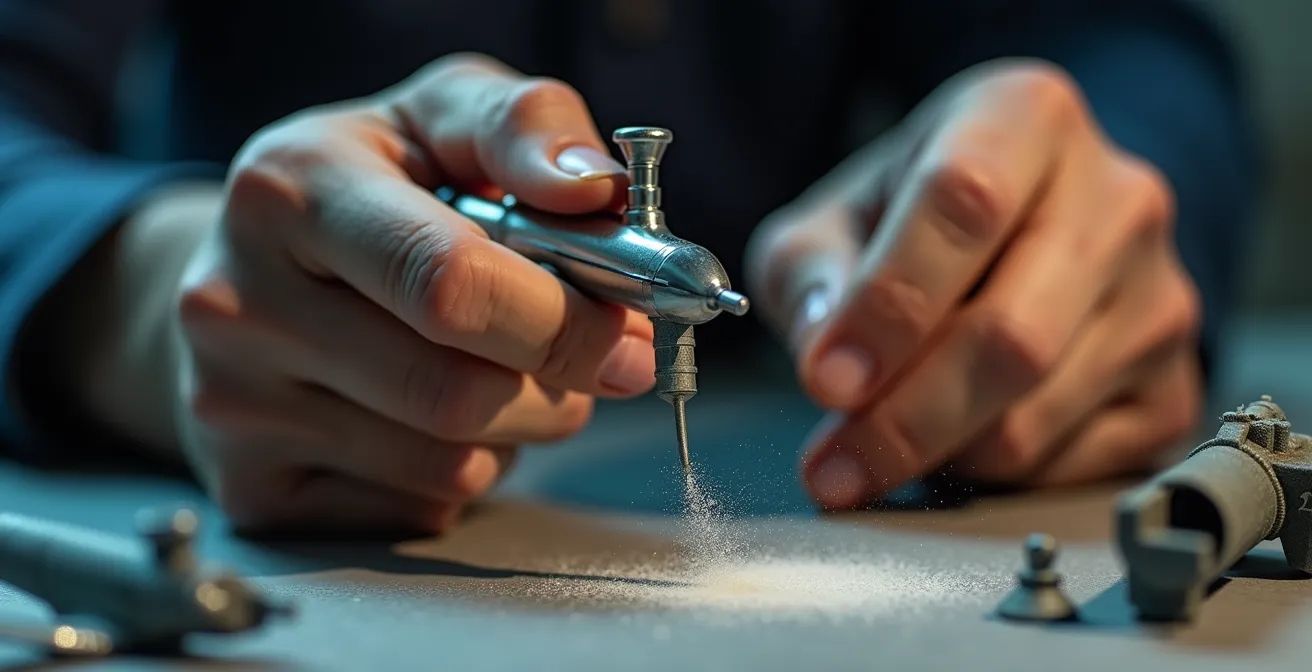
- Practice on a spare piece of paper by creating small dots and then pulling away to expand them into cones. This exercise builds essential trigger feathering control.
Mastering this technique allows you to “draw” with your airbrush, creating the subtle and realistic camouflage patterns seen on scale aircraft models.
How to Start Building Static Aircraft Models Without Spending Over $100?
Entering the world of scale modeling can seem daunting, with an endless array of tools and paints vying for your attention and your wallet. While you can spend a fortune, getting started with airbrushing on a budget is entirely possible. The key is to invest wisely in the core components and avoid the pitfalls of cheap, unreliable equipment. In fact, many experienced modelers argue that the frustration from using a poor-quality, budget airbrush is the main reason 60% of beginners abandon the hobby before they even get started.
Your most important investment is the airbrush itself. A cheap, unbranded, single-action airbrush might seem like a bargain, but it will lack the control needed for modeling and will quickly become a source of frustration. A quality, entry-level, double-action airbrush from a reputable brand is the single best investment you can make. This, paired with a basic compressor, forms the heart of your “minimum viable kit.” A budget of $100 can be tight, but it’s achievable if you prioritize quality over quantity.
The following table, based on recommendations often shared in beginner tutorial channels and blogs, compares some of the most popular and reliable starter airbrushes that will serve you well without breaking the bank.
| Model | Price Range | Needle Size | Best For |
|---|---|---|---|
| Iwata Neo CN | $58-65 | 0.35mm | General purpose, reliable |
| Badger Patriot 105 | $70-90 | 0.5mm | Beginners, larger coverage |
| Master G22 | $25-35 | 0.3mm | Budget option (less reliable) |
By choosing a reliable airbrush like the Iwata Neo or Badger Patriot ($70-90) and pairing it with a simple, tankless compressor (around $30), you establish a solid foundation. This may push the budget slightly, but the reduction in frustration is priceless. This setup leaves just enough for one starter model kit, a few essential paint colors, and the necessary thinner, giving you everything you need to start learning the right way.
Key takeaways
- Master the “Air-On, Paint-On, Paint-Off, Air-Off” sequence. This is the non-negotiable foundation for preventing splatters.
- The “Atomization Triangle” (Pressure, Viscosity, Distance) is not just a theory; it’s your primary diagnostic tool for all paint finish issues.
- Practice “mechanical sympathy.” Gentle handling and correct procedures during cleaning and reassembly will save you money and frustration by preventing damage.
How to Build Visual Depth on Monotone Camouflage Schemes?
Painting a model in a single, monotone color scheme, like the overall grey of a modern jet fighter, presents a unique challenge: how do you make it look realistic and visually interesting instead of like a flat, boring toy? A real aircraft is not a uniform color. It weathers, fades, and accumulates grime in different ways across its surface. Replicating this subtle variation is the key to bringing a monotone scheme to life, and the airbrush is the perfect tool for the job.
The technique is known as “post-shading” or “tonal modulation.” It involves spraying very thin, translucent layers of lighter and darker versions of the base color over the model after the main coat has been applied. This creates subtle shifts in tone that suggest sunlight, shadows, and wear, giving the surface a sense of depth and history. The key to this technique is extreme paint dilution—think 90-95% thinner to 5-10% paint. These “ghost tints” allow you to build up the effect gradually and with great control.
Some artists prefer “pre-shading,” where panel lines are highlighted before the main coat, but this can create a very stark, high-contrast look. Post-shading offers a more subtle and controllable path to a realistic finish. As expert modeler Bryant Dunbar notes in the Grex Model Aircraft Airbrushing Video Series:
The ‘marbling’ effect created by random pre-shading patterns before the main color creates a subtle, non-uniform finish that brings life to otherwise flat monotone schemes.
– Bryant Dunbar, Grex Model Aircraft Airbrushing Video Series
To apply this concept using post-shading, you can follow this general process:
- Complete the base monotone camouflage application and let it cure fully.
- Create a highlight tint by mixing your base color with about 10% white or a light grey.
- Thin this mixture drastically with 90-95% thinner to make it highly translucent.
- Using low pressure, spray these ultra-thin layers over the center of raised panels and areas you want to highlight.
- Create a shadow tint by mixing the base color with 10% black or a dark grey.
- Apply this shadow tint subtly along panel lines, in recessed areas, and on the undersides of wings.
- Optionally, finish with a highly thinned filter coat of the original base color to unify the variations and tone down the effect.
The journey from a sputtering, frustrating tool to a precise instrument of creativity is one of practice and understanding. The next logical step is not to buy more tools, but to pick up your airbrush, fill it with water or a cheap practice paint, and deliberately work on the fundamental trigger sequence until it becomes second nature. Master the machine, and you will master the finish.