The debate between pre-shading and black-basing isn’t about which is ‘better’, but about choosing between two distinct artistic philosophies for achieving realism.
- Pre-shading is a structural approach, using lines to define the form and geometry of the aircraft.
- Black-basing is a textural approach, using random mottling to create atmospheric depth and a non-uniform surface.
Recommendation: Select your technique based on the specific visual narrative you want to create for your model, not simply because one is considered the ‘modern’ trend.
For any scale model painter seeking realism, the question of how to create authentic tonal variation is paramount. The airbrush offers two dominant paths: the classic, methodical approach of pre-shading, and the more recent, seemingly chaotic technique of black-basing. The internet is filled with tutorials for both, often presenting them as a simple choice between an “old” and a “new” way of doing things. This creates a false dichotomy, pushing painters to pick a side rather than understand the core purpose of each method.
The truth is more nuanced and, from an artistic standpoint, far more interesting. These techniques are not merely recipes to be followed; they are distinct visual philosophies. Pre-shading is an act of structural definition, an almost architectural process of outlining a form before coloring it in. Black-basing, in contrast, is an exercise in creating textural atmosphere, a painterly approach that embraces randomness to break up the monotony of a factory-fresh finish. The common frustration of a pre-shaded model looking like a “plaid shirt” or a black-based model looking like a mess often stems from a misunderstanding of these underlying goals.
This guide moves beyond the simple “how-to” to explore the “why.” We will analyze the aesthetic purpose of each technique, diagnose their common pitfalls, and uncover how to master them not just as technical steps, but as artistic tools. By understanding the visual story each method tells, you can make a deliberate, informed choice that truly serves your model’s final presentation, transforming it from a well-painted object into a convincing miniature replica.
This article dissects the aesthetic and practical differences between these two foundational techniques. The following sections will guide you through the artistic philosophy, common mistakes, and advanced applications of both pre-shading and black-basing to help you master tonal variation.
Summary: A Critical Guide to Pre-shading and Black-basing
- Why pre-shading often looks like a “plaid shirt” grid (and how to avoid it)?
- How to spray random squiggles to break up monochrome surfaces?
- Black vs Dark Brown: why black pre-shading looks too harsh on light grey jets?
- The mistake of painting over your shading until it disappears completely
- How to Start Building Static Aircraft Models Without Spending Over $100?
- How to Simulate Scale Lighting Effects on Flat Wings?
- Raised vs Recessed Panel Lines: How to Handle Older Kits for a Modern Look?
- Why Clean Models Look like Toys: Adding Authentic Weathering to Scale Aircraft?
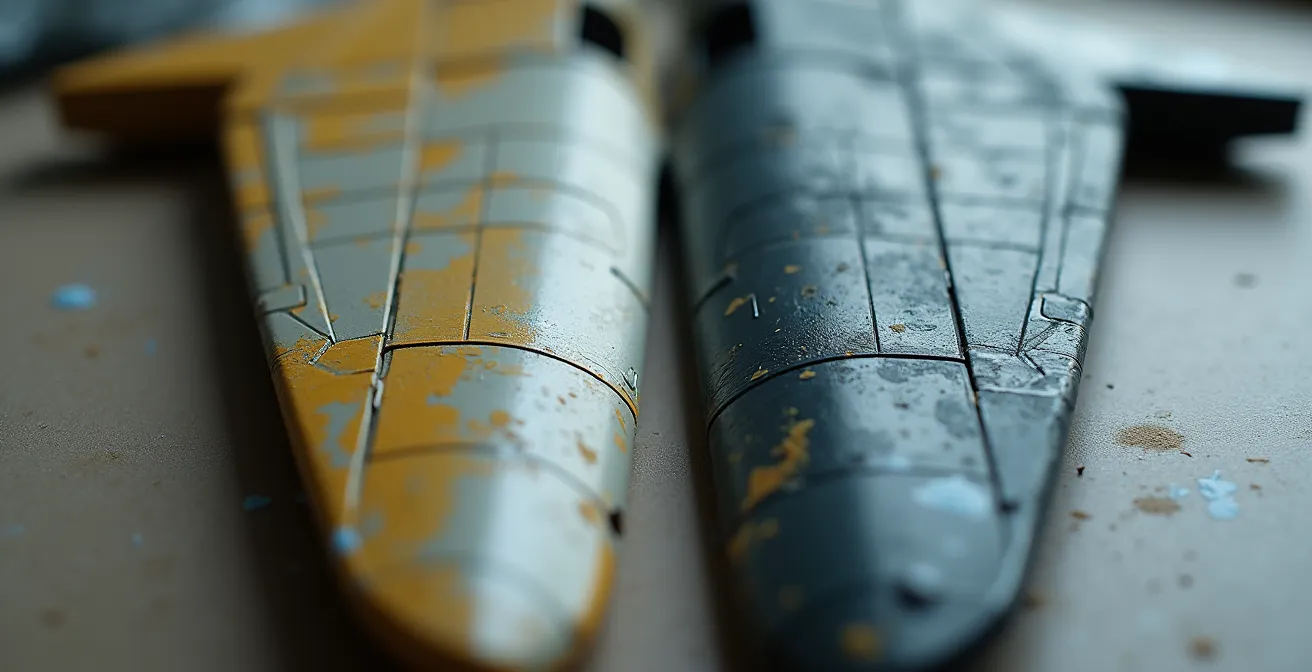
Why pre-shading often looks like a “plaid shirt” grid (and how to avoid it)?
The most common critique of pre-shading is that it can result in a stark, grid-like pattern that looks unnatural and cartoonish. This “plaid shirt” effect occurs when the technique is treated as a simple exercise in tracing every panel line with a uniform, heavy black line. The goal of pre-shading is not to draw a dark skeleton of the aircraft, but to initiate a structural definition of its form. The lines should suggest where shadows would naturally accumulate, implying depth rather than screaming it.
The primary cause of the grid effect is a lack of subtlety in application. Heavy-handed spraying, incorrect paint consistency, or high air pressure creates bold lines that are difficult to blend. To avoid this, the artist must think in terms of gradients. The shading should be heaviest in tight corners and areas of deep shadow (like wing roots) and lighter or even absent on open, flat panels. Varying the line weight and distance of the airbrush from the surface is critical. According to airbrushing guidelines, pressures of 10-15 PSI are optimal for detailed work, allowing for fine, controllable lines that are easier to blend into the base coat. By treating pre-shading as the first step in a lighting plan, you move from a rigid grid to a dynamic foundation for realism.
Action Plan: Achieving Subtle Pre-Shading
- Calibrate Your Tools: Set your airbrush to a low pressure, around 12-15 PSI, especially when using a fine 0.2mm nozzle for controlled line work.
- Perfect Your Paint Mix: Thin your shading color to a consistency of approximately 30% paint to 70% thinner. This semi-transparent mix prevents harsh, opaque lines.
- Maintain a Clean Needle: To prevent spatter and inconsistent lines, pause to clean the airbrush needle tip every one to two minutes during the shading process.
- Vary Line Weight and Focus: Modulate your lines by adjusting the distance. Spray from 1cm for fine, sharp lines in recessed areas and pull back to 3-5cm for softer, broader shading on larger panel joints.
How to spray random squiggles to break up monochrome surfaces?
If pre-shading is about structure, black-basing is about texture. The technique involves starting with a solid black primer coat and then building up the final color by spraying light, mottled “squiggles” or “marbling” patterns over it. This process intentionally creates a non-uniform base, ensuring the final color has a rich, varied, and weathered appearance. The goal is to achieve a textural atmosphere, mimicking the subtle shifts in tone seen on real-world operational aircraft due to sun-fading, maintenance, and grime.
The key to successful black-basing is embracing controlled chaos. The squiggles should be random but deliberate. Denser, tighter mottling can be used in areas that would see more dirt and wear, while broader, softer patterns suit large, open surfaces like the top of a wing. The randomness is what prevents the mechanical look of pre-shading, but it must be guided by an understanding of how a real surface weathers. Research on paint atomization shows that thinner paints atomize properly at 10-20 PSI, which is ideal for creating these fine, web-like patterns. This method trades the precise lines of pre-shading for an organic, almost painterly foundation that excels at representing used, in-service machines.
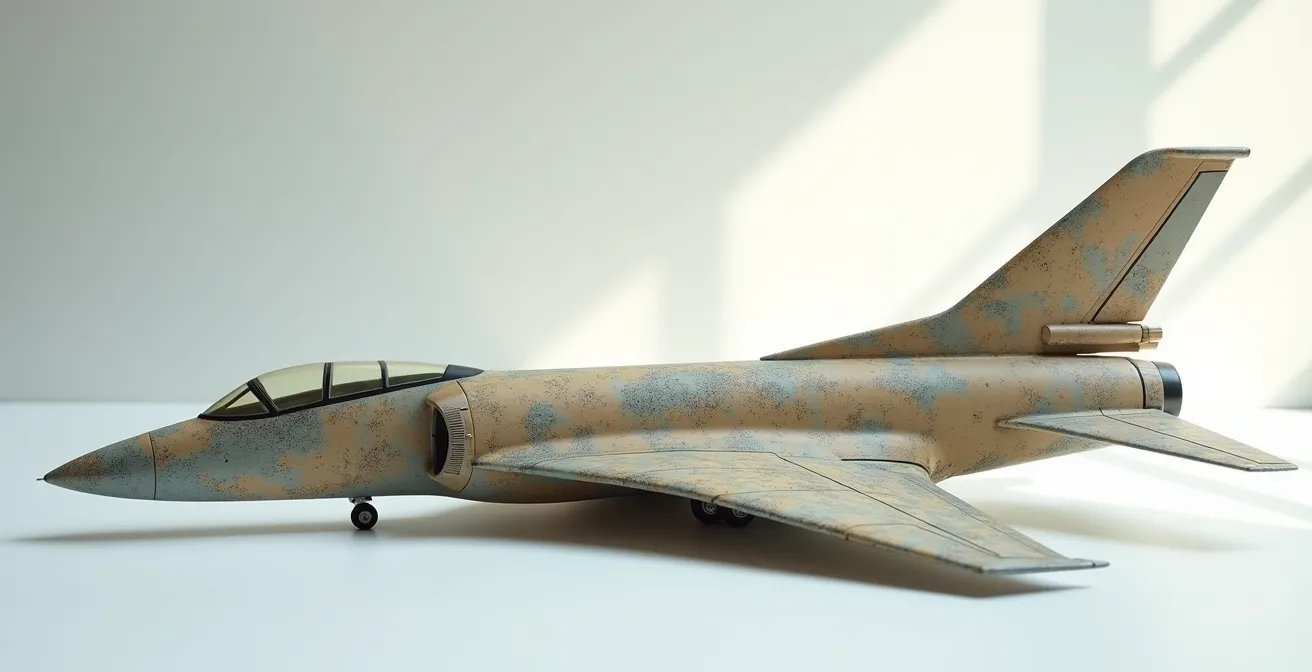
The result, as seen in the marbling on the wing above, is a surface alive with subtle variation. This non-uniformity is the perfect canvas for the final, thin top coats of color, allowing the underlying texture to subtly show through.
Case Study: Black-Basing Marbling on an F4U Corsair
A classic application of this technique is on single-color naval aircraft like the F4U Corsair. By starting with a black base and using thin, blending coats of dark sea blue to build up the color, modellers create a wonderful and subtle ‘marbling’ effect. This avoids the uniformity of a simple panel line shade and imparts an immediate sense of scale and operational history to the finish, a process that is surprisingly easy to execute.
Black vs Dark Brown: why black pre-shading looks too harsh on light grey jets?
The choice of shading color is as critical as the application itself. A common mistake, particularly on modern aircraft with light grey camouflage schemes, is using pure black for pre-shading. While logical in theory, pure black creates an extremely high-contrast foundation. When the light grey top coat is applied, the underlying black can create a stark, almost blueish tint that looks artificial. The result is a brutalist contrast that overpowers the subtlety of the aircraft’s form.
A more sophisticated artistic choice is to use a color that harmonizes with the top coat. For light grey jets, a dark brown, a dark grey, or even a dark blue can provide the necessary shadow effect without the harshness of black. Dark brown, in particular, offers a warmer, more natural-looking shadow that mimics the accumulation of dirt and grime. This shift in color theory moves the technique away from a simple black-and-white exercise and into the realm of true color modulation. It allows the shading to integrate seamlessly into the final finish, creating depth that feels authentic rather than applied.
Some critics argue that any pronounced shading is unrealistic. However, real-world examples often prove otherwise. As Dave’s Model Workshop notes when analyzing heavily weathered aircraft:
Some modellers believe that these painting styles are unrealistic, not true to scale, and the panel lines become too pronounced. All I will say is: check out the pronounced panel lines on the Caspian Sea Monster.
– Dave’s Model Workshop, Weathering and black basing paint analysis
The mistake of painting over your shading until it disappears completely
Perhaps the most heartbreaking mistake in both pre-shading and black-basing is accidentally obliterating hours of careful work. After laying down a perfect foundation of subtle lines or organic mottling, the painter applies the top color too heavily, and the underlying tonal variation vanishes completely. This happens due to a fear of the shading looking too strong, leading to “one more coat” that ends up being one coat too many. The model reverts to a monochrome, toy-like state.
The solution is to work with highly thinned “ghost coats” of your main color. Instead of aiming for full coverage in one pass, you must build the color up with multiple, transparent layers. The goal is to tint the surface, not paint it opaquely. A good rule is to stop when the underlying shading looks about 20% stronger than you want it in the final result; paint tends to lose some contrast as it dries and cures. Testing on a scrap piece is invaluable. Extensive testing reveals that 3-5 thin coats at 30% opacity is a reliable range that preserves up to 80% of the underlying shading effect.
A methodical approach is to apply the first ghost coat only to the center of each panel, leaving the pre-shaded lines untouched. Subsequent, broader coats can then blend the center into the shaded areas. This process ensures the shading is gradually integrated, not buried. It requires patience, but it is the only way to preserve the delicate foundation you worked so hard to create. This is the final, crucial step in translating your structural or textural foundation into a finished, realistic surface.
How to Start Building Static Aircraft Models Without Spending Over $100?
A pervasive myth in scale modeling is that high-quality results, especially with advanced techniques like pre-shading, require a significant investment in high-end equipment. Aspiring painters often delay starting, believing they need a top-of-the-line airbrush and a professional spray booth. This is a fallacy. The quality of the finish is dictated far more by the artist’s technique and understanding of the medium than by the price tag of their tools. It is entirely possible to achieve competition-worthy results on a strict budget.

The essentials are surprisingly affordable: a reliable entry-level, dual-action airbrush, a small compressor, basic cutting and sanding tools, and a few key paints and thinners. The focus should be on mastering these fundamental tools, not acquiring more of them. Learning how to properly thin paint, control air pressure, and maintain trigger discipline will yield far greater returns than buying an expensive airbrush you don’t know how to use. Techniques like pre-shading are about control and patience, not horsepower.
Case Study: Budget Airbrushing for Professional Results
Many builders achieve professional pre-shading effects using only an entry-level airbrush like the Iwata Neo. As experienced modellers often advise, a budget-friendly airbrush is perfectly capable of performing every task required for a high-quality build. Success in pre-shading comes from carefully following the panel lines and building up thin coats, regardless of how neat the initial lines are. The emphasis is on the process, proving that expensive equipment is not a prerequisite for an excellent finish.
How to Simulate Scale Lighting Effects on Flat Wings?
Creating tonal variation on a model is not just about simulating shadows; it’s about simulating scale lighting. A real aircraft sitting on a tarmac is a massive object interacting with light in complex ways. Different panels reflect light differently based on their angle, material, and finish. Replicating this effect on a small-scale model, especially on large, flat surfaces like wings, is a significant artistic challenge. Black-basing is a great start, but the effect can be dramatically enhanced by considering the final clear coat.
Varnish is not just a protective layer; it’s a powerful tool for manipulating light. By using a combination of matte, satin, and gloss varnishes on different panels, you can create incredibly subtle and realistic variations in light reflection. For example, a walkway area might receive a dead-flat matte coat, while an access panel that is frequently opened could have a slightly more satin or semi-gloss finish to suggest wear and handling. This technique breaks up the uniformity of the surface in a way that paint alone cannot.
The following table, based on an analysis of varnish properties, breaks down how different finishes can be used to achieve specific visual effects, transforming a flat wing into a dynamic surface.
| Varnish Type | Light Reflection | Visual Effect | Best Application |
|---|---|---|---|
| Matte | 5-10% | Deep shadows | Panel centers |
| Satin | 20-30% | Moderate depth | Transition areas |
| Semi-gloss | 40-50% | Highlight effect | Raised details |
| Gloss | 70-80% | Maximum contrast | Access panels |
Raised vs Recessed Panel Lines: How to Handle Older Kits for a Modern Look?
The choice between pre-shading and black-basing is complicated when dealing with older model kits, many of which feature raised panel lines instead of the modern standard of recessed ones. Applying traditional pre-shading to raised lines is nearly impossible and often results in a messy, undefined finish. Black-basing can work, but it doesn’t accentuate the lines themselves. This presents a unique artistic problem: how do you give an older kit a modern, detailed look without the painstaking process of re-scribing the entire model?
One effective technique is the “Ghost Line” preservation method. This involves carefully sanding the raised panel lines down until they are just barely visible—faint “ghosts” on the surface. After priming, these ghost lines can be treated with a pin wash to give them subtle definition. This preserves the kit’s original detail while creating a much more in-scale effect. For the most prominent lines, like the fuselage spine or wing roots, a limited amount of re-scribing can be done to add emphasis. An alternative is to paint the model and then use a silver pencil to lightly trace the raised lines, simulating paint chipping along the panel edges for a convincing wear effect.
It is also a matter of scale. Overly pronounced shading can look out of place, especially on smaller models. As one modeling community member wisely noted:
Some panel-line shading has gotten pretty silly-looking, especially in the smaller scales. I see builds in the likes of SAMI with these totally exaggerated shades in 1/72 models that suggest to the eye that the panel lines are about six inches deep… It is always a better technique (to my eyes at least) in 1/48 or larger scales.
– Dave’s Model Workshop Community, Discussion on scale-appropriate panel line treatment
Checklist: The Ghost Line Preservation Method
- Sanding: Use 600-grit sandpaper to gently sand down the raised panel lines until they are only faintly visible on the plastic surface.
- Primer Check: Apply a light coat of primer. The lines should appear as subtle ‘ghosts’, not sharp ridges. If they are too prominent, sand again.
- Subtle Definition: After the base color, apply a targeted pin wash directly into the faint ghost lines to restore their definition without overwhelming the panel.
- Selective Re-scribing: For critical structural lines only (e.g., wing roots, fuselage spine), use a 0.2mm scribing tool to carefully deepen the line for emphasis.
- Alternative Finish: For a weathered look, skip the wash and instead trace the faint raised lines with a silver pencil after painting to simulate authentic paint wear along the edges.
Key takeaways
- The choice between pre-shading and black-basing is an artistic one: define structure or create texture.
- Subtlety is paramount. Avoid the “plaid shirt” grid by varying line weight and using thin, transparent “ghost coats” of paint.
- Black-basing’s “controlled chaos” is a powerful tool for breaking up monochrome surfaces and creating an atmospheric, weathered look.
Why Clean Models Look like Toys: Adding Authentic Weathering to Scale Aircraft?
A perfectly assembled and painted model with a uniform, factory-fresh finish can, paradoxically, look unrealistic. It often resembles a high-quality toy rather than a miniature version of a real-world machine. This is because real aircraft are not pristine; they are streaked with oil, faded by the sun, chipped by mechanics, and stained by exhaust. Both pre-shading and black-basing are not end goals in themselves; they are the foundational first layer of the weathering process. They establish the tonal canvas upon which the story of the aircraft’s operational life will be painted.
The tonal variations created by these techniques provide the perfect, non-uniform surface that makes subsequent weathering layers—filters, washes, streaks, and pigments—look far more convincing. A wash applied over a flat, single-color surface can look stark and artificial. The same wash applied over a black-based surface with subtle marbling will settle into the variations naturally, creating a much more organic effect. The underlying shading provides the “tooth” for the weathering to grab onto, both visually and physically.
Real Aircraft Reference: The Caspian Sea Monster
For those who feel black-basing is unrealistic, observing real-world subjects can be enlightening. The heavily weathered Soviet “Caspian Sea Monster” ekranoplan is a prime example. Photographs show its surface covered in random tonal variations, faded paint, and streaking that look remarkably similar to a model finished with a black-basing technique. This demonstrates that the goal of these methods is to replicate the complex, chaotic beauty of a machine that has lived a hard life in its environment.
Thinking of pre-shading or black-basing as the start of the visual narrative, rather than the end of the painting process, is the final step in mastering them. They are tools to avoid the sterile perfection that makes a model look like a toy, and instead imbue it with a sense of history and realism.
Ultimately, both techniques are valid, powerful tools in a painter’s arsenal. The truly skilled artist is not one who masters a single method, but one who understands when to use each to tell the most compelling visual story. Choose your philosophy, practice with patience, and begin creating models that are not just well-painted, but truly believable.