The key to an authentic model isn’t choosing one source over the other, but understanding why they differ: restored aircraft are living history bound by modern laws, while wartime photos capture a fleeting, utilitarian reality.
- Restored, airworthy warbirds legally require modern safety and navigation gear (like GPS) that are anachronistic.
- Wartime finishes were dull, hastily applied for camouflage and speed, not the high-gloss shine seen at airshows.
- Interpreting black and white photos requires technical knowledge of film types, as they distort color values.
Recommendation: Use museum aircraft for form and basic markings, but rely on period photos and historical context to replicate the authentic “operational finish,” field modifications, and weathering that tell the aircraft’s true story.
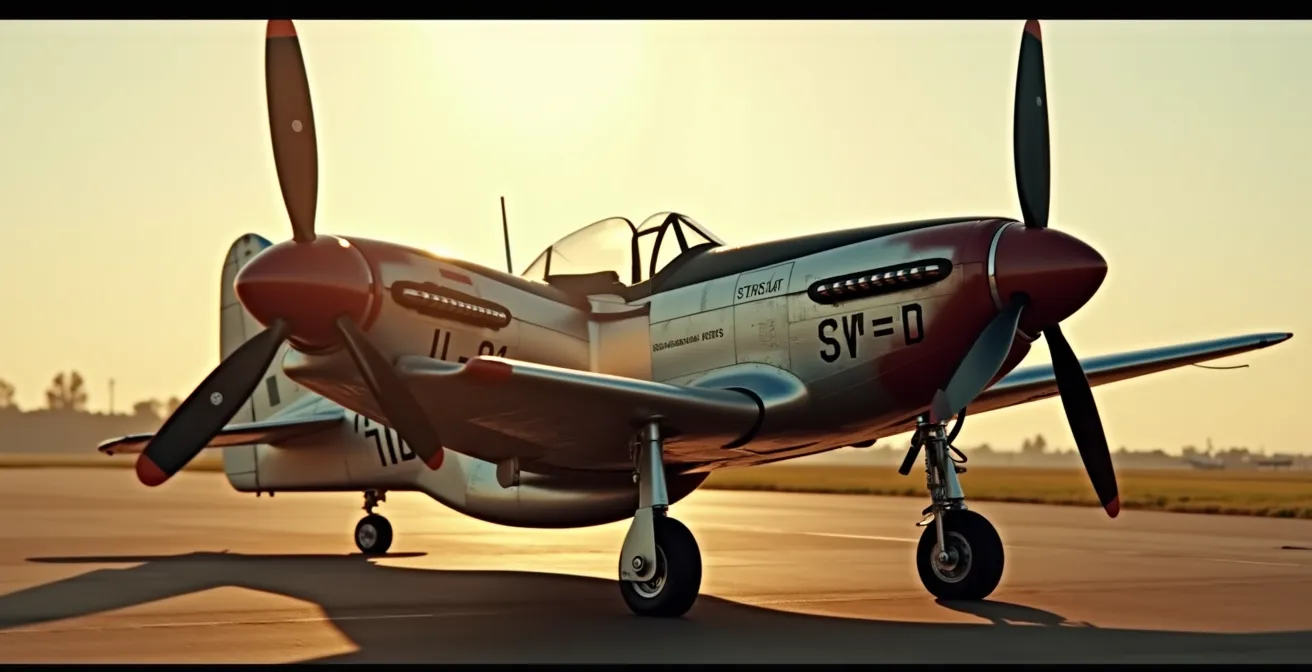
You’ve found it: the perfect project. A P-51D Mustang, flown by an ace. You have the kit, the decals, and two key references. The first is a set of crisp, color photos of the exact same aircraft, beautifully restored and gleaming in a museum. The second is a grainy, black and white snapshot from 1944, showing the plane on a muddy airfield in England. The problem? They look like two different machines. The museum plane has a mirror-like shine and strange little antennas; the wartime photo shows a dull, battle-worn workhorse. Which one is the “truth”?
Many modelers face this dilemma, often defaulting to the idea that “period photos are always right” or that “museums make mistakes.” The reality, as any living history curator knows, is far more nuanced. An aircraft that flew in combat and one that flies today are both authentic, but they represent different chapters of the same story. One is a weapon of war, shaped by battlefield necessity; the other is a piece of living history, constrained by modern airworthiness regulations and the goals of its restorers.
The secret to a truly masterful model lies not in blindly copying one source, but in becoming a historical detective. It’s about learning to read the evidence—understanding why a restored plane has an “Exit” sign, why its paint is a “best guess,” and why the most authentic details are often the ones that were never in the blueprints. This guide will not give you a simple answer, but something far more valuable: a framework for understanding the context behind your references, allowing you to synthesize them into a model that feels genuinely real.
This article breaks down the core discrepancies between wartime aircraft and their modern, restored counterparts. By exploring the reasons behind these differences, you will gain the critical eye needed to interpret your references and make informed decisions for your next build.
Summary: A Modeler’s Guide to Historical Aircraft References
- Why you should ignore the GPS antenna on a restored P-51 Mustang?
- War finish vs Airshow shine: why combat planes were rarely polished?
- Modern regulations: why restored planes have “Exit” signs that weren’t there in 1944?
- Why “restoration colors” are often just a modern guess (and sometimes wrong)?
- How to spot non-standard gun mounts in vintage photos that museums don’t have?
- How to Research a Specific Pilot’s Plane When Official Records Are Missing?
- Why Clean Models Look like Toys: Adding Authentic Weathering to Scale Aircraft?
- How to Research Historical Liveries When Archival Photos Are Black and White?
Why you should ignore the GPS antenna on a restored P-51 Mustang?
That small dome or blade antenna on a restored warbird, which is glaringly absent from all wartime photos, is the most visible example of a “regulatory anachronism.” It’s not a mistake or a restorer’s whim; it’s a legal necessity. For a historical aircraft to be airworthy today, it must be able to navigate and communicate safely within a modern airspace system. This introduces a fundamental conflict between historical purity and operational reality.
The governing principle is that these flying artifacts must coexist with modern air traffic. An analysis of aviation rules confirms that 100% of restored warbirds flying in controlled airspace must meet FAR 91 requirements. These Federal Aviation Regulations mandate specific equipment for flight, especially under instrument flight rules (IFR) or in busy terminal areas. This means that even the most meticulously restored Spitfire or Corsair must carry some modern technology.
For the modeler, this means learning to identify and consciously omit these modern additions. They are part of the aircraft’s current life as a piece of living history, not its operational past. Key anachronisms to look for include:
- GPS antennas: Essential for modern navigation and airspace compliance.
- Modern radio/comm antennas: Required for communication with air traffic control.
- Modern transponders: Which broadcast the aircraft’s position and altitude to radar systems.
- Additional formation or strobe lights: Often brighter LEDs used for enhanced visibility and safety during airshow displays.
When you see these on a restored warbird, recognize them for what they are: a passport to the 21st-century sky. For your 1944-era model, they should be the first details you decide to leave in the box. This act of selective omission is your first step toward true historical accuracy.
War finish vs Airshow shine: why combat planes were rarely polished?
One of the most jarring differences between a restored warbird and its wartime counterpart is the finish. Airshow aircraft often sport a deep, lustrous shine, with paintwork that looks like it belongs on a luxury car. In contrast, period photos reveal aircraft with a distinctly matte, utilitarian appearance. This isn’t just due to dirt and wear; it’s because the concept of an “operational finish” was fundamentally different.
During the war, paint on a combat aircraft served two purposes: camouflage and aerodynamic smoothness. A high-gloss finish was undesirable as it could reflect sunlight, betraying the plane’s position to the enemy. Paints were formulated to be non-specular (non-reflective). Furthermore, paint was applied quickly and efficiently on factory lines. Quality control was focused on coverage and durability, not on achieving a perfect, mirror-like surface. Stripping down original airframes during restoration often reveals that wartime finishes were applied rapidly with varying levels of quality.
The image above illustrates the lifecycle of an operational finish. A plane might leave the factory with a relatively clean, even coat of olive drab, but once it reached an operational squadron, its appearance changed dramatically. Ground crews, working in harsh conditions with limited resources, were concerned with keeping the aircraft mechanically sound, not aesthetically pleasing. Paint touch-ups were done hastily, leading to mismatched shades and visible brush marks. The famous “bare metal” finish of later P-51s and P-47s was a weight-saving and production-speed measure, not an aesthetic choice. These aircraft were often delivered with a protective coating that was quickly scoured away by weather and cleaning, leaving a dull, oxidized aluminum surface, not a polished mirror.
Therefore, when you build your model, resist the temptation of the high-gloss varnish. An authentic war finish is characterized by its dullness, its subtle imperfections, and its evidence of a hard-working life. That “airshow shine” is for celebrating history; the operational finish is for representing it.
Modern regulations: why restored planes have “Exit” signs that weren’t there in 1944?
Beyond the obvious GPS antennas, a host of smaller, subtler modifications are made to restored warbirds to satisfy modern safety standards. The small “EXIT” placard you might see inside the canopy of a restored P-47 is a perfect example. While no 1944-era pilot needed a sign to know how to bail out, today’s regulations, especially for aircraft that may carry passengers (even for a short flight), mandate such markings for airworthiness certification.
These changes are not arbitrary. They are driven by a fundamental shift in the aircraft’s purpose: from a disposable weapon of war to a precious, irreplaceable historical artifact that must be operated with maximum safety. As one expert on the WW2Aircraft.net forums notes, the exact equipment can vary, but the legal obligation is absolute. He states:
Many operators will put new radios and GPS on their aircraft. There is nothing specific about what type of equipment they must have, as long as they meet the minimum requirements of FAR 91 for day VFR, night VFR, and or instrument flight.
– WW2Aircraft.net Forum Expert, WW2Aircraft.net Forums Discussion
This principle extends far beyond simple placards. Restorers must often integrate modern fire-suppression systems in engine bays, install contemporary seat belts and harnesses, and even reinforce certain structural elements to account for metal fatigue accumulated over 80 years. These modifications are almost always internal and invisible to the public, but they underscore the reality that a flying warbird is a modern machine wrapped in a historical skin.
The following table, based on information from restoration experts, categorizes these essential post-war modifications. It serves as a mental checklist for the modeler to distinguish between original design and modern necessity, as detailed in an analysis from warbird restoration specialists.
| Category | Examples | Reason |
|---|---|---|
| Safety | Fire suppression, Exit placards | FAA airworthiness requirements |
| Navigation/Communication | GPS, modern radios | Controlled airspace compliance |
| Structural | Fatigue reinforcements | Extended service life safety |
| Passenger-related | Seat belts, emergency exits | Multi-seat warbird requirements |
For the modeler, the lesson is clear: treat the restored aircraft as a brilliant, three-dimensional reference for shape, form, and general markings, but maintain a critical eye for these small but significant safety-driven intrusions. They are part of the plane’s continued story, not its original chapter.
Why “restoration colors” are often just a modern guess (and sometimes wrong)?
Choosing the “correct” color for a model is one of the biggest challenges in the hobby, and restored aircraft can sometimes muddy the waters rather than clarify them. While restorers go to incredible lengths to be accurate, the “Olive Drab” or “Azure Blue” you see on a museum piece is often a highly educated guess, a product of what can be called “color archeology.”
The process involves carefully stripping back layers of paint from an original, unrestored part of the airframe to find a protected patch of the original color. This tiny sample, which has hopefully not degraded over decades, is then used as the master reference. However, this process is fraught with challenges. The original paint may have faded, been chemically altered by fluids, or shifted in hue due to the type of primer used underneath. Furthermore, wartime paint manufacturing was not perfectly consistent; batches of “RAF Dark Green” could vary noticeably from one factory to another, or even from one month to the next.
Consequently, the color on a restored aircraft represents a single data point—the best possible interpretation based on the specific evidence found on that specific airframe. It may not represent the color of the same type of aircraft from a different production block or a different theater of war. Some restorations have famously gotten colors wrong, only to be corrected years later when new evidence emerged. The famous debate over the correct shade of blue/grey for early-war Wildcats is a prime example of this ongoing historical detective work.
A modeler’s goal should not be to find the one “perfect” shade, but to find a plausible one that fits the context of the specific aircraft being modeled. This means cross-referencing multiple sources: official paint specification documents (like Federal Standard 595 in the US), notes from other modelers, and, most importantly, a critical interpretation of wartime photos. Understanding that “restoration colors” are a good-faith effort, not gospel, frees you to make your own informed artistic and historical judgment.
How to spot non-standard gun mounts in vintage photos that museums don’t have?
Perhaps the most exciting and challenging aspect of historical modeling is recreating the unofficial, non-standard modifications made in the field. These changes, born out of a mechanic’s ingenuity or a pilot’s demand for better performance or protection, are a testament to “field expediency.” They were never documented in official blueprints and are almost always removed during a modern “by-the-book” restoration. The only place they survive is in vintage photographs.
These field modifications could range from simple additions, like extra pieces of armor plate bolted around the cockpit, to more complex changes, such as altering gun mounts to improve firing patterns or adding improvised bomb racks. For example, P-47 Thunderbolt units in the Pacific often added fins to their drop tanks to turn them into makeshift napalm bombs. Eighth Air Force fighter groups sometimes tinkered with gun convergence settings, which isn’t visible but was a critical modification. These details tell the unique story of a specific squadron or even a single aircraft.
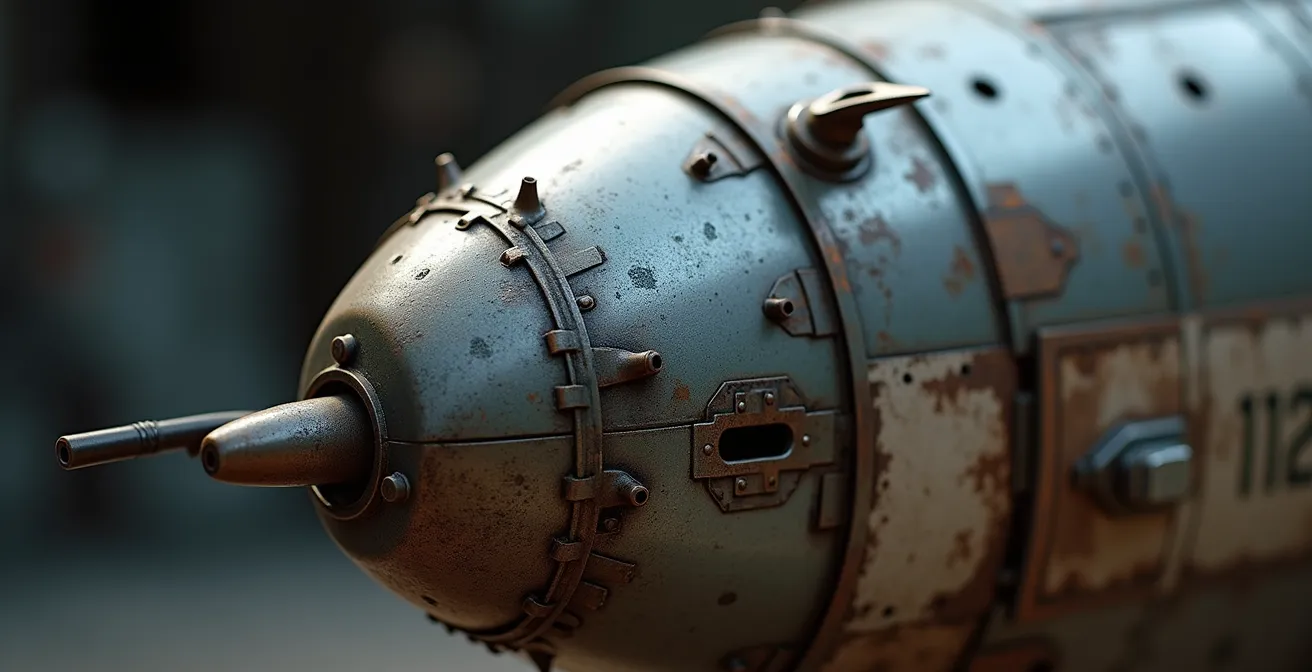
Spotting these modifications requires a keen eye and a forensic approach to photo analysis. You are not just looking at the plane; you are looking for deviations from the norm. Compare the photo to factory-standard drawings. Look for unusual lumps, bumps, or brackets. Pay attention to mismatched paint or rough weld marks, as seen in the detail shot above. These are the fingerprints of field expediency. A restored aircraft, by its very nature, aims to represent the factory-standard “platonic ideal” of the machine, erasing these beautifully imperfect but historically vital details.
For the modeler, hunting for these details is the path to a truly unique and authentic build. It transforms the model from a generic representation of a type into a portrait of a specific, battle-hardened machine. Here is a plan for analyzing your photo references to uncover these hidden stories.
Action plan: Analyzing field modifications in photos
- Compare multiple angle photos of the same aircraft serial number to confirm the modification’s shape and placement.
- Study shadow patterns and light reflections to confirm that a feature is a three-dimensional addition and not just a paint marking or stain.
- Check for lens distortion effects, especially at the edges of older photos, which can alter the appearance of shapes.
- Cross-reference with squadron maintenance records or pilot diaries if available; these sometimes mention unofficial changes.
- Distinguish battle damage (dents, holes) from intentional modifications (welded plates, added brackets).
How to Research a Specific Pilot’s Plane When Official Records Are Missing?
So you’ve decided to model the aircraft of a specific pilot, but official records are sparse or missing. This is a common problem, as combat records were often lost, destroyed, or never fully detailed. This is where the modeling community itself becomes one of the most powerful research tools. You must shift from being a passive consumer of information to an active historical researcher.
The first step is to move beyond broad internet searches and dive into specialized communities. Online forums like Britmodeller, Hyperscale, and the forums of historical aircraft societies are treasure troves of collective knowledge. These communities are filled with veteran researchers, amateur historians, and even descendants of pilots who have spent decades piecing together information. Posting a specific query, such as “Looking for photos of P-38J ‘Marge’ flown by Capt. Richard Bong in late 1944,” can often yield photos, decal sources, or leads you would never find otherwise. This demonstrates how modelers often uncover historical details through community research and cross-referencing multiple unofficial sources.
The second avenue is to search for the pilot’s unit or squadron association. Many of these groups maintain websites, newsletters, or Facebook groups. These are invaluable for finding squadron-specific markings or connecting with veterans and their families. When a pilot’s personal logbook or photo album is found, it often contains the “Rosetta Stone” for a modeler: a clear shot of the nose art, a note on a strange modification, or the correct serial number.
Finally, think laterally about records. If the official combat reports are a dead end, check squadron morning reports, maintenance logs, and even the pilot’s hometown newspaper archives. Local papers during the war often published stories about their hometown heroes, sometimes including photos of them with their aircraft. This process is slow and meticulous, but finding that one missing piece of the puzzle to create a truly personal and accurate tribute to a specific pilot is one of the most rewarding experiences in scale modeling.
Why Clean Models Look like Toys: Adding Authentic Weathering to Scale Aircraft?
After all the painstaking research into colors, markings, and modifications, the final step that separates a good model from a great one is weathering. A model built straight from the box with a pristine paint job, no matter how accurate the colors, often looks sterile and artificial—it looks like a toy. An authentic aircraft, especially one in a combat zone, is a product of its environment. Weathering is the art of telling that story on your model’s surface.
Think of weathering not as “making the model dirty,” but as replicating the effects of reality. The “operational finish” was the starting point, but the story was written by engine exhaust, leaking fluids, chipping paint, and the scuffing boots of pilots and ground crew. Exhaust stains trailing back from the engine cowlings are a classic example. Their color and intensity depended on the engine type and fuel mixture, ranging from light grey to sooty black. Oil and hydraulic fluid leaks would create dark, glossy streaks, always following the direction of airflow.
Paint chipping is another critical element. On metal panels that were frequently opened for maintenance—like gun bays or engine access hatches—paint would quickly chip away at the edges, revealing the zinc chromate primer or bare metal underneath. The leading edges of wings and propeller blades would be sandblasted by dust and debris, especially on aircraft operating from rough, unpaved airfields. Foot traffic would wear away paint on the wing roots where pilots and crew climbed into the cockpit.
The key is subtlety and logic. The weathering should be consistent with the aircraft’s operational environment. A plane based in the dusty deserts of North Africa would have different wear patterns than one operating from a muddy field in England or a coral airstrip in the Pacific. By observing these patterns in wartime photos and applying them thoughtfully, you transform your model from a static replica into a miniature piece of living history, capturing a moment in time and telling the story of its service.
Key Takeaways
- Restored, airworthy warbirds are legally required to have modern equipment (GPS, radios), making them anachronistic references for wartime configurations.
- Wartime aircraft had dull, non-reflective “operational finishes” for camouflage; the high-gloss shine of airshow planes is a modern aesthetic choice.
- Field modifications (improvised armor, custom weapon mounts) were common in combat but are absent from “by-the-book” restorations, existing only in period photos.
How to Research Historical Liveries When Archival Photos Are Black and White?
Interpreting color from a black and white photograph is one of the ultimate challenges for a historical modeler. It’s a process filled with pitfalls, where a red can look black and a yellow can look almost identical to a light blue. Relying on guesswork is a recipe for inaccuracy. The key is to understand the technical properties of the photographic film used during the era.
Most black and white film used during WWII fell into two categories: Orthochromatic and Panchromatic. Each type of film was sensitive to the light spectrum in different ways, dramatically altering how it rendered colors as shades of gray. Orthochromatic film, common in the earlier years of the war, was insensitive to red light. This means any red markings—like the red center of a US national insignia before 1943 or the red in a British roundel—would appear as black or very dark gray. This is a crucial clue. Panchromatic film, which became more common later, was sensitive to all colors, rendering them in shades of gray that are closer to what our eyes perceive in terms of brightness.
This technical knowledge allows you to move from guessing to deduction. By comparing the gray tones of known colors in a photo (like the national insignia) to the unknown color of a squadron marking or piece of nose art, you can make an educated inference. As this guide to analyzing film types shows, the differences can be stark.
| Film Type | Red Rendering | Blue Rendering | Yellow Rendering |
|---|---|---|---|
| Orthochromatic | Very dark gray/black | Light gray | Light to medium gray |
This table provides a powerful diagnostic tool. If you are looking at a photo of an early-war P-40 and the red dot in the center of the star is black, you are likely looking at an orthochromatic image. If the blue in that same insignia appears very light, it reinforces that conclusion. You can then apply that logic to interpret other colors on the aircraft. This forensic, evidence-based approach is the only reliable way to translate the ghostly grays of the past into the vibrant colors of your model.
Frequently Asked Questions on Restored Warbirds vs Wartime Photos: Which Reference Source Should You Trust?
What online communities are best for warbird research?
Forums like Britmodeller, Hyperscale, and specialized historical aircraft societies offer valuable community intelligence from experienced researchers. These platforms are excellent for asking specific questions and finding obscure information that isn’t available in mainstream sources.
How can I find pilot descendants for information?
Search specialized Facebook groups dedicated to specific squadrons or aircraft types, as well as genealogy sites. When you make contact, approach descendants respectfully and with a clear purpose, as they often possess private photo albums, logbooks, and diaries containing invaluable details.
What alternative records should I check?
Squadron morning reports, maintenance logs, and even hometown newspapers from the wartime period often contain specific details not found in official combat records. Newspapers, in particular, sometimes published photos of local pilots with their aircraft that are not widely circulated.