Building a model of a prototype aircraft presents a unique challenge that goes far beyond standard assembly. Unlike mass-produced subjects with abundant documentation, experimental airframes require a forensic engineering mindset. Success hinges not on the quality of the kit, but on the modeler’s ability to rigorously investigate, validate conflicting data, and accurately reconstruct a specific, often fleeting, configuration from a moment in aviation history. This guide reframes the process as one of research and problem-solving first, and construction second.
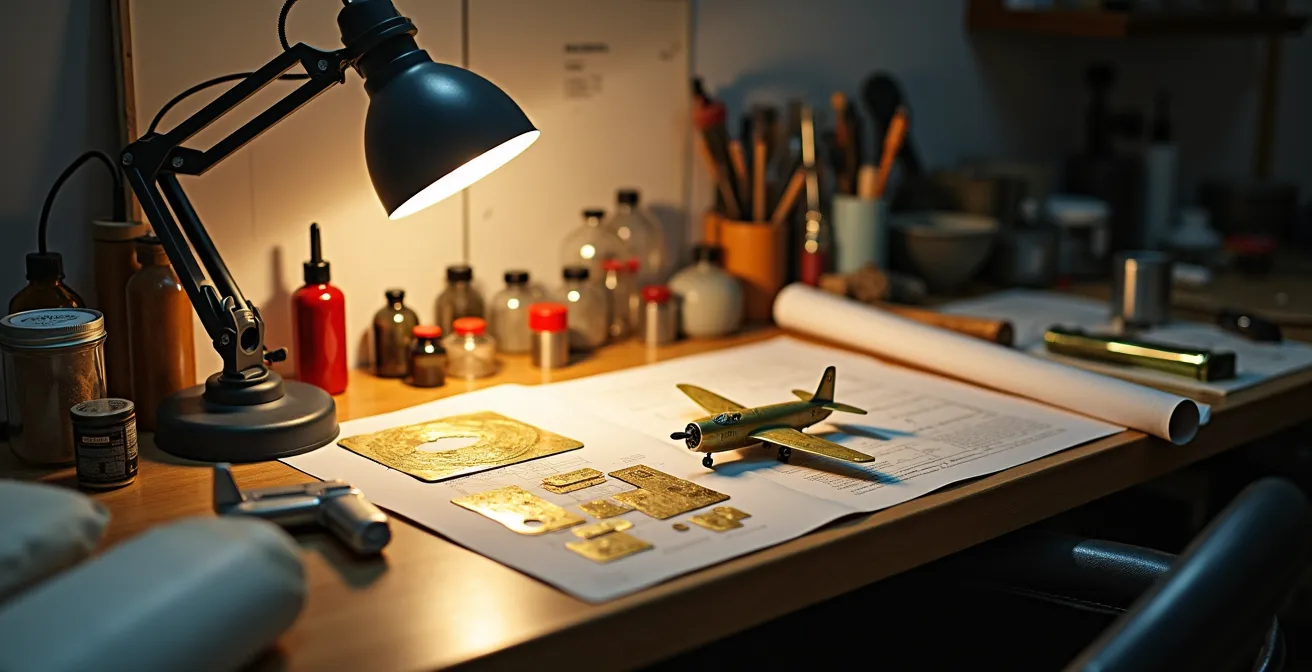
For many scale modelers, the allure of an experimental aircraft is irresistible. These “X-planes” and one-off test-beds represent the bleeding edge of aerospace innovation—raw, unrefined, and often draped in striking high-visibility markings. Yet, tackling such a project often leads to frustration. The standard approach of following kit instructions is quickly revealed as inadequate when confronted with parts that don’t match reference photos, missing decals, or a complete lack of guidance on the unique lumps and bumps that define a prototype.
The common advice—to simply “scratch-build” or “use more putty”—misses the fundamental point. The real work in modeling a prototype isn’t in the physical construction, but in the investigative process that precedes it. These models are not just plastic kits; they are historical artifacts in miniature. Their configurations were fluid, changing from one test flight to the next. A sensor boom might be added, a wing-glove modified, or a tail surface altered. The challenge, and the reward, lies in capturing a precise moment in that developmental timeline.
But if the core of the project is research, where does one even begin? This is where we must shift our perspective from that of a hobbyist to that of a flight test engineer. The key is not to find the perfect kit, but to build a validated data file on your subject. It’s an exercise in forensic engineering, piecing together evidence from disparate and often contradictory sources to establish a definitive “configuration baseline” for your model. This is the true nature of building prototypes: it’s less about assembly and more about rigorous, rewarding detective work.
This guide explores the essential techniques and mindset required to navigate the world of prototype modeling. We will cover how to evaluate a subject’s value, master unique painting and fabrication challenges, and, most importantly, how to conduct the research needed to transform a box of plastic into an accurate piece of aerospace history.
Summary: Modeling Prototype Aircraft: A Guide to Research and Accuracy
- Phase 1 vs Phase 2:Military vs Civil Aircraft Models: Which Collection Retains Value Better?
- Orange and White: how to paint high-visibility test schemes without brush strokes?
- How to make pitot booms and sensor vanes from hypodermic needles?
- Fact vs Fiction: drawing the line between a paper project and a flown prototype
- Where to find “Experimental” stencils when no kit provides them?
- How to Research a Specific Pilot’s Plane When Official Records Are Missing?
- How to Align Fuselage Halves Perfectly When the Kit Is Warped?
- How to Paint Pure White Fuselages Without Dust Inclusions?
Phase 1 vs Phase 2:Military vs Civil Aircraft Models: Which Collection Retains Value Better?
The decision to model a prototype over a production variant is often driven by a desire for a unique subject, but it also has implications for a collection’s long-term value. Unlike mass-market kits of famous aircraft like the P-51 Mustang or F-16 Falcon, prototype models occupy a specialized niche where rarity and historical significance are paramount. The value of these models is intrinsically linked to the depth of research required to build them accurately, creating a high barrier to entry that fuels collector interest.
Phase 1 prototypes—the very first airframes to fly—typically command the highest interest among specialists. These are often dramatically different from their production counterparts and exist in a data-poor environment, making an accurately built model a testament to the builder’s skill and dedication. Military prototypes, especially those from secretive “X-plane” or “black” projects, carry a particular mystique that enhances their value. Civil prototypes, like early Boeing or Douglas test-beds, also have a strong following, though the research often requires digging into corporate archives rather than declassified government files.
Ultimately, a model’s value retention is a direct function of its accuracy and the difficulty of the research involved. A well-executed model of a little-known experimental craft, backed by solid documentation, will almost always be more valuable than a perfectly built but common production aircraft. The following table breaks down these dynamics, highlighting how collector interest correlates with the research effort involved.
This comparative analysis from a recent market overview demonstrates the relationship between model type and collector value.
| Model Type | Market Value Retention | Research Depth Required | Collector Interest |
|---|---|---|---|
| Production Variants | Stable (mass-produced) | Moderate | Wide audience |
| Phase 1 Prototypes | High (rarity factor) | Extensive (limited sources) | Specialists only |
| Civil Prototypes | Moderate-High | Corporate archives needed | Niche collectors |
Choosing a prototype is therefore a commitment not just to a build, but to a research project. The financial and historical value of the final piece is a direct reflection of that investigative effort.
Orange and White: how to paint high-visibility test schemes without brush strokes?
One of the most defining visual characteristics of prototype aircraft is the use of high-visibility paint, particularly combinations of gloss white and fluorescent orange. This isn’t just for aesthetics; these schemes are engineered for optimal tracking by optical instruments and chase planes during flight tests. The use of this bold color scheme was formalized in the aerospace industry, with historical records showing that a 1959 study officially recommended orange for marking test vehicles. Replicating this finish without brush strokes, streaks, or a “thick” appearance is a significant technical challenge for the modeler.
The key to a flawless high-visibility finish lies in surface preparation and paint selection. Bright colors like orange and yellow have notoriously poor opacity. Applying them directly over grey plastic will result in a muted, uneven tone. The solution is to use a dedicated primer. A light grey or even pink primer can dramatically improve the vibrancy of the final orange coat, requiring less paint and preserving fine surface detail. For the white areas, a specialized white primer is non-negotiable, as it provides a pure, dense base that standard primers cannot match.
The choice of paint is equally critical. For achieving a perfectly smooth, self-leveling finish, lacquer-based paints are superior to acrylics or enamels. Brands like Mr. Color and MRP (Mr. Paint) are formulated to be airbrushed in very thin layers. The technique is to build up the color with multiple, light “mist” coats, allowing a few minutes for the paint to “flash off” (partially dry) between applications. This prevents paint from pooling or running. Once the color is built up, a high-gloss automotive-grade clear coat provides the final, pristine sheen seen on real test aircraft, as shown in the process below.
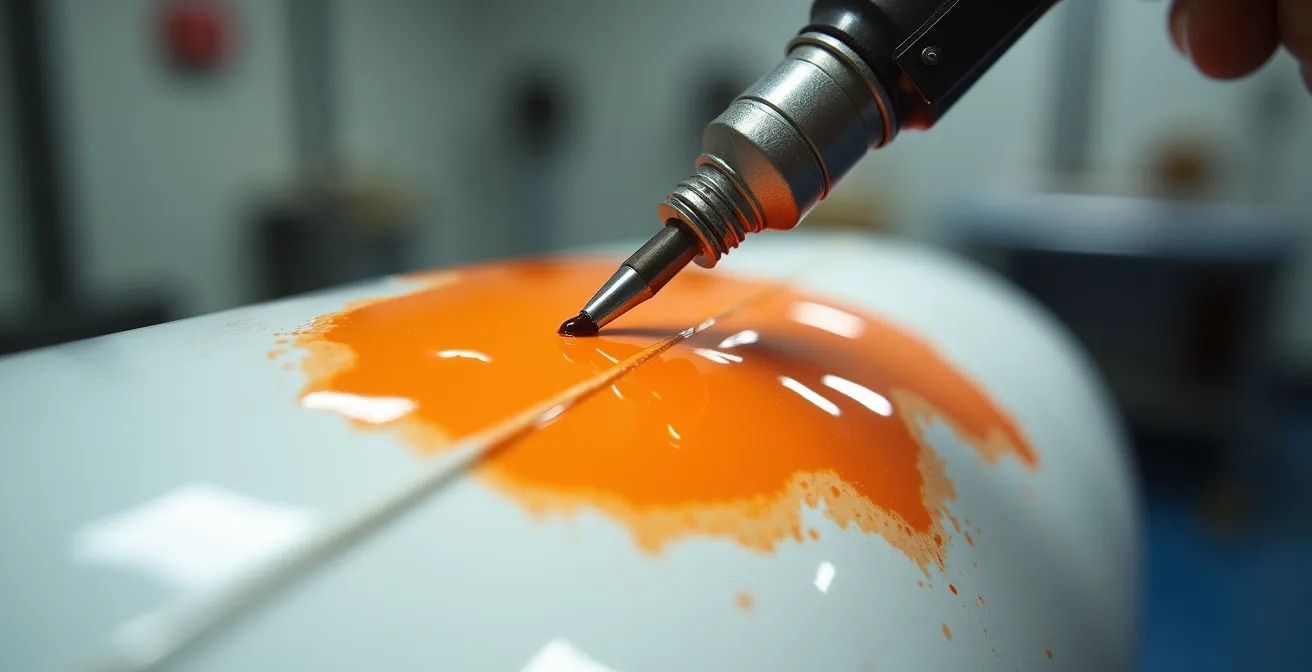
As this visualization of the technique demonstrates, the goal is a thin, even application that allows the color’s own properties to create a smooth surface. This methodical, layered approach is the only way to replicate the glass-like finish of a real-world flight test article.
By treating the painting process with the same precision as an aerospace finishing shop, you can transform your model’s appearance from a simple paint job to an authentic replication of a flight test vehicle.
How to make pitot booms and sensor vanes from hypodermic needles?
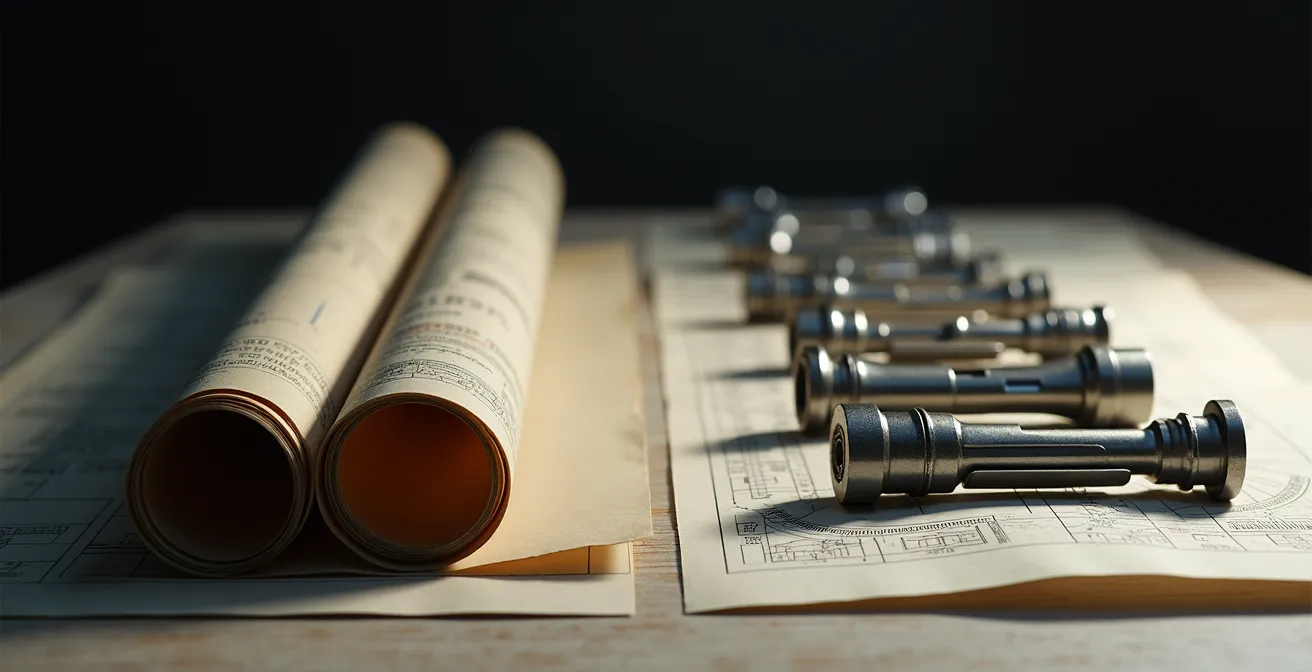
Prototypes are defined by their instrumentation. Long pitot booms, delicate sensor vanes, and temperature probes are not optional details; they are the very reason for the aircraft’s existence. Unfortunately, kit-supplied plastic parts for these components are almost always oversized, fragile, and lacking in realism. The professional solution is to fabricate them from metal, specifically stainless steel hypodermic tubing and needles. This material offers superior strength, a sharp appearance, and the correct hollow cross-section that plastic can never replicate.
The core of this technique is selecting the correct diameter tubing for the scale. Hypodermic needles are measured in “gauge,” with a higher number corresponding to a smaller diameter. For example, a 30-gauge needle has an outside diameter of approximately 0.3mm, making it ideal for a 1/72 scale pitot tube, while a thicker 25-gauge (0.5mm) needle might be appropriate for a 1/48 scale model. Accessing a reference chart that converts gauge to millimeters is essential for accurate selection. It transforms the process from guesswork to a precise engineering choice based on scaled-down measurements from the real aircraft.
Working with this material requires a specific set of techniques. Needles cannot be cut with standard sprue cutters, which will crush the hollow tube. Instead, the tube should be rolled firmly under a fresh, sharp hobby blade until it snaps cleanly. The tip can then be deburred and sharpened with a micro-file or fine-grit sandpaper. To create the small airfoil-shaped sensor vanes often seen on these booms, thin brass sheet or spare photo-etch fret can be carefully cut and soldered or glued with cyanoacrylate (CA) adhesive. This hybrid metal construction results in a detail part that is both incredibly realistic and durable enough to withstand handling.
The following steps provide a repeatable workflow for fabricating these critical components:
- Select the appropriate gauge needle based on your scale and reference photos (e.g., 30-gauge for 1/48, 33-gauge for 1/72).
- Roll the needle under a fresh No. 11 blade on a hard surface to score and cut it cleanly without crushing.
- Carefully deburr the cut end using a fine-grit sanding stick or a needle file.
- If necessary, insert a solid brass wire as a mounting pin for a stronger connection to the model’s airframe.
- For complex sensor arrays, build a support structure from thin polystyrene sheet to ensure proper alignment.
- Fabricate and attach any associated sensor vanes using thin brass sheet or photo-etch parts, affixed with CA glue.
By adopting this “material science at scale” approach, you can create instrumentation details that elevate your model from a simple replica to a convincing miniature of a real-world data-gathering machine.
Fact vs Fiction: drawing the line between a paper project and a flown prototype
The world of experimental aircraft is filled with a spectrum of subjects, ranging from aircraft that flew hundreds of test flights to concepts that never left the drawing board. For the modeler, the first and most critical act of research is to determine exactly where on this spectrum their chosen subject lies. Was it a fully-functional, flown prototype, or a “paper project” representing a design that was never built? This distinction is fundamental, as it dictates the entire approach to the build, from the level of detail to the weathering and finishing. A flown aircraft will have evidence of use; a paper project is a study in pristine, theoretical form.
The NASA X-plane program provides the quintessential definition of this philosophy. These were not pre-production machines but pure research vehicles. As the NASA Armstrong Flight Research Center explains, the goal was to push boundaries, free from commercial or military production requirements. This distinction is crucial for the modeler.
Rather, they established the concept of the research aircraft built solely for experimental purposes, unhampered by any military or commercial requirements or expectations of being produced in large numbers. Although subsequent X-planes were built for a wide range of purposes – technology or concept demonstrators, unmanned test missiles, and even as prototypes – the X-1s were built to go faster than an aircraft had ever flown before.
– NASA Armstrong Flight Research Center, X-Planes at Armstrong Historical Overview
This “forensic engineering” process involves data validation. You must cross-reference blueprints, manufacturer’s models, and artist’s concepts with actual, dated photographs. Blueprints show the design intent, but photographs show the ground truth of what was actually built and flown. Often, there are significant discrepancies. A common error is to model an aircraft based on an early, clean blueprint, while photos from its first flight show it covered in additional antennas, sensor probes, and reinforcing plates added during construction.
The ultimate goal is to establish a configuration baseline for a specific date or flight. This means finding a photo of the aircraft on the day you wish to model it and using that as your primary reference, treating blueprints and other drawings as secondary, supporting information. If no photos of a flown airframe exist, then you are building a model of a concept, and it should be finished as such—clean, unweathered, and representing an idea rather than a working machine.
Without this crucial step of verification, a modeler risks creating a fantasy piece—a hybrid of design concepts and production features that never co-existed on a real airframe.
Where to find “Experimental” stencils when no kit provides them?
Once you have established the correct configuration of your prototype, the next major hurdle is markings. Mainstream kit manufacturers rarely include the specific decals for one-off test aircraft. Markings like the iconic “EXPERIMENTAL” stencil, flight test instrumentation calibration marks, or temporary logos are almost always missing. This leaves the modeler with two primary options: source them from a specialized aftermarket supplier or create them from scratch. Both paths require a degree of research and specific techniques to achieve a professional result.
The most direct route is to seek out aftermarket decal companies that cater to this niche. Small, specialized producers like Caracal Models, Fundekals, and Vingtor Decals have built their businesses on serving modelers of rare and experimental subjects. They often produce small, limited-run decal sheets that provide the historically accurate stencils and unique markings that mainstream manufacturers ignore. These sheets are typically based on extensive research and are the go-to solution for achieving accuracy with minimal fuss, provided a sheet exists for your specific subject.
If no aftermarket option is available, you must create the decals yourself. This is less daunting than it sounds, thanks to modern tools. The process begins with high-quality reference imagery. You can then use free vector graphics software like Inkscape to trace the required markings or match the fonts using online identification tools. For colored markings, this artwork can be printed onto special clear or white decal paper using a standard inkjet printer. For white or metallic text, which inkjet printers cannot produce, the best option is to have them custom-printed as dry transfers by a service like Archer Fine Transfers. A thin clear coat must be applied over inkjet decals to protect the water-soluble ink before application.
This DIY approach offers ultimate flexibility, allowing you to replicate any marking for which you can find a clear reference. The workflow is as follows:
- Find clear reference photographs of the exact markings needed.
- Use vector software (e.g., Inkscape) to trace the artwork or recreate it using identified fonts.
- For colors, print the artwork onto clear inkjet decal paper. For white text, consider custom dry transfers.
- If using inkjet, seal the printed decal sheet with a light coat of decal film liquid or acrylic clear spray.
- Apply the custom decals as you would any other kit-supplied marking.
Whether you choose to buy or create, solving the decal problem is a critical step that brings authenticity and life to your experimental aircraft model.
How to Research a Specific Pilot’s Plane When Official Records Are Missing?
Modeling a prototype as it was flown by a specific test pilot adds another layer of historical depth, but it also presents a significant research challenge. Official records may be incomplete, classified, or simply non-existent. Standard archives might document the airframe’s test program, but they often omit the personal details that distinguish one pilot’s mission from another. To uncover this information, you must move beyond traditional sources and employ alternative, more creative research methods—acting as a historian and journalist.
The first step is to focus on the human element. Test pilot memoirs and autobiographies are invaluable resources. While a pilot may not detail every switch in the cockpit, they often recall significant events, personal markings applied to the aircraft, or unique configurations used for a record-breaking flight. These personal accounts provide context and clues that are absent from dry technical reports. Similarly, oral history projects, such as those maintained by the Flight Test Historical Foundation, can contain hours of interviews with pilots and ground crew, filled with anecdotal details perfect for a modeling project.
Another crucial avenue is photography from unofficial sources. While official manufacturer photos are often sterile, images taken by ground crew, other pilots, or even family members can reveal a wealth of information. Look for informal “walk-around” shots on the flight line, post-flight celebrations, or in the background of other events. These photos often capture temporary markings, mission symbols, or even the pilot’s name stenciled on the canopy rail—details that were never part of the official documentation but are essential for personalizing the model. Cross-referencing these findings with declassified post-flight debriefing notes or pilot logs in national archives can help confirm dates and specific aircraft serial numbers.
When official records fail, this systematic approach to alternative sources is your best strategy. It requires patience and a willingness to follow leads across different media, but the reward is a model that tells a unique and personal story.
Action Plan: Researching a Test Pilot’s Aircraft
- Pilot Memoirs: Search for autobiographies and memoirs written by the test pilot or their contemporaries for personal accounts and flight details.
- Oral Histories: Access archives like the Flight Test Historical Foundation’s oral history collection for recorded interviews with pilots and crew.
- Manufacturer Archives: Check the photographer archives of major manufacturers (e.g., Boeing, Lockheed Martin) for less-formal, unpublished images.
- Informal Photos: Look for personalization details (nose art, names on canopy) in personal photos, enthusiast websites, and social media groups.
- Debriefing Notes: Cross-reference findings with post-flight debriefing notes or pilot logs, which can sometimes be found in national archives.
- Pilot Associations: Contact test pilot associations or alumni groups, as they may hold unpublished materials or be able to connect you with knowledgeable individuals.
By shifting your search from the machine to the person who flew it, you can piece together the story and details needed for a truly unique and historically significant model.
How to Align Fuselage Halves Perfectly When the Kit Is Warped?
One of the most common and frustrating problems encountered with limited-run or older resin kits of prototype aircraft is part warpage. Unlike modern, precision-molded kits, these often suffer from distortions caused by the casting process or improper storage. A warped fuselage can seem like a project-ending flaw, but with a systematic, structural approach, it can be corrected. The key is not to force the parts together with glue and hope for the best, but to reshape the parts and reinforce them internally before assembly.
The first line of attack for warped resin parts is heat. Resin becomes pliable when warmed. Submerging the warped fuselage half in hot water (not boiling, which can damage the resin) for a few minutes will soften it enough to be gently reshaped by hand. Once you have bent it back into its correct form—or even slightly past it—immediately plunge it into cold water. This will “shock” the resin and lock it into its new, correct shape. This process may need to be repeated a few times for severe warps, but it is remarkably effective.
For persistent warps or to ensure perfect alignment during gluing, internal bracing is the ultimate solution. This involves creating a series of internal bulkheads or “formers” from thick styrene sheet (0.5mm to 1.0mm is ideal). Cut several tabs of plastic that match the internal cross-section of the fuselage at various points. These bulkheads are then glued inside one fuselage half. When the other half is joined, these formers act as an internal skeleton, forcing the warped parts into alignment and providing a massive increase in the gluing surface area. This technique not only corrects the warp but also creates an incredibly strong and stable fuselage assembly that will resist any future distortion.
Once the parts are corrected and braced, the final assembly should be done methodically. Use a combination of slow-setting CA glue or epoxy to allow for final adjustments. Apply pressure along the seam using a sequence of rubber bands and specialized modeling clamps, ensuring the entire length of the fuselage is held securely in its correct alignment while the adhesive cures. This combination of reshaping, bracing, and careful clamping transforms a seemingly impossible task into a manageable engineering problem.
This structural approach ensures that the foundation of your model is sound, providing the stable base needed for all subsequent detailing and finishing work.
Key Takeaways
- Prototype modeling is primarily a research and engineering challenge, not just a construction task.
- Accuracy is achieved by creating a “configuration baseline” for a specific moment in time, validated by cross-referencing photos and documents.
- Specialized techniques for painting (lacquers over primer) and fabrication (metal tubing) are essential for replicating the unique features of test aircraft.
How to Paint Pure White Fuselages Without Dust Inclusions?
Painting a model pure, gloss white is one of the most difficult finishing tasks in the hobby. White paint highlights every surface flaw, and its slow drying time and static-attracting properties make it a magnet for airborne dust and debris. For prototype models, many of which feature large white areas on the fuselage and wings, achieving a flawless white finish is a non-negotiable requirement. Success depends on a rigorous workflow focused on two things: static elimination and dust control within the painting environment.
The battle against dust begins long before any paint is sprayed. Plastic surfaces build up a static charge from handling and sanding, which actively pulls dust particles out of the air. To combat this, the model must be neutralized. Wiping the entire surface with a tack cloth will remove loose particles, but an anti-static brush, of the type used for camera lenses or vinyl records, is even better for neutralizing the surface charge itself. This simple step dramatically reduces the amount of dust that will be attracted to the model during the painting process.
Your spray environment is the next critical factor. Even a dedicated spray booth is not perfectly dust-free. A highly effective technique is to lightly mist the interior of the spray booth with water from a spray bottle just before you begin painting. The fine water mist will capture airborne dust particles and pull them down to the floor, effectively “scrubbing” the air in your immediate work area. This, combined with a properly primed surface using a dedicated white primer like Mr. Surfacer 1500 White, creates the ideal conditions for a clean paint job. Building the white with multiple thin mist coats, rather than one heavy wet coat, further minimizes the risk by reducing the time the surface remains tacky.
Even with the best preparation, a stray dust nib may find its way onto the surface. Do not attempt to wipe it away while the paint is wet. Let the paint fully cure for at least 24 hours. Then, carefully slice the top off the dust nib with the tip of a fresh, sharp hobby blade. The tiny remaining blemish can then be polished out with very fine abrasives (like 8000-grit micro-mesh). A final, thinly blended coat of white applied just to that spot will make the repair invisible.
By controlling static and your environment, you can conquer the challenge of gloss white and produce a finish worthy of a pristine, ready-for-testing experimental airframe.