The common belief that realism comes from simply adding dirt and damage is what makes models look like toys; true authenticity is achieved by telling a coherent visual story.
- Weathering isn’t a checklist of techniques, but a narrative script based on an aircraft’s specific operational history and environment.
- Effects like mud and exhaust stains must be translated to scale, not just copied, respecting physics and material science.
Recommendation: Stop thinking like a painter applying techniques and start thinking like a director staging a scene. Ask “why” for every chip and stain to build a character, not just a replica.
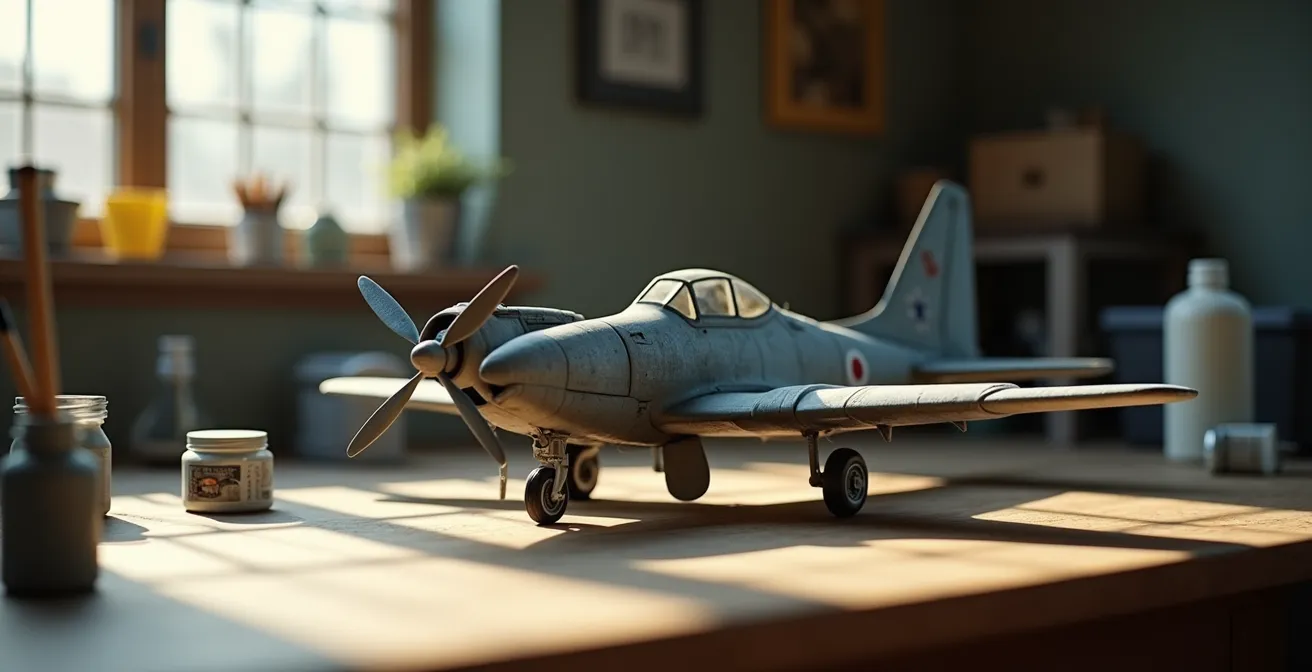
You’ve spent weeks on it. The cockpit is detailed, the canopy is crystal clear, and the decals are perfectly set. Yet, when you place your finished aircraft model on the shelf, something feels off. It’s clean, it’s precise, but it looks… like a toy. It lacks the soul, the gravitas, of the real machine. This is a common frustration for intermediate modelers who have mastered the fundamentals of construction but struggle to breathe life into their creations. The internet is filled with tutorials on applying washes, chipping paint, and streaking grime, treating weathering as a series of disconnected technical steps.
But here’s the secret: authentic weathering isn’t about applying dirt. It’s about directing a visual story. The most realistic models are not the dirtiest, but the ones whose every imperfection tells a logical and compelling tale. They have what we in filmmaking call narrative plausibility. Did this aircraft operate from a dusty desert airstrip or a corrosive carrier deck? Is that panel mismatched because it’s a recent field repair? Does the wear on the wing root tell the story of countless pilots and crew climbing aboard? A pristine model tells no story, but random, illogical weathering tells a bad one.
This guide will shift your perspective from that of a painter to that of an art director. We will move beyond the “how” of weathering techniques and dive deep into the “why.” We’ll explore how to build a character and a history for your model, grounding every effect in mechanical causality, environmental logic, and the laws of physics. You will learn to see your model not as a plastic kit, but as a protagonist in a story you control. By understanding the principles of visual storytelling, you’ll finally be able to transform that “toy” into a high-fidelity replica that feels menacing, heroic, or weary, oozing with character.
In the following sections, we will break down this directorial approach. We will explore how to translate real-world effects to scale, how to sequence your weathering for a coherent narrative, and how to research the true story of your subject, even from limited historical sources. Get ready to direct your next masterpiece.
Summary: A Director’s Guide to Authentic Aircraft Weathering
- Why Heavy Mud Looks Wrong: The Art of Scale Translation
- Chipping with Intent: Creating Wear on Wing Roots
- The Language of Liquids: Which Panel Line Washes Flow Best?
- The Aerodynamic Truth: Avoiding the Classic Exhaust Stain Mistake
- The Narrative Sequence: In What Order Should You Apply Weathering?
- Decoding History: Researching Liveries from Black and White Photos
- Beyond the Kit: What Defines a High-Fidelity Replica?
- Completing the Scene: Pairing Ground Support Equipment with Aircraft Eras
Why Heavy Mud Looks Wrong: The Art of Scale Translation
The first rule of directing a believable scene is understanding scale. A common mistake that immediately makes a model look like a toy is the direct copying of real-world textures. Heavy mud is the perfect example. On a full-sized aircraft tire, a clump of mud might be an inch thick. At 1:72 scale, that same clump would be smaller than the head of a pin—effectively just a stain, not a texture. Applying thick mud products to a small-scale model breaks the illusion because our brains know it’s disproportionate. This is where the concept of scale translation becomes critical.
Your job as a director is not to replicate reality, but to translate its *effect* into a smaller format. For instance, an analysis of WWII Pacific aircraft reveals that what looks like “mud” in photos is often atomized coral dust and hydraulic fluid. On a 1:48 scale P-51 Mustang, this translates to fine, almost translucent staining, not caked-on texture. This effect is achieved with highly thinned pigments or multiple light washes, building up layers that suggest dirt without creating a physically thick coat. The goal is to create visual weight, not physical weight.
This macro photograph highlights the difference. The incorrect application on the left uses thick, out-of-scale clumps that scream “model,” while the correct application on the right uses fine, atomized staining to suggest the same environment with narrative plausibility.
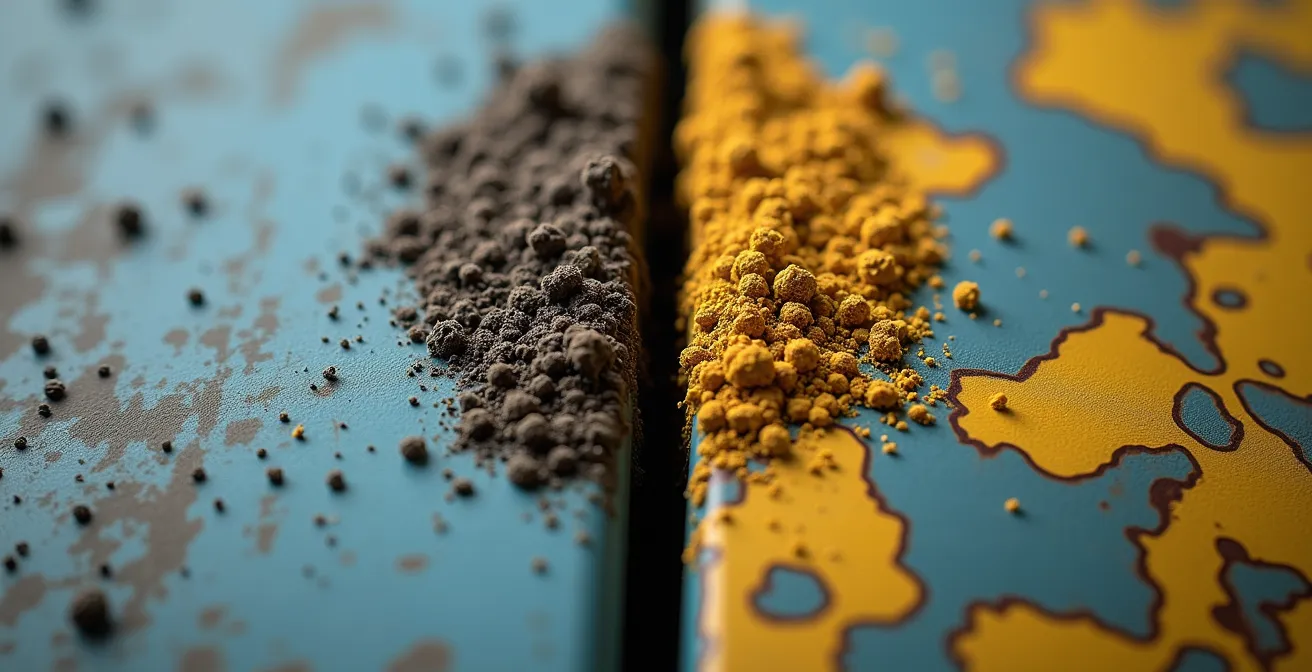
To master this, you must think in layers and differentiate environments. Red dust from the Pacific is different from the dark, greasy grime of a carrier deck or the fine sand of a desert. Each tells a different story and demands a unique approach. Key techniques include:
- Using highly thinned pigments (a 10:1 ratio of thinner to pigment is a good start) to create micro-splatters.
- Applying weathering with an airbrush at low PSI to follow the natural airflow and prop wash patterns.
- Building weathering in translucent layers to create depth, rather than applying one single, heavy, opaque coat.
- Always referencing archival photos to understand how dirt *actually* accumulates at scale, not how you imagine it does.
By shifting your mindset from copying to translating, you take the first major step away from creating toys and toward directing convincing, scale-appropriate visual stories.
Chipping with Intent: Creating Wear on Wing Roots
Once you understand scale, the next chapter in your visual story is damage. Paint chipping is a popular technique, but when applied randomly, it just looks like noise. To make it meaningful, you must understand its cause—what we call mechanical causality. Paint doesn’t just flake off; it’s worn away by specific actions. The scuffs on a wing root are the collected footprints of every pilot and crew member who has stepped there. The wear around a canopy rail is from hands resting on it. As the editorial team at Model Airplane News points out, “The key to realistic chipping is understanding that paint doesn’t flake off smoothly unless there’s a consistent wearing agent such as feet on walkways and arms resting on window rails.” This insight is your director’s note for this scene.
Therefore, you must choreograph your chipping. Before touching a brush to the model, visualize the crew’s daily routine. Where do they walk? What panels do they open most frequently? Where do tools rest during maintenance? These high-traffic areas are where chipping should be concentrated. The leading edges of wings and propellers are abraded by dust and rain in flight. Ammunition loading ports will show scratches and dings. In contrast, a large, flat fuselage panel with no access points should remain relatively pristine. This selective application tells a story of human interaction and operational life.
The choice between the hairspray technique and dedicated chipping fluids depends on the story you’re telling. Hairspray tends to create larger, more random flakes, suitable for a heavily worn aircraft operating in harsh conditions. Chipping fluids offer more control, allowing for finer, more subtle scratches that represent gradual wear. For creating the focused wear on a wing root or along a panel line, applying the fluid with a fine brush and then agitating it gives you the precision to tell a specific story of friction and use. Don’t just chip the paint; narrate the reason for its absence. Each scratch is a line in your script. As we learn from a guide on weathering from Model Airplane News, this focus on the wearing agent is what separates amateur efforts from professional results.
By grounding every chip and scratch in a logical cause, you transform random damage into a believable history, adding another layer of depth to your aircraft’s character.
The Language of Liquids: Which Panel Line Washes Flow Best?
Every aircraft is a map of seams and panels. Highlighting these lines is essential for creating a sense of scale and complexity, but this is another area where the wrong choice can ruin the story. Panel line washes are not just about making lines dark; they are about simulating the accumulation of grime, oil, and dust that naturally gathers in these recesses. The medium you choose dictates how well this story is told. While acrylic washes are convenient, they often dry too quickly and can stain the surrounding surface, creating a messy, toy-like effect. For a truly professional finish, especially over a robust acrylic gloss coat, nothing performs like an oil-based wash.
The superiority of oils lies in their slow drying time and low surface tension. As demonstrated in Jim Hiller’s masterful work on a Der Jet Grumman EA-6B Prowler, a properly thinned oil wash (using mineral spirits or a dedicated thinner) flows effortlessly into panel lines via capillary action. It follows the path of least resistance, just as real grime would. Crucially, the gloss coat acts as a barrier, allowing any excess wash to be easily wiped away with a clean brush dampened with thinner, leaving only the crisp, sharp line behind. This gives you immense control to be selective. You can apply a heavier wash around engine panels and hydraulic actuators where grime is heaviest, and a lighter one on general airframe surfaces. You can even leave a freshly “replaced” panel clean to add a powerful narrative detail of recent maintenance.
Color choice is another part of the script. A universal black wash is a mistake; it’s too stark and looks unnatural on most schemes. Your wash color must be dictated by the aircraft’s environmental logic:
- For desert aircraft: A raw umber or light brown wash convincingly simulates accumulated dust.
- For naval aircraft: A dark grey-green wash suggests the mix of salt spray, grease, and hydraulic fluid common on carrier decks.
- For winter schemes: A light grey wash provides subtle contrast on dark surfaces, mimicking frost and light dust.
- Custom Mixes: Never be afraid to mix custom tones. The goal is a subtle contrast, not a stark black grid.
By using oil washes and choosing your colors with narrative purpose, your panel lines cease to be just lines; they become the veins of your aircraft, channeling its history and operational environment.
The Aerodynamic Truth: Avoiding the Classic Exhaust Stain Mistake
Few weathering effects are as prominent or as frequently done wrong as exhaust stains. The typical mistake is to airbrush a simple, straight black line behind the exhaust stack. This defies the laws of physics and aerodynamics, immediately shattering the illusion of realism. An aircraft in flight is a dynamic object battling immense forces. The exhaust doesn’t just flow backward; it’s violently twisted and shaped by the propeller wash and the airflow over the fuselage and wings. To direct this scene correctly, you must become a student of fluid dynamics.
Consider the subject. The exhaust from a jet engine is very different from that of a piston engine. Wartime analysis of aircraft like the B-17 Flying Fortress reveals that exhaust stains follow complex spiral patterns, dictated by the powerful prop wash. They are also not a single color. A stain is a layered story: a brownish-grey base from unburnt fuel, darker oily streaks from engine wear, and a light grey outer haze from lead deposits in the fuel. The intensity of this stain is a direct report on the engine’s health; a new engine runs clean, while a high-hour engine nearing overhaul will leave a dense, dark trail. Furthermore, scale modeling analysis shows that radial engines produce exhaust temperatures of 1,400°F, creating turbulent stains that can extend much further than one might expect.
This diagram visualizes how airflow dictates the path of exhaust. The stain is not a straight line but a complex shape that hugs the contours of the aircraft, guided by the forces of flight.
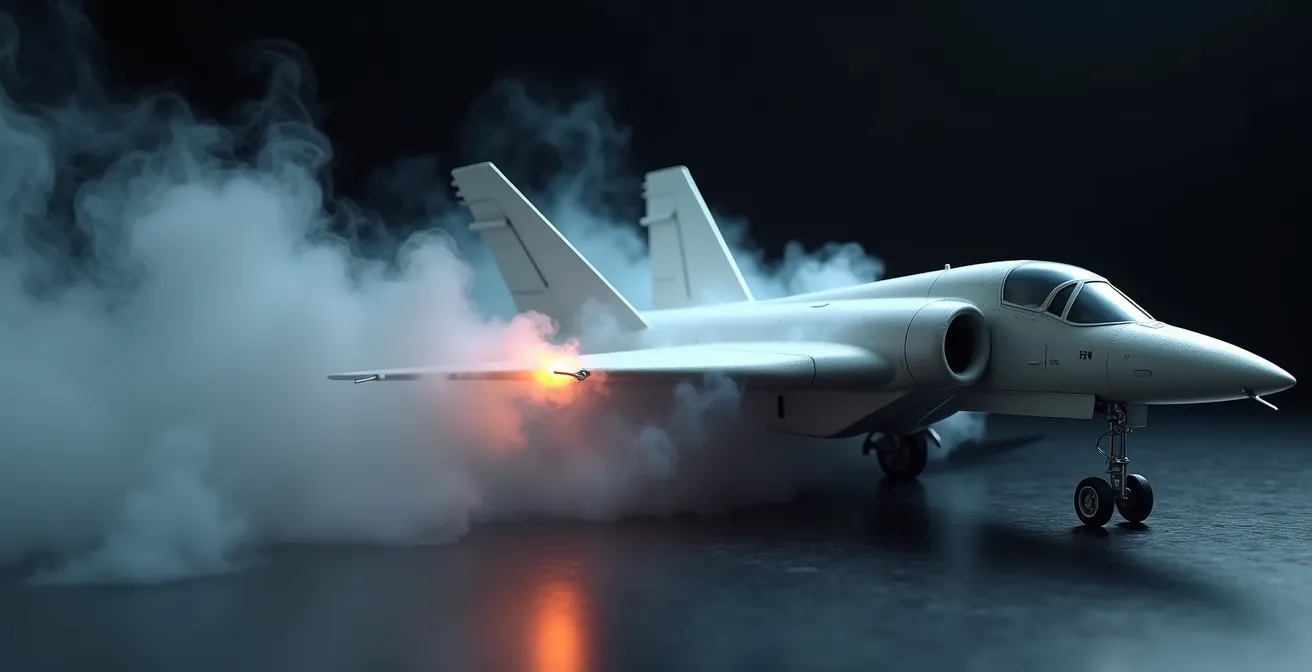
To recreate this, you must build the stain in thin, translucent layers with an airbrush. Start with a light tan or grey to map out the general shape, following the aerodynamic flow. Then, build up the darker, oilier core closer to the exhaust stack. Use references of the specific aircraft you are modeling. Look at how the stains curve around the wing roots or along the fuselage. This attention to the aerodynamic truth is what sells the effect. You are not painting a stain; you are painting the invisible forces of flight made visible by soot and oil.
When you respect the physics, the exhaust stain is no longer just a dirty mark. It becomes a powerful indicator of speed, power, and the mechanical lifeblood of the machine.
The Narrative Sequence: In What Order Should You Apply Weathering?
A story has a beginning, a middle, and an end. The same is true for a convincing weathering job. Applying effects in the wrong order can lead to a chaotic, nonsensical finish. For example, applying a unifying filter *after* adding delicate pigment dust will simply erase your work. To build a coherent narrative, you must follow a logical sequence, where each layer interacts with the one before it. This is your “filming schedule,” ensuring every scene is shot in the correct order for a seamless final cut.
While every project is unique, a generally accepted workflow moves from the largest, most general effects to the smallest, most specific ones. This can be thought of as a recursive process, where layers are built upon and sealed to protect the work underneath. A critical piece of expert advice comes from modeler Jon Bius, who cautions about the chemical interaction between layers. When discussing the application of acrylics over oils, he states, “The key is they must be dried and cured, technically. Otherwise the oils will continue to gas out, and will crack the acrylics.” This highlights the importance of not just the order, but also the patience required. This tip, found in a detailed guide on weathering, is a perfect example of how technical knowledge serves the artistic outcome.
The sequence is about layering history. Filters represent the overall effect of sun and environment on the base “costume” of the paint. Chipping tells the story of physical interaction. Washes add the grime of daily operation. Finally, pigments ground the aircraft in its immediate environment with fresh dust or mud. Each step adds a new chapter to the aircraft’s life.
Action Plan: The Recursive Weathering Workflow
- Initial Fading (The Backstory): Apply a dot filter using small spots of oil paint (e.g., black, burnt umber, yellow ochre, white), then blend them with a thinner-dampened brush to subtly vary the base coat and simulate sun-fading.
- Major Wear and Tear (The Action): Execute paint chipping using a silver pencil, fine brush, or chipping fluid on high-wear areas like wing roots and panel edges. This represents the primary story of physical use.
- Unification (The First Edit): Apply a second, very light unifying filter to slightly tone down the chipping and blend it into the base paint, making it look like it happened over time, not yesterday.
- Operational Grime (The Daily Grind): Add targeted panel line washes based on panel function (e.g., darker, oilier washes around engines). This is the story of the aircraft’s mechanical life.
- Final Scene (The Present Moment): After sealing all previous layers with a matt varnish, apply fresh pigments for effects like dust, mud, or exhaust soot. This grounds the model in a specific, immediate moment in time.
By following a logical sequence, you ensure that each layer of your story is legible, creating a rich, multi-layered history that is both visually complex and easy to read.
Decoding History: Researching Liveries from Black and White Photos
A director’s most important job is research. To tell an authentic story, you must know the facts. This becomes a significant challenge when modeling historical subjects, as most of our primary source material—photographs—is in black and white. How can you be sure of the correct colors when all you have are shades of grey? Guessing is a surefire way to create a fictional character when you intended a historical biography. The key is to become a detective, using technical knowledge and triangulation of sources to decode the past.
The first clue lies in understanding the film used to take the photograph. Before the mid-1940s, orthochromatic film was common. This type of film was not sensitive to red light, causing red and yellow tones to appear very light, almost white, while blues and greens rendered as dark grey or black. After about 1943, panchromatic film became the standard, which was sensitive to all colors and produced a more tonally accurate greyscale image. Knowing the date of a photo can therefore provide a crucial hint about the colors of markings or camouflage.
This is where cross-referencing becomes essential. As Julian Beckett’s research on a Bf 109 demonstrated, you can’t rely on one photo. By comparing multiple images, analyzing how known RLM (Reichs-Luftfahrtministerium) paint codes rendered as specific grey values on orthochromatic film, and cross-referencing with data from paint manufacturer codes and even archaeological paint chips from crash sites, an accurate picture emerges. This triangulation methodology revealed that what appeared as “light grey” in many photos was, in fact, the distinctive RLM 76 light blue. The table below serves as a basic guide for this type of analysis.
| Film Type | Red/Yellow Rendering | Blue/Green Rendering | Best For Analyzing |
|---|---|---|---|
| Orthochromatic (pre-1943) | Very light grey | Dark grey to black | Distinguishing red markings |
| Panchromatic (1943+) | Light to medium grey | Light to medium grey | Overall tonal accuracy |
| Infrared | White | Very dark | Camouflage detection |
This forensic approach to research ensures your model is not just a well-painted object, but a faithful historical document. It’s the ultimate sign of respect for the subject and its story.
Key Takeaways
- Translate, Don’t Copy: Real-world effects like mud and dirt must be artistically translated to scale, focusing on the visual effect rather than physical replication.
- Narrate with Causality: Every chip, stain, and streak must have a logical cause rooted in the aircraft’s function, environment, and human interaction.
- Sequence is Story: The order of weathering applications builds a layered history, moving from broad, aged effects to specific, recent grime.
Beyond the Kit: What Defines a High-Fidelity Replica?
“My model may not be F4C scale, but it no longer looks like a toy aeroplane. It oozes character and actually looks a little menacing.”
– Julian Beckett, RCM&E Magazine – Weathering a Model Aircraft
This quote from modeler Julian Beckett perfectly captures the ultimate goal. The transition from a “toy aeroplane” to a “menacing” character is the pinnacle of the craft. So, what is the final alchemy that creates this transformation? It’s not one single technique, but the successful fusion of technical skill and artistic vision. For serious collectors and discerning modelers, a high-fidelity replica is defined by a trinity of qualities: geometric accuracy, technical craftsmanship, and, most importantly, narrative plausibility.
Geometric accuracy and craftsmanship are the foundation. This means the model’s dimensions are true to scale, the panel joins are seamless, and there are no visible glue marks. It’s the “in-character” performance of the model itself. However, a perfectly built, factory-fresh model is like an actor who knows their lines but has no emotional connection to the role. It’s technically perfect but emotionally sterile. This is where narrative plausibility comes in—it’s the soul of the model.
Narrative plausibility is the sum of all the choices we’ve discussed. It’s the story told by the weathering, and its power lies in its subtlety and logic. It is the art of controlled imperfection that mimics the real world. A truly masterful model achieves this through a few key principles:
- Geometric & Colorimetric Accuracy: The foundation. Measurements are verified against scale drawings, and period-correct paint codes are used.
- Technical Craftsmanship: The execution. Panel joins are seamless, alignment is perfect, and the finish is flawless before weathering begins.
- Narrative Plausibility: The story. Weathering tells a logical tale. Mismatched panels suggest field repairs; faded roundels on the upper wings speak of long hours under the sun.
- Controlled Asymmetry: The realism. Deliberate, subtle imperfections are introduced to mimic real-world randomness, avoiding a perfectly symmetrical, unnatural look.
- Implied History: The subtext. Visual cues hint at unseen events, inviting the viewer to imagine the missions the aircraft has flown.
Ultimately, a high-fidelity replica convinces the viewer they are looking at a real aircraft, shrunk down with impossible technology. This suspension of disbelief is achieved not just through technical skill, but through the power of a well-told story.
Completing the Scene: Pairing Ground Support Equipment with Aircraft Eras
A great director knows that the protagonist doesn’t exist in a vacuum. The world around them—the set, the props, the extras—all contribute to the story’s authenticity. For an aircraft model, this “set” is often a diorama, and the “props” are the Ground Support Equipment (GSE). Placing a Vietnam-era aircraft next to a WWII-era starter cart is like having a Roman centurion check his smartphone—it instantly breaks the narrative. Ensuring your GSE is historically accurate for your aircraft’s specific era is the final step in creating a fully immersive and believable scene.
GSE evolved alongside aviation technology. The hand-cranked starter trolleys and manual fuel drums of the 1940s gave way to gas turbine power units and mobile refuelling trucks in the jet age. Each piece of equipment tells a story about the technology and logistics of its time. Pairing the correct equipment is not just a matter of historical pedantry; it’s about completing the ecosystem of your story. An F-4 Phantom surrounded by modern R-11 hydrant trucks is a historical contradiction that undermines all the careful weathering work on the aircraft itself. The following table provides a brief overview of how this equipment evolved.
| Era | Starter Cart | Fuel System | Bomb Loader |
|---|---|---|---|
| WWII (1940-45) | Hand-crank Trolley Acc | Manual fuel drums | Manual winch hoist |
| Korea (1950-53) | Early electric carts | Mobile bowsers | Hydraulic lift trucks |
| Vietnam (1965-75) | MD-3 gas turbine | R-9 refueling units | MHU-12 trailers |
| Modern (1990+) | NC-8A Mobile Electric | R-11 hydrant trucks | MJ-1 Jammer |
Beyond just choosing the right equipment, the weathering must be harmonious. As seen in masterfully executed carrier deck dioramas, the environmental consistency is key. An EA-6B Prowler showing salt corrosion and hydraulic fluid stains must be accompanied by an MD-3 starter cart and deck tractor that exhibit the *exact same types of wear*. They have lived in the same harsh environment. If the aircraft is weathered and the GSE is pristine, the narrative falls apart. This harmony sells the illusion that this is a snapshot of a real, living environment.
By extending your narrative logic to the entire diorama, you move beyond modeling an aircraft and begin directing a world. This final layer of authenticity is what separates a great model from an unforgettable masterpiece. Your role as a director is now complete; the scene is set, the character is ready, and the story is ready to be told.