In summary:
- Achieve realism not with a single brown paint, but by building up chromatic depth using layered acrylics like tan, ochre, and even salmon as an undercoat.
- Treat oil paints as a sculpting medium, not just paint. Use a fine, flat dry brush to streak and blend Burnt Umber or Raw Sienna to create the texture of real grain.
- Unify the entire effect with a final varnish of thinned Tamiya Clear Orange or Yellow, which simulates the warm, rich glow of aged shellac and brings the layers together.
For any builder of WWI aircraft, there’s a moment of truth. The fuselage is rigged, the insignias are perfectly placed, but one crucial element threatens to shatter the illusion of a living, breathing machine: the propeller. Too often, it remains what it is—a flat, grey piece of plastic. The common advice often feels inadequate, suggesting a simple coat of brown paint or a cursory dry-brushing that leaves the surface looking more like a painted toy than a finely crafted laminate of ash and mahogany.
But what if we approached this challenge not as painters, but as miniature cabinetmakers? The secret to a truly breathtaking wooden propeller doesn’t lie in a single, perfect color, but in the patient construction of texture, depth, and the story the grain tells. It’s a sculptural act. This is about transforming inert plastic into a surface that feels like it has absorbed sunlight, weathered storms, and vibrated with the power of a rotary engine. It requires an understanding of how wood lives, how light passes through varnish, and how imperfection is the key to authenticity.
This guide will walk you through that artisanal process. We will explore how to select our “lumber” by choosing and layering the right acrylic base coats. We will then learn to “carve” the grain using the unique properties of oil paints. Finally, we’ll apply the finishing touch that brings the entire piece to life, a translucent varnish that unifies the layers into a cohesive, realistic masterpiece.
This article provides a detailed, step-by-step methodology for achieving a superior wood grain effect. The following sections break down each phase of the process, from base color selection to the final varnishing techniques that will set your model apart.
Summary: From Plastic to Patina: How to Paint a Masterpiece-Worthy Wood Grain Propeller
- Tan and Brown: choosing the right acrylics for light and dark wood laminations
- The dry brush technique: how to use oils to streak grain over the acrylic base?
- Thin tape strips: how to mask curved propeller blades for laminated layers?
- Why 1:How to Start Building Static Aircraft Models Without Spending Over $100?
- Varnishing: how to use clear orange to unite the layers and simulate varnish?
- How to Organize Your Kit Assembly Sequence to Avoid Painting Disasters?
- How to Install Resin Engines Without Destroying the Plastic Cowling?
- Why Oil Paint Renders Better Grime Effects Than Acrylic Washes?
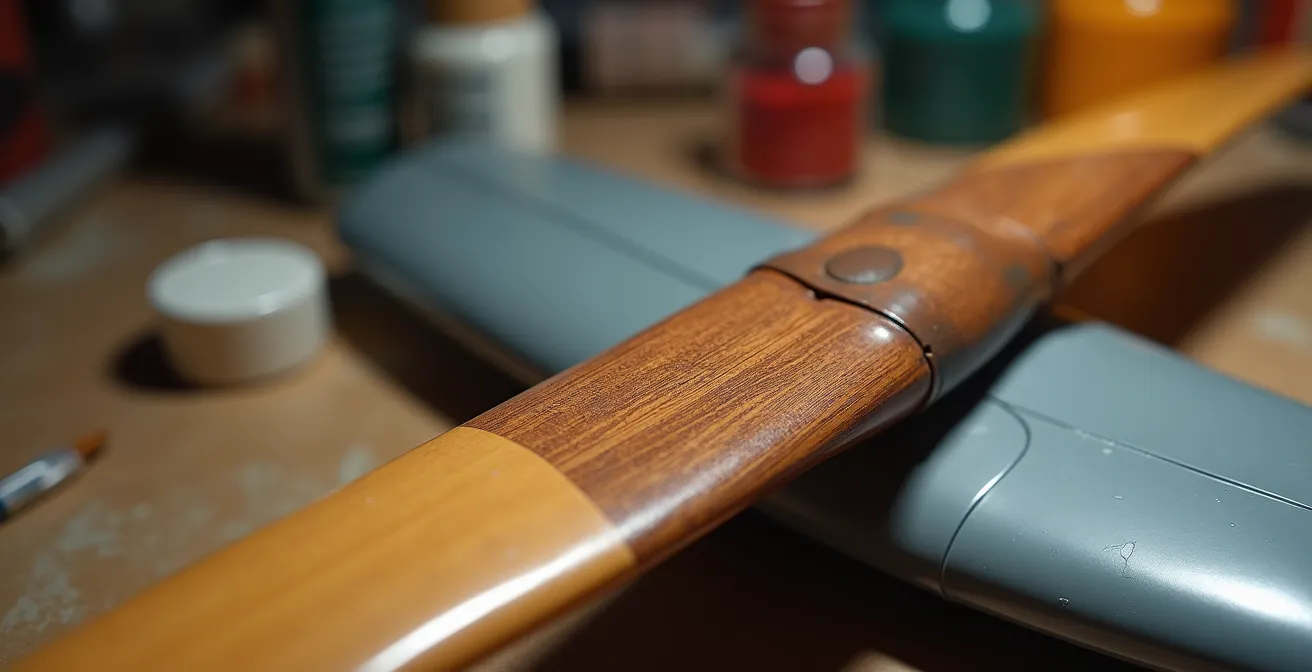
Tan and Brown: choosing the right acrylics for light and dark wood laminations
A master cabinetmaker doesn’t just grab any piece of wood; they select their lumber for its color, character, and grain. For our purposes, the acrylic base coat is our lumber. The choice of colors here is not about finding a single “wood brown,” but about creating chromatic depth that will shine through the subsequent layers. A simple tan base will always look like tan paint. To simulate real wood, we need to think in layers of color that interact with each other. For the lighter laminations, such as those representing Ash, a base of Vallejo Ochre Brown or even a pale sand color provides a warm, honey-toned foundation.
The true artistry begins with the underpainting. Instead of a uniform coat, consider using a salmon or light grey as the very first layer. This seemingly counter-intuitive choice provides a vibrant, complex base that prevents the final wood tone from appearing flat or monotone. When translucent browns and yellows are applied over it, this hidden color creates subtle shifts in hue that mimic the natural variations in wood. For darker woods like mahogany, a base of Tamiya Hull Red or a deep brown provides the necessary richness. You can even modulate the base color by applying a slightly lighter shade to the center of the propeller blades to simulate a sun-bleached effect before the grain is even applied.
The choice of paint brand and type is also a crucial material consideration. The characteristics of each paint will affect how they interact with the oil paints we apply later. A robust, hard-curing paint is essential.
| Paint Type | Adhesion | Hardness | Oil Compatibility | Drying Time |
|---|---|---|---|---|
| Tamiya Acrylics | Excellent | Medium | Good with sealing | 15-30 min |
| Vallejo Model Color | Good | Soft | Requires clear coat | 20-40 min |
| Tamiya LP Lacquers | Superior | Very Hard | Excellent | 5-10 min |
As the table demonstrates, while Tamiya acrylics are a strong choice, lacquer-based paints offer superior hardness, which is a significant advantage. A hard base coat is less likely to be disturbed or “lifted” when you apply mineral spirits with the oil paints in the next stage. Regardless of your choice, a crucial step is to seal the acrylic base coat with a layer of gloss clear coat, such as Tamiya Clear or Pledge Floor Gloss (Future). This creates an impermeable barrier, protecting your carefully built color foundation.
The dry brush technique: how to use oils to streak grain over the acrylic base?
With our base coat sealed and ready, we transition from painter to sculptor. This is where we carve the soul of the wood into the plastic. For this task, oil paints are our medium of choice, specifically rich earth tones like Burnt Umber and Raw Sienna. Forget painting thin lines; we are going to use the paint’s texture and slow drying time to create the grain itself. The tool for this is a small, stiff, flat-headed brush. Apply a small amount of oil paint to your palette, then wipe most of it off onto a paper towel until the brush seems almost dry.
Now, with a firm but controlled pressure, drag the tip of the brush across the propeller surface in the direction of the grain. Don’t paint a line; instead, let the bristles catch on the surface, depositing a fine, broken streak of color. This is the grain. Vary the pressure and the angle of the brush to create thicker and thinner streaks. This technique creates a delicate, organic pattern that is impossible to achieve with a fully loaded, wet brush. The beauty of oils is their forgiveness. If a streak is too thick or in the wrong place, a cotton swab lightly dampened with odorless mineral spirits will wipe it away cleanly, allowing you to try again.
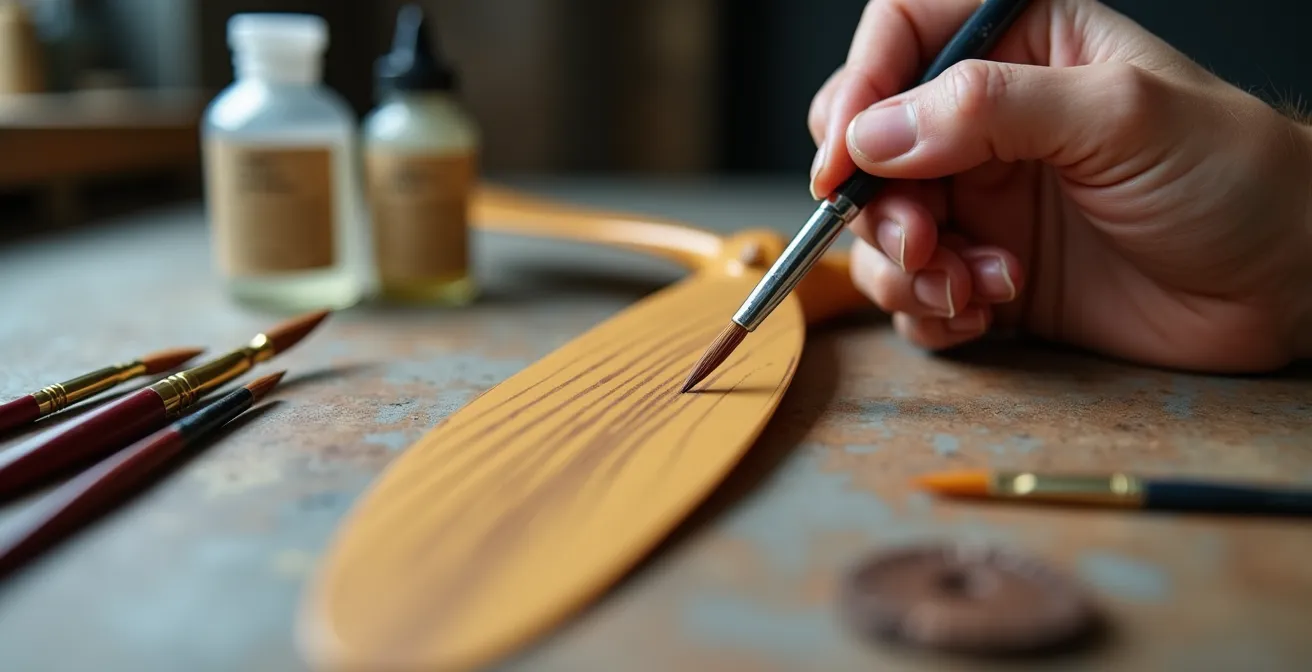
As the image demonstrates, the goal is controlled imperfection. This is not about drawing a wood pattern, but about building up a texture of fine streaks. An important artistic consideration is scale. It can be tempting to cover the propeller in dramatic, high-contrast grain patterns. However, as scale modeling experts emphasize that in 1/32 scale, the human eye would barely distinguish individual grain lines from a normal viewing distance, and certainly not in smaller scales like 1/48 or 1/72. Subtlety is the key to realism. Focus on creating a fine, dense texture rather than a few bold stripes.
Master’s Technique: The Dave’s Model Workshop Method
The process often involves building upon the acrylic base with washes of oil paint to create richness and tonal variation. Burnt Umber oil paint is a favorite, as it can be thinned and applied, with the excess gently wiped away. This stains the surface and fills the subtle textures, creating an incredible sense of depth. The technique is remarkably forgiving; mistakes can be easily corrected, encouraging experimentation to find the perfect look.
Thin tape strips: how to mask curved propeller blades for laminated layers?
A signature feature of many WWI propellers is their laminated construction, with layers of different woods bonded together. Replicating this requires precise masking. However, the goal is not to create perfectly uniform, ruler-straight lines. That would look artificial. The secret is to introduce organic irregularity, mimicking the subtle variations of a hand-crafted wooden object. For this, standard masking tape is too thick and unwieldy. The cabinetmaker’s tools of choice are thin masking tape strips (such as those made by Tamiya or Aizu), cut into varying widths from as narrow as 0.5mm to 2mm.
Begin by laying down your first strip of tape along the length of the propeller blade. Don’t worry about perfect mathematical precision. Follow the blade’s curve, allowing for slight, natural-looking deviations. This is your first lamination line. Now, apply a second strip parallel to the first, but use a slightly different width. Continue this process, alternating the width of the tape and the gap between them. This variation is what sells the effect. Once your pattern is laid out, burnish the edges of the tape firmly with a toothpick or a dedicated tool to prevent paint from bleeding underneath.
For an even sharper line, a master’s trick is to use a liquid mask or a gloss clear coat as a sealant. After laying down the tape, apply a very thin layer of liquid mask or gloss clear right along the edge of the tape. This will seep into any microscopic gaps and seal them completely. When you then spray your contrasting wood color (the darker laminate), the line will be perfectly crisp. Once the paint is dry to the touch, carefully peel away the tape to reveal your two-tone wood effect. The process can be repeated with a third color for more complex laminations.
Action Plan: Achieving Perfect Lamination Lines
- Use fine-tipped paint brushes and thin strips of tape for precision; vary strip widths between 0.5-2mm for authentic irregular lamination patterns.
- Apply a liquid mask or a thin coat of clear gloss along the tape edges after burnishing them down; this creates an ultimate seal against paint bleed.
- Spray your darker laminate color in light, even coats. Avoid heavy, wet coats that can work their way under the mask.
- Add multiple thin layers of the final gloss varnish over the entire propeller to create the deep, unified look of a laminated wooden prop.
- For maximum sharpness, apply a clear gloss coat over the mask edges and let it dry before you spray your color coat. This seals the edge completely.
Why 1:How to Start Building Static Aircraft Models Without Spending Over $100?
At first glance, the pursuit of a masterpiece-worthy propeller seems at odds with a modest budget. The world of scale modeling is filled with expensive tools, specialized paints, and high-end airbrushes. However, the true spirit of a craftsman or artisan lies not in the cost of their tools, but in their skill and ingenuity. Achieving a stunning wood grain effect is less about spending money and more about mastering fundamental techniques with simple, effective materials. The cabinetmaker’s wisdom is knowing that results come from the hand, not the price tag.
You can assemble a highly effective wood grain toolkit for a surprisingly small investment. The sophisticated multi-layer acrylic base? A few bottles of basic craft acrylics in tan, ochre, and brown will suffice. The all-important oil paints for the grain? A single tube of Burnt Umber or Raw Sienna oil paint, which will last for dozens of projects, is the only essential purchase. Thinned with common odorless mineral spirits, it becomes the perfect medium for sculpting grain. Even the final varnish doesn’t require a model-specific product; a simple can of clear gloss or satin varnish from a hardware or craft store will unify the layers beautifully.
The most innovative budget solutions often come from looking outside the modeling world. The most complex and subtle wood grain effects can be achieved with a set of tools you might find in a hardware store’s wood repair section.
Your Roadmap: The Frugal Artisan’s Wood Effect Toolkit
- Begin with furniture repair marking pens. A set of three colors (light, medium, dark brown) is inexpensive and works exceptionally well for drawing fine grain lines.
- Use basic enamel or acrylic craft paints for your base coating. At just a few dollars per bottle, you can create a wide palette of wood tones.
- Create your own versatile oil washes from a single tube of Burnt Umber oil paint and a bottle of mineral spirits.
- Apply the wood grain with the marker pens in long, even strokes. This technique takes only minutes to master and produces incredibly consistent results.
- Finish your propeller with a clear varnish from a craft store instead of purchasing expensive, model-specific gloss coats.
Varnishing: how to use clear orange to unite the layers and simulate varnish?
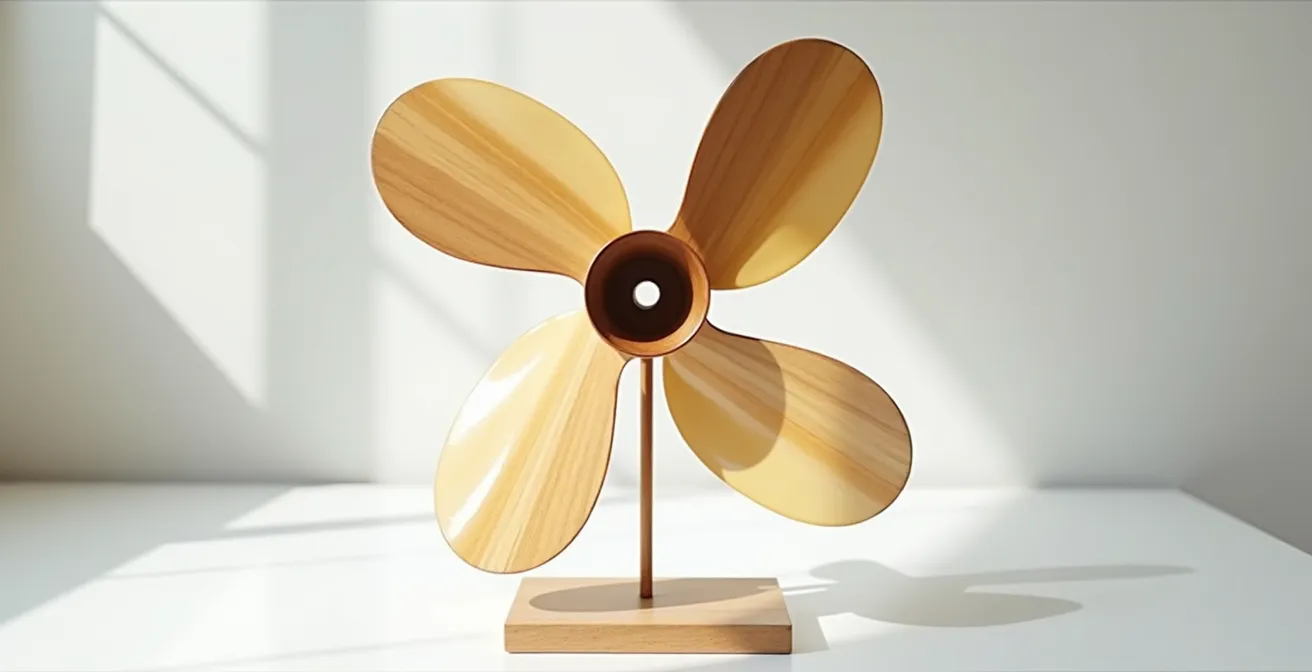
The final stage is the one that transforms the collection of painted layers into a single, cohesive piece of “wood.” This is the role of the varnish. In the world of real aircraft, propellers were often protected with layers of shellac or varnish, which imparted a characteristic warm, amber, or honey-colored glow. A simple clear gloss coat will protect the paint, but it won’t replicate this vital chromatic effect. To achieve this, we must use our varnish not just as a protective coat, but as a unifying color filter.
The perfect tools for this are translucent colored paints, specifically Tamiya’s Clear Yellow and Clear Orange. By heavily thinning one of these colors with acrylic thinner, you create a tinted varnish. This is then brushed over the entire propeller in several thin, even layers. With each pass, the color deepens, the underlying grain becomes richer, and the different layers of acrylic and oil begin to harmonize. The clear color acts as a glaze, unifying the lighter and darker laminations and giving the entire piece that signature warm glow of aged, varnished wood.
The Tamiya Clear Varnish Method
A proven mixture is Tamiya Clear Yellow with just a few drops of Tamiya Smoke to add a touch of aged warmth. This should be thinned significantly for easy brushing without leaving streaks. As experienced modelers have found that the more thin layers you add, the richer the honey shade gets, giving the underlying grain a much deeper and more realistic effect. For a darker, more reddish varnish look, you can substitute the Clear Yellow with Clear Orange, creating a beautiful mahogany-like finish.
This final step is what brings the “soul of the wood” to the surface. It’s the difference between a painted object and a miniature replica. The layers of clear color add a visual depth that a single opaque coat could never achieve, allowing light to penetrate and reflect off the layers below, creating a convincing and beautiful finish.
How to Organize Your Kit Assembly Sequence to Avoid Painting Disasters?
A masterpiece is often ruined not by a lack of skill, but by a lack of planning. The complex, multi-layered process of painting a wood grain propeller is a delicate operation. Handling the propeller after it has been attached to the engine or fuselage is a recipe for smudged oils, chipped paint, and heartbreak. The cardinal rule of the workshop is therefore to treat the propeller as a completely separate sub-assembly. It should be the last part you attach to your finished model, handled with extreme care.
This means your entire workflow must be built around this principle. Before you even begin painting the propeller, you must have a plan for how you will hold and manipulate it through its many stages. Simple fixtures can be made from clothes pins, alligator clips glued to a dowel, or specialized modeling holders. This allows you to airbrush base coats, apply oil grain, and hang the part to dry without ever touching the delicate surfaces. This disciplined approach prevents the most common and frustrating of disasters.
Furthermore, never test a new technique on the final part. All the steps described—the acrylic layering, the oil streaking, the tinted varnish—should first be practiced on a “paint mule.” This can be a spare part from another kit, a sheet of scrap plastic, or an old, unusable propeller. Replicate the entire process on this test piece to perfect your technique, test your color mixes, and ensure you are confident before committing to the real thing. This foresight is the hallmark of an experienced builder.
Checklist: The Propeller Sub-Assembly Workflow
- Treat the propeller as its own model kit. Completely finish, weather, and varnish it separately before considering attachment.
- Create a dedicated “paint mule” from scrap plastic to test your entire multi-layer wood grain process from start to finish.
- Build or acquire custom fixtures and jigs to hold the propeller securely during all painting and drying stages, eliminating handling damage.
- Plan your weathering sequence. General wear and tear is applied to the propeller sub-assembly, but specific stains like oil leaks from the engine should be added after final assembly for realism.
- Attach the finished propeller as the very last step in your model’s construction, using gloves to prevent fingerprints on the final varnish.
How to Install Resin Engines Without Destroying the Plastic Cowling?
The philosophy of a master craftsman is consistent across all materials. The same patience, precision, and foresight required to fit a delicate resin engine into a thin plastic cowling is directly applicable to creating a convincing wood grain propeller. Both tasks are about a deep respect for the materials and an understanding of how to make different elements work in visual and physical harmony. A beautifully detailed resin engine deserves an equally well-executed propeller; one cannot shine without the other.
The integration begins at the painting stage. The oil paints you use to sculpt the wood grain—the Burnt Umber and Raw Sienna—are the very same colors you will use to weather your resin engine. By using the same palette of oils to create grease stains on the engine block and subtle grime on the propeller hub, you create a cohesive visual story. It tells the tale of a machine where the mechanical and the organic have lived and worked together. This shared color palette subtly ties the two disparate elements together into a believable whole.
This mindset of integration extends to your tools and jigs. The fixtures you build to hold your propeller during its complex painting process can often be adapted to hold and support the resin engine during its own fitting and painting. The core skill is problem-solving: how to hold a delicate part securely while allowing access for tools and paint. Applying the lessons learned from one task to the other makes you a more efficient and effective builder. The final result is a seamless marriage of the mechanical art of the engine and the organic art of the propeller.
Action Plan: Integrating Resin and Wood Effects
- Apply the same meticulous patience required for sanding and test-fitting resin parts to the slow, deliberate process of building up wood grain layers.
- Use the same oil paints (Burnt Sienna, Raw Umber) for both the wood grain streaks on the propeller and the grease and grime weathering on the engine to create a cohesive visual palette.
- After creating the wood grain, use a fine brush to work subtle engine grime effects into the propeller hub, telling a story of use.
- Adapt your propeller-holding jigs and fixtures to assist in the assembly and painting of the delicate resin engine components.
- View the engine and propeller not as two separate parts, but as a single composition. Ensure the level of detail and weathering is consistent between them.
Key takeaways
- Think like a miniature cabinetmaker, not a painter. Your goal is to sculpt texture and depth, not just apply color.
- Realism comes from translucent layers. Build your wood tone from a non-obvious base coat up through tinted varnishes.
- Oils are superior for grain effects due to their slow drying time, which allows for blending, streaking, and correction—qualities essential for an organic look.
Why Oil Paint Renders Better Grime Effects Than Acrylic Washes?
The choice between oil paints and acrylics for fine detail work like wood grain or weathering is a fundamental one for any modeler. While acrylic washes are quick and easy, they behave like a layer of pigmented plastic sitting on the surface. They dry fast, are difficult to blend, and tend to leave a hard edge. For an effect as organic and subtle as wood grain, this is a significant drawback. Oil paints, by contrast, behave more like a true wood stain. Their fundamental properties make them the superior medium for this kind of artistic work.
The single most important difference is the extended blending time. As paint comparison studies show that acrylic paints dry in 15-40 minutes while oils allow hours, or even days, of working time. This allows you to not just apply a streak of color, but to feather its edges, blend it into the underlying layer, and manipulate its transparency. You can work the paint, pushing and pulling it until the grain looks exactly right. This is simply not possible with fast-drying acrylics. This quality allows for the creation of incredibly subtle and complex wood patterns that feel like they are part of the wood, not just painted on top of it.
Furthermore, oils offer superior transparency and depth. When thinned, they create a translucent glaze that adds color without obscuring the details and colors of the layers beneath. This is crucial for our technique of building chromatic depth. An oil-based grain allows the complex acrylic underpainting to shine through, creating a rich, multi-tonal effect. An acrylic wash, being more opaque, would simply cover it. The following comparison highlights why oils are the cabinetmaker’s choice.
| Property | Oil Paints | Acrylic Washes | Best Application |
|---|---|---|---|
| Transparency | Excellent | Limited | Subtle grain effects |
| Blending Time | Hours | Minutes | Complex wood patterns |
| Correction | Easy wipe-away | Permanent quickly | Experimentation |
| Depth Effect | Superior | Flat | Realistic wood tone |
By embracing the mindset of a cabinetmaker and choosing the right materials for their intrinsic properties, you can elevate a simple plastic part into a convincing work of miniature art. The next logical step is to gather these simple tools and begin your first experiment on a piece of scrap plastic.