In summary:
- Flawless rigging is a systematic process, not guesswork. The key is eliminating variables before you even touch the model.
- Choose your material based on its elasticity and resilience; Lycra thread offers superior durability against accidental bumps compared to brittle stretched sprue.
- Securely anchor wires using micro-eyelets set in shallow holes with CA glue, preventing pull-through and damage to the model’s structure.
- Use a non-fogging adhesive like PVA or canopy glue for clear parts, applied with a needle for micro-droplet precision.
- Achieve perfect, taut lines by applying indirect heat from an incense stick, which provides controlled, even tension without risk of melting.
The final 1% of a model build carries 99% of the stress. You’ve spent weeks, maybe months, on painting, detailing, and weathering. Now comes the most delicate part: the fine antennae rigging. The fear is palpable. One unsteady hand, one sneeze, one drop of glue in the wrong place, and the entire finish can be ruined. The wire snaps, the superglue fogs the canopy, or the anchor point pulls out, taking a chunk of paint with it. It’s a high-stakes operation where a single mistake feels catastrophic.
Many modelers rely on age-old advice: “be patient,” or “use less glue.” While well-intentioned, this counsel is insufficient. It treats a procedural challenge as a test of willpower. The truth is, preventing these failures isn’t about having a surgeon’s steady hand; it’s about adopting a surgeon’s systematic protocol. The secret lies not in the final, tense moments of application, but in the preparatory steps, material choices, and specific techniques that eliminate risk long before it can manifest.
This guide departs from generic advice. We will treat rigging as a micro-surgical procedure. The focus is on a multi-stage process of material selection, micro-anchoring, adhesive isolation, and controlled tensioning. We’ll explore why some materials survive bumps while others shatter, how to create anchor points that are stronger than the surrounding plastic, and how to apply adhesives with precision to avoid the dreaded canopy fog. We’ll even cover the foundational work—like fuselage assembly and surface preparation—that ensures your model can withstand the tension of the rigging in the first place.
By following this systematic protocol, you can transform the most nerve-wracking step of the build into a controlled, predictable, and even satisfying conclusion to your project. It’s time to replace fear with precision.
This article details the complete protocol for achieving flawless rigging, from material choice to final preservation. Each section builds upon the last, creating a comprehensive system for success.
Summary: A Systematic Protocol for Flawless Model Rigging
- Stretched Sprue vs Lycra Thread: which material survives accidental bumps?
- How to anchor rigging wires into the tail fin without drilling through?
- The heat method: how to tighten stretched sprue with a soldering iron?
- How to glue rigging to the canopy without fogging the clear plastic?
- How to create tiny blobs of white glue to replicate aerial wire insulators?
- Thin vs Thick Cement: Which Glue Works Best for Joining Fuselage Halves?
- How to Choose an Acrylic Case That Protects Your Models from UV Yellowing?
- How to Prevent Decal Silvering on Matte Paint Surfaces?
Stretched Sprue vs Lycra Thread: which material survives accidental bumps?
The choice of rigging material is the first critical decision in our systematic protocol. It directly dictates the model’s resilience to handling, environmental changes, and accidental bumps. The two primary contenders, traditional stretched sprue and modern elastic threads, offer fundamentally different properties. Stretched sprue, made by heating and pulling a piece of the kit’s plastic sprue, provides a historically accurate, rigid line. However, its complete lack of elasticity makes it exceptionally brittle. A slight knock can cause it to snap instantly, undoing hours of work.
In contrast, modern materials like Lycra or EZ-Line are designed with elasticity as their primary feature. Their ability to stretch and return to form provides immense durability. Experienced modelers note that this property gives them a resilience similar to a spider’s web, allowing them to survive collisions and even changes in temperature and humidity that might cause rigid materials to sag or break. While stretched sprue remains taut on models after 30 years in stable conditions, its fragility makes it best suited for smaller scales or models that will rarely be handled.
The decision depends on your model’s intended purpose. For a competition piece that will be transported and judged, the superior durability of an elastic thread is a significant advantage. The following comparison breaks down the key attributes of common rigging materials.
| Material | Durability Score | Elasticity | Diameter Range | UV Resistance | Installation Difficulty |
|---|---|---|---|---|---|
| Lycra Thread (Infini) | 9/10 | High stretch | 0.055-0.135mm | Moderate | Easy |
| Stretched Sprue | 6/10 | None | Variable | Good | Moderate |
| EZ-Line | 8/10 | Very high | 0.003-0.006″ | Good | Easy |
| Monofilament | 7/10 | Low | 0.002-0.005″ | Excellent | Moderate |
How to anchor rigging wires into the tail fin without drilling through?
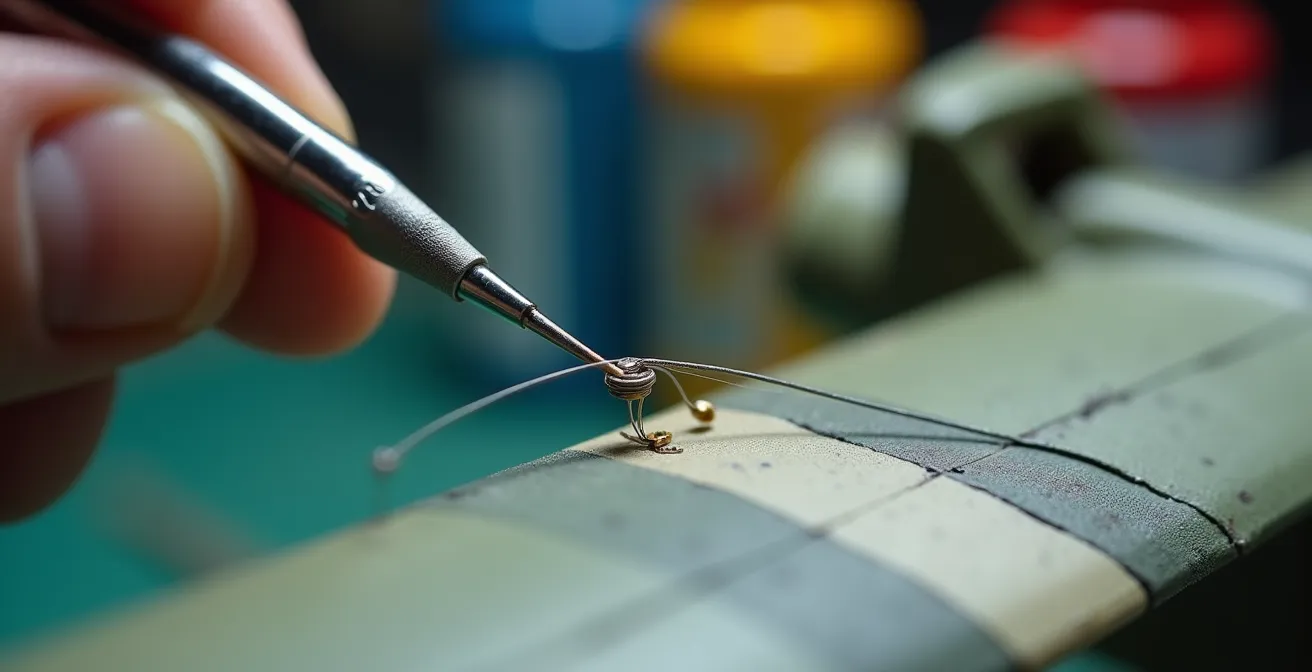
A rigging line is only as strong as its anchor point. The common fear of drilling completely through a thin tail fin or wing is valid, as it can ruin the part. The surgical solution is not to avoid drilling, but to perform a controlled form of micro-anchoring. This technique involves creating a shallow, robust anchor point that grips the wire securely without compromising the structural integrity of the part. The goal is to embed an eyelet or the wire itself into the plastic, not to pass it through.
The most reliable method is to install a micro-eyelet made from fine, twisted wire. This creates a secure loop for the rigging material to pass through. The process involves drilling a hole that is intentionally shallow—only about three-quarters of the way through the plastic. A tiny droplet of CA (cyanoacrylate) glue is then placed inside the hole, and the eyelet is inserted. This bonds the eyelet to the surrounding plastic, creating an anchor point far stronger than a simple knot or a dab of surface glue.
For an even more secure bond on painted surfaces, experts recommend an adhesive isolation technique. As Brian Baker, an IPMS member, notes in the Modeling Madness Wire Rigging Tutorial, “The ‘PVA base’ technique creates a buffer zone between aggressive CA glue and delicate paint work.” By first placing a tiny dot of PVA (white glue) and letting it dry, you create a clear, stable base. You can then apply a micro-droplet of CA glue onto this base to attach your rigging, protecting the underlying paint from the CA’s aggressive solvents.
Action Plan: Micro-Eyelet Installation
- Create micro-eyelets from 0.1mm twisted wire with a 0.3mm opening diameter.
- Drill shallow anchor holes (using a 0.4mm bit) going only three-quarters into the wing or fin depth.
- Apply a micro-droplet of CA glue inside the hole using a needle applicator for precision.
- Insert the eyelet so it sits flush with the surface, oriented in the direction the rigging will pull.
- Allow a full 15 minutes for the glue to cure completely before attempting to thread the rigging material.
The heat method: how to tighten stretched sprue with a soldering iron?
For modelers who choose the authenticity of stretched sprue, achieving a perfectly taut line without snapping it is the final challenge. The material’s rigidity means it must be installed with a slight amount of slack, which is then removed through controlled tensioning. The most effective way to do this is with a gentle application of heat. This method causes the plastic to shrink just enough to pull the line tight, creating a permanent, straight rigging wire. However, direct flame is far too aggressive and will instantly melt the delicate sprue.
The micro-surgeon’s tool of choice is a source of indirect, radiant heat. While a soldering iron can be used, it carries a high risk of error. A far safer and more controlled alternative is a lit incense stick or a recently extinguished match. The gentle heat radiated from the glowing tip is sufficient to shrink the sprue without melting it. The technique involves holding the heat source near the midpoint of the rigging line, but never touching it. You will observe the line sag for a moment as it softens, then immediately tighten as it cools and shrinks.
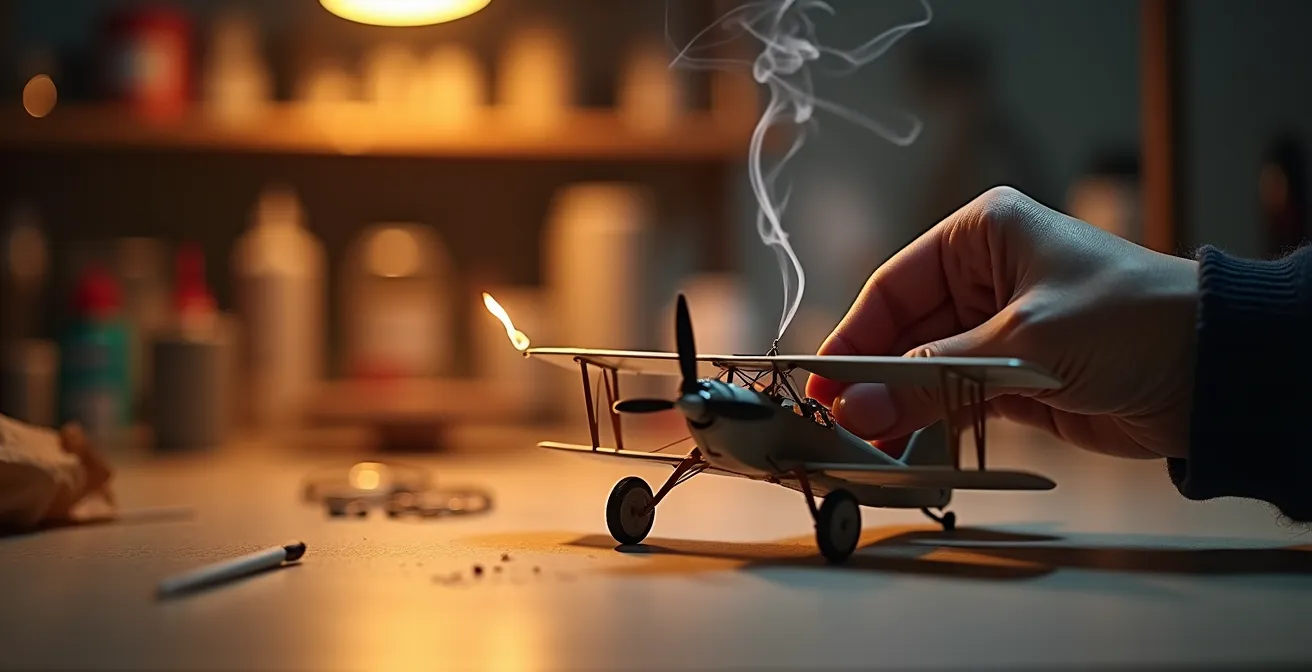
As the illustration demonstrates, the key is distance and control. Ship modelers have perfected this, showing that the incense stick method provides far more control than other heat sources. If you must use a soldering iron, ensure it has cooled slightly from its maximum temperature. The professional guidance is to maintain a half-inch distance from the line – it will momentarily sag, then tighten and remain permanently taut. It is absolutely essential to practice on a spare piece of stretched sprue first to find the correct distance and timing for your specific heat source.
How to glue rigging to the canopy without fogging the clear plastic?
Attaching an aerial wire to a clear canopy is one of the highest-risk steps in the entire build. Standard CA glues release vapors as they cure, a process known as “outgassing.” When these vapors are trapped under a canopy or near a clear part, they react with the plastic surface, creating a permanent white, frosted effect called fogging. This can instantly ruin an otherwise perfect canopy. Therefore, selecting a canopy-safe adhesive is not optional; it is a mandatory part of the protocol.
The solution is to use an adhesive that has zero or very low outgassing properties. PVA-based glues (white glue) and specialized canopy glues are the safest options. These adhesives are water-based and dry through evaporation, releasing only water vapor, which does not harm the clear plastic. They have a medium bond strength that is more than sufficient for a delicate antenna wire. A forum contributor on WW2Aircraft.net highlights a key benefit of one such product: “Clearfix glue transitions from milky to completely transparent when cured, making it perfect for canopy attachments without fogging risk.”
For modelers who require a stronger, faster bond, odorless CA glues or UV-curing resins are excellent alternatives. Odorless CA is formulated to minimize outgassing, significantly reducing the risk of fogging, though not eliminating it entirely. UV-curing resins are perhaps the ultimate solution: they remain liquid until exposed to a UV light source, allowing for perfect placement, and they do not outgas at all. The choice depends on your preference for bond strength versus working time.
The following table provides a clear comparison of adhesives suitable for this delicate task, helping you choose the right tool for the job.
| Adhesive Type | Fogging Risk | Bond Strength | Drying Time | Application Method |
|---|---|---|---|---|
| PVA/White Glue | Zero | Medium | 15-30 min | Needle applicator |
| Odorless CA | Very Low | High | 10-30 sec | Micro-droplet |
| Formula 560 Canopy Glue | Zero | Medium-High | 45-60 min | Direct application |
| UV-Curing Resin | Zero | Very High | 2-5 min (UV) | Precision placement |
How to create tiny blobs of white glue to replicate aerial wire insulators?
Replicating the small ceramic insulators found on many WWII-era aircraft antennae adds a final touch of convincing detail. These are often represented by tiny, perfectly spherical “blobs” on the rigging line. Creating these with consistency can be challenging, as glue tends to form teardrop shapes or uneven lumps. The secret to a perfect sphere lies in using the right consistency of glue and leveraging gravity.
Standard PVA or white glue is the ideal material. However, straight from the bottle, it can be too thick or too thin. The optimal viscosity is achieved by mixing the PVA with a small amount of acrylic gloss or matte medium. This improves its flow characteristics and strength. To create the insulator, apply a small droplet of the tinted glue mixture to the rigging line using a fine wire or needle applicator. The most crucial step follows immediately: rotate the model so that the section of rigging wire with the droplet is hanging perfectly vertically. Gravity will then pull the glue into a perfect, symmetrical sphere as it dries over the next 20 to 30 minutes.
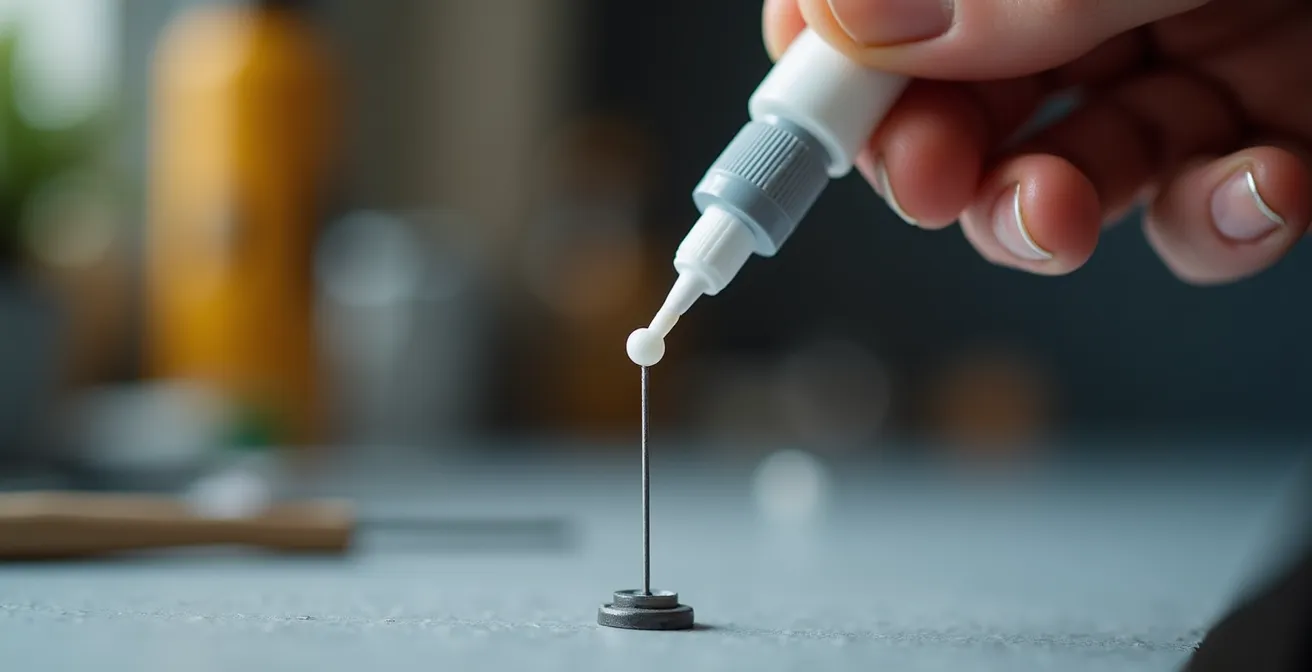
For added realism, you can pre-tint the glue before application. Adding a tiny amount of off-white, grey, or ceramic-colored acrylic paint to your PVA mixture will create the color of the insulator directly, saving you from the difficult task of trying to paint a tiny sphere on a flexible wire later. This technique, while simple, requires a steady hand and an understanding of fluid dynamics. The following steps outline the entire process for creating these delicate details.
- Mix PVA glue with a small amount of acrylic medium to achieve a honey-like viscosity. Pre-tint the mixture with a drop of ceramic-colored acrylic paint.
- Using a 0.1mm wire applicator, apply a tiny droplet of the glue mixture to the installed rigging line.
- Immediately rotate the model or the sub-assembly so the wire segment is perfectly vertical, with the droplet in the middle.
- Allow gravity to form the glue into a perfect sphere. Do not touch or disturb it for at least 30 minutes while it dries.
Thin vs Thick Cement: Which Glue Works Best for Joining Fuselage Halves?
A flawless rigging job depends on an unshakable foundation. The tension applied by rigging wires, though small, can be enough to split weak fuselage seams over time. Therefore, the choice of adhesive for joining the main fuselage halves is a critical preliminary step in our rigging protocol. The goal is to create a bond that is not just seamless, but has deep structural integrity. This cannot be achieved with a single type of cement alone.
The professional approach is a two-step fusion method. First, thin or “extra thin” cement is used. This type of glue works by capillary action, wicking itself into the seam between the two halves. It melts the surface of the plastic, creating a clean, welded bond with minimal mess on the exterior. This initial weld provides the cosmetic perfection and alignment. However, it may not be strong enough on its own to resist the continuous, focused stress of a taut rigging wire.
The Two-Step Fusion Method
The professional approach involves using thin cement for initial capillary action, followed by thick cement or sprue-goo applied internally for structural reinforcement that can withstand rigging tension. This ensures the model’s core is robust. Experts stress that all paint and glue must be fully dry and hard before rigging – thinking ‘it should be hard enough’ leads to complete ruination of your model. The forces involved are not trivial; RAF Museum research indicates that a full-size 9/64 inch (0.35mm) rigging wire requires 20lbs of breaking strain support, and even at scale, the forces are significant enough to exploit any weakness in the fuselage joint.
The second step is to reinforce the seam from the inside. Once the thin cement has set, a thick, gap-filling cement or a homemade mixture known as “sprue goo” (dissolved sprue in liquid cement) is applied along the interior of the seam. This creates a powerful internal brace that dramatically increases the joint’s strength, making it more than capable of handling the tension from even the tightest rigging lines. This two-step process ensures both a perfect exterior finish and a rock-solid foundation.
How to Choose an Acrylic Case That Protects Your Models from UV Yellowing?
The rigging protocol does not end when the last wire is glued. The final step is preservation. A finished model, especially one with delicate rigging, is vulnerable to dust, damage, and the invisible threat of ultraviolet (UV) light. Over time, UV radiation from sunlight or even indoor lighting can cause paints to fade, decals to yellow, and certain rigging materials to become brittle.
As a conservation specialist from the Kawartha Scale Modellers notes, “Models with rigging made from organic materials like lycra thread can degrade under UV exposure, making museum-grade acrylic essential for long-term preservation.” Standard acrylic or glass offers little to no UV protection. A museum-grade display case is treated with a special coating that blocks over 90% of harmful UV rays, safeguarding your work for decades.
Beyond UV protection, the right case also protects against physical threats. An anti-static formulation is crucial for models with fine rigging, as it repels dust that would otherwise cling to the delicate wires and be nearly impossible to clean. The design of the case also matters. A case with a fully removable top (a “five-sided box”) is far safer for fragile models than a “slide-in” or “shoebox” style, which can easily snag rigging or antennae during placement. Finally, ensuring at least two inches of clearance above the highest point of your model prevents accidental contact and damage.
Choosing a case is an investment in the longevity of your work. Use the following criteria to select a case that provides true archival protection:
- Verify a specified UV protection rating of 90% or higher.
- Choose an anti-static acrylic formulation to prevent dust attraction, especially on rigging.
- Select a design with a fully removable top, which is safer for fragile models.
- Ensure there is a minimum of two inches of clearance above the tallest point of the rigging.
- Consider including silica gel packets to maintain humidity below 50%, further protecting decals and materials.
Key takeaways
- Rigging success is a system: It starts with a strong fuselage join and a perfect paint surface, not just the final wire.
- Material matters: Elastic thread offers superior durability for handled models, while stretched sprue provides ultimate authenticity but is very brittle.
- Control is everything: Use micro-anchoring instead of drilling through, non-fogging glue on canopies, and indirect heat for tensioning to eliminate common failures.
How to Prevent Decal Silvering on Matte Paint Surfaces?
A perfectly rigged model can be let down by “silvering” decals—the milky, reflective sheen that appears when a decal fails to conform to the underlying surface. This issue is not just cosmetic; it’s a structural problem that can directly interfere with our rigging protocol. The cause is microscopic air pockets trapped between the decal film and a rough paint surface. Matte paints are the primary culprits.
As microscopic analysis reveals that matte paint surfaces have 10-15 micron surface irregularities, creating a porous texture that traps air. The solution is to create a perfectly smooth, non-porous surface for the decal to adhere to. This is achieved through a technique known as the “gloss sandwich.” Before applying decals, a clear gloss coat is sprayed over the entire model. This fills in the microscopic pores of the matte paint, creating a glass-smooth foundation.
The Gloss Sandwich Technique for Rigging-Ready Surfaces
This technique serves a dual purpose critical to our rigging protocol. Professional modelers apply a gloss coat before decals to create a smooth surface that prevents air entrapment. After the decals are applied and sealed with another gloss coat, a final matte or satin coat is applied to restore the desired finish. Crucially, that same initial gloss surface provides optimal adhesion points for rigging attachment. A tiny droplet of CA or PVA glue forms a much stronger, cleaner bond on a non-porous gloss surface than on a porous matte one, preventing the glue from seeping into the paint and weakening the bond or causing discoloration.
By preparing the surface for decals, you are simultaneously preparing it for rigging. This synergy is a core principle of the systematic approach. It turns a potential problem area into a stable foundation for the final, delicate steps. Failing to prepare the surface properly not only risks silvered decals but also creates weak anchor points for your antenna wires, compromising the entire structure.
By viewing the entire build as an interconnected system, from fuselage seam to display case, the delicate act of rigging becomes the logical, controlled culmination of a well-executed plan. It is transformed from a source of anxiety into a final, satisfying flourish of precision.