Achieving a flawless silver finish isn’t about filling a seam; it’s a zero-tolerance surface engineering process where the repair becomes optically indistinguishable from the original plastic.
- Filler choice is critical: Cyanoacrylate (CA) glue offers zero shrinkage, preventing “ghost seams” that reappear over time.
- Sanding is not about abrasion but about progressive polishing, using water to create a glass-smooth, light-receptive surface.
Recommendation: Treat every seam as a micro-fabrication task. Your goal is not to hide the line, but to rebuild the surface so completely that even reflective paint cannot find a flaw.
There is no finish more demanding than natural metal. A coat of silver or aluminum paint acts like a harsh spotlight, revealing every microscopic scratch, pinhole, and textural inconsistency with brutal honesty. For the intermediate modeler, the most persistent frustration is the fuselage seam: a fine line that, despite hours of filling and sanding, stubbornly reappears, shattering the illusion of a seamless aluminum skin. It’s the final flaw that separates a good model from a breathtakingly realistic one.
The common advice often revolves around generic tips: use putty, sand it smooth, and be patient. But this overlooks the fundamental truth of metallic finishes. The problem isn’t just a physical gap; it’s an optical one. A typical solvent-based putty and the surrounding polystyrene plastic are two different materials. They shrink at different rates, have different densities, and absorb paint differently, creating a “ghost line” visible only under that unforgiving silver coat.
But what if the secret wasn’t merely to fill the seam, but to re-engineer the surface itself? The key to making a seam truly vanish is to create a repair that is a perfect fusion of materials—a single, homogenized surface that reacts to light identically across its entire length. This is not just model-making; it’s a discipline borrowed from automotive finishing, where the goal is a flawless, mirror-like surface prepared with zero tolerance for error.
This guide will walk you through that perfectionist’s process. We will dissect the science of fillers, the art of progressive wet sanding, the tools that preserve delicate curves, and the techniques to restore lost detail, ensuring your next natural metal finish is nothing short of perfect.
While this article focuses on the meticulous, time-tested methods for fuselage seams, the following video explores an innovative ‘no-sanding’ technique using latex paint, particularly effective for complex shapes like jet intakes. It offers a fascinating alternative to consider for specific applications.
To achieve this level of finish, we must break down the process into its critical components. The following sections detail each step, from fundamental surface preparation to handling the specific challenges of different model kits. This structured approach will provide the road map to a truly seamless result.
Summary: A Perfectionist’s Workflow for Invisible Seams
- 400 to 2000: Sequence Your Sanding to Remove Scratches, Not Detail
- Why Water Is the Secret to a Glass-Smooth Plastic Surface
- Solvent Putty vs. CA Glue: Which Filler Doesn’t Shrink Over Time?
- Flex-i-files vs. Sanding Sticks: Preserving the Curvature of the Fuselage
- How to Rescribe Panel Lines Lost During the Sanding Process
- How to Remove Parts from Sprues Without Gouging the Plastic Surface
- Understanding Polystyrene Grades: Why Some Kits React Poorly to Lacquer Thinners
- Raised vs. Recessed Panel Lines: How to Handle Older Kits for a Modern Look
400 to 2000: Sequence Your Sanding to Remove Scratches, Not Detail
Sanding is not a brute-force act of abrasion; it’s a process of refinement. The goal isn’t to grind down a seam, but to replace large scratches with progressively smaller ones until they are too fine for the human eye—or a coat of silver paint—to detect. Starting with too coarse a grit or jumping grits too quickly is a cardinal sin. It inflicts deep scratches on the soft plastic that are then impossible to remove, creating an optical flaw that will haunt your final finish. The key is a disciplined, sequential progression.
Each sanding stage has a specific job. The initial, coarser grits (around 400-600) are for shaping and leveling the filler so it’s perfectly flush with the fuselage. Once the shape is correct, you are no longer removing material; you are polishing the surface. Subsequent grits (800, 1200, 1500, 2000, and beyond) exist only to remove the scratches left by the previous grit. Skipping a step means you’ll be trying to polish out deep 600-grit gouges with 1500-grit paper, which is ineffective and leads to over-sanding and lost detail.
Think of it like polishing a car’s clear coat. You start with a cutting compound and move to finer and finer polishes. For a natural metal finish, the plastic itself is your clear coat. It must be polished to a near-perfect sheen *before* any primer is applied. This meticulous surface homogenization ensures that the filled area and the surrounding plastic reflect light as one continuous surface.
Action Plan: The Zero-Flaw Sanding Sequence
- Initial Leveling: Use 400-grit paper to remove the bulk of excess filler and level the seam. Work carefully to avoid damaging surrounding plastic.
- First Refinement: Switch to 600-grit paper to remove the 400-grit scratches. The surface should feel smooth to the touch.
- Intermediate Polishing: Progress to 1200-grit wet sanding. The water will carry away plastic particles and start to create a semi-gloss sheen.
- Final Polish: Use 2000-grit (or higher, such as micromesh pads) with water until the surface is reflective and glass-smooth.
- Inspection: Wipe the surface clean and inspect under a strong, low-angle light. Any remaining scratches will be immediately visible. Repeat the last step if necessary.
This methodical approach is non-negotiable. While it demands patience, it is the only way to build a foundation strong enough to support the unforgiving nature of a silver finish. Any shortcut taken here will be paid for in the final result.
Why Water Is the Secret to a Glass-Smooth Plastic Surface
Dry sanding is aggressive. It tears at the surface of the plastic, creating friction and heat that can soften and gouge the material. More importantly, it clogs the sandpaper almost instantly with plastic dust, reducing its effectiveness and leading you to apply more pressure, which only worsens the damage. For a finish that needs to be optically perfect, dry sanding in the final stages is simply not an option. Water is the essential lubricant that transforms sanding from a crude abrasive process into a delicate act of polishing.
When you introduce water, several critical things happen. First, it acts as a coolant, preventing heat buildup and keeping the plastic stable. Second, it floats the plastic and filler particles away from the surface and out of the sandpaper’s grit. This is called creating a slurry. This slurry prevents the paper from clogging, allowing it to cut consistently with minimal pressure. The result is a much finer, more uniform scratch pattern and a significantly smoother surface. For an intermediate modeler struggling with fine surface scratches, adopting wet sanding is often the single biggest leap forward in quality. In fact, there is an overwhelming consensus among professionals, with some best practices guides claiming virtually 100% agreement on its necessity for high-shine finishes.
This technique is particularly vital when working with higher grits (600 and above). The goal in these stages is to polish, and only a wet surface allows for that level of finesse.
As you can see in the image, the water creates a glossy, reflective path that immediately reveals the quality of the surface. A dry, dusty surface hides these imperfections. By working wet, you are constantly cleaning the area and getting real-time feedback on your progress. It’s the difference between working blind and working with absolute clarity.
Never underestimate this simple addition to your workflow. A small cup of water and a willingness to embrace the process will elevate your surface preparation to a professional standard, creating a perfect canvas for that demanding silver paint.
Solvent Putty vs. CA Glue: Which Filler Doesn’t Shrink Over Time?
The choice of filler is the most critical decision in eliminating seams for a metallic finish. The wrong choice guarantees the appearance of a “ghost line”—a faint indentation that materializes days or even weeks after painting, as the filler continues to cure and shrink. This is the primary failure of traditional solvent-based tube putties. They work by melting the plastic and drying via solvent evaporation. This evaporation process causes the putty to lose volume, or shrink, long after you’ve finished sanding.
For a truly permanent and stable fill, you need a material that cures through a chemical reaction, not evaporation. This is where Cyanoacrylate (CA) glue, or superglue, excels. CA glue cures by reacting with moisture in the air. This is a catalytic reaction, not an evaporative one, meaning there is virtually no shrinkage. Once cured, it is dimensionally stable. This property makes it the superior choice for small-to-medium seams that must disappear under a reflective finish. It ensures that the perfectly smooth surface you create today will remain perfectly smooth tomorrow.
While CA glue is ideal for fine seams, other fillers have their place. Two-part epoxy putties also cure chemically with minimal shrinkage and are excellent for large structural gaps or rebuilding shapes. The key is understanding how each material behaves over time.
This comparative table, based on information from an analysis of common filler materials, breaks down the core differences. It illustrates why evaporative putties are a high-risk choice for natural metal finishes.
| Filler Type | Drying Method | Shrinkage | Best Use |
|---|---|---|---|
| Solvent Putty | Evaporative | Continues for 1+ week | Large gaps |
| CA Glue | Catalytic (moisture) | No shrinkage | Small seams |
| Two-Part Epoxy | Chemical reaction | Minimal | Structural fills |
Professional Filler Selection for Metallic Finishes
When preparing a B-29 “Silver Plate” bomber, a model renowned for its vast metallic surfaces, experienced modelers often turn to two-part epoxy putties. Materials like Milliput’s Super Fine grade or Apoxie Sculpt are chosen specifically because their chemical curing process results in a hard, non-shrinking fill. Both can be smoothed with water before they fully cure, minimizing the need for aggressive sanding and achieving a finish quality perfectly suited for silver paint, demonstrating the professional’s preference for chemically-curing fillers.
Therefore, for the perfectionist, the debate is settled. For all but the largest structural fills, CA glue is the standard. It provides the material fusion and long-term stability that a reflective finish absolutely demands.
Flex-i-files vs. Sanding Sticks: Preserving the Curvature of the Fuselage
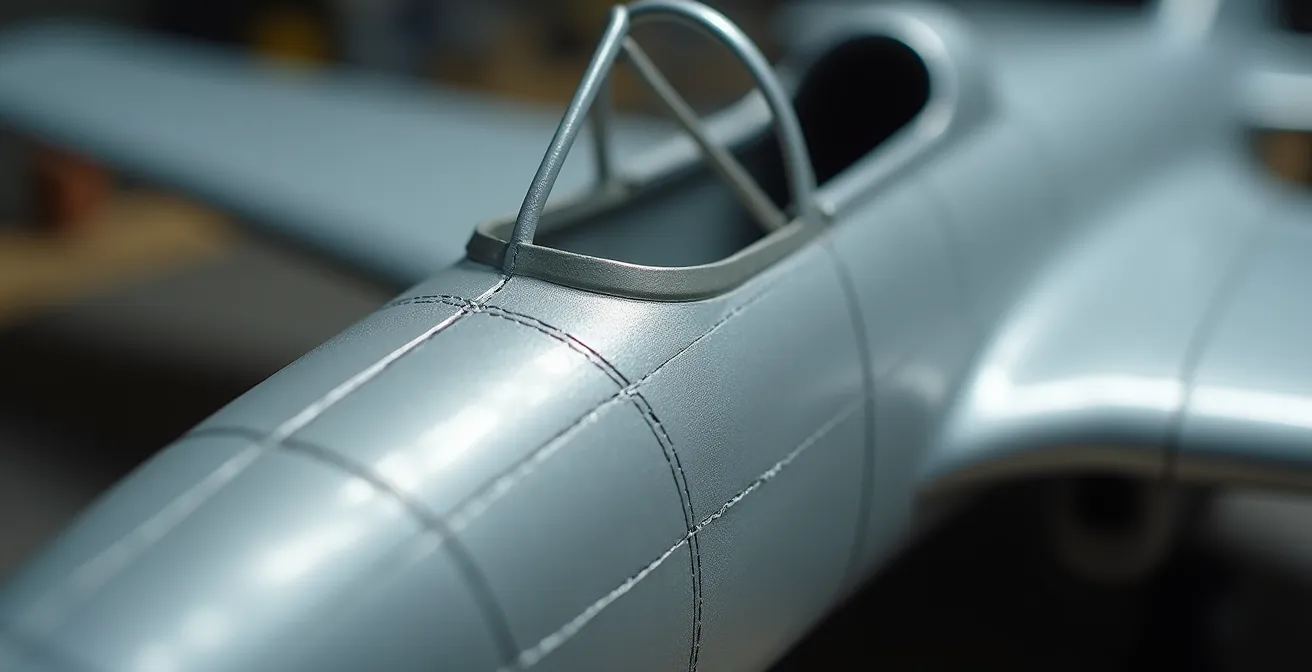
One of the easiest ways to ruin a seamless finish is to create flat spots. A rigid sanding stick or block, when used on a curved surface like a round fuselage or a wing’s leading edge, will inevitably flatten the area around the seam. While this might not be obvious on a camouflaged model, under a coat of silver paint, that flat spot will catch the light differently, creating an unnatural, faceted look that screams “model.” Preserving the gentle, compound curves of an aircraft is just as important as making the seam itself disappear.
This is where the choice of sanding tool becomes critical. Rigid sanding sticks have their place on flat surfaces or controlled, single-axis curves. However, for the complex, multi-axis curves of a fuselage, a flexible tool is non-negotiable. The Flex-i-File or similar tools, which use a taught band of abrasive cloth in a frame, are designed for this exact purpose. They naturally conform to the surface’s curvature, applying even pressure across the curve and preventing the creation of flat spots. This ensures the sanding process removes the seam without altering the aircraft’s fundamental shape.
You can also create your own custom flexible sanders by wrapping sandpaper around dowels, foam tubes, or other curved objects that match the radius of the area you are working on. The principle is the same: the tool must follow the curve, not fight it.
The unforgiving nature of metallic paint means that even subtle surface variations become major visual defects. In one documented build of a 1/72 Airfix FW-190A-8, a decent silver paint job was significantly detracted from because improper seam preparation on the curved fuselage created visible flat spots. This serves as a stark reminder that the tool must match the task.
Always check your work with a raking light—a strong light source held at a low angle to the surface. This will instantly reveal any unintended flat areas as distorted reflections. For a perfect silver finish, the reflection must flow smoothly and unbroken across the seam, proving that both the line and the original curvature are perfectly preserved.
How to Rescribe Panel Lines Lost During the Sanding Process
It’s an unavoidable consequence of seam removal: the fine, recessed panel lines that cross the seam will be filled and sanded away. Restoring these details is not an optional step; it’s essential for a realistic finish. A perfectly smooth but featureless fuselage looks like a toy. The challenge lies in scribing a new line across a multi-material surface (filler and plastic) that is straight, clean, and consistent in depth and width.
A proactive approach is best. Before you even apply filler, use a scribing tool to slightly deepen the existing panel lines on either side of the seam. This creates a more defined “groove” for your scriber to follow later, reducing the chance of it slipping. Once the seam is filled and sanded, the ghost of the old panel line is often still faintly visible. This is your guide. The most common technique is to use a flexible guide, such as Dymo labeling tape, laid along this ghost line. The raised edge of the tape provides a hard guide for your scribing tool.
The key to successful scribing is to use multiple light passes, not one heavy-handed gouge. Let the tool do the work. The required pressure will vary depending on the filler used. Hard, brittle fillers like CA glue require a light touch with a sharp tool to avoid chipping, while softer putties require care to prevent the tool from tearing or crumbling the material. The process should be as follows:
- Prepare the Area: Deepen the panel lines on either side of the seam before filling.
- Use a Guide: After sanding, place Dymo tape or a similar flexible straight edge along the path of the original line.
- Scribe in Light Passes: Draw your scribing tool along the guide with very light pressure. Repeat this 3-4 times, gradually increasing the depth of the line until it matches the surrounding panel lines.
- Clean the Line: Use a sharp hobby blade or a needle to gently clean out any debris from the newly scribed line. A soft toothbrush can also be effective.
- Repair Mistakes: If the scriber slips, don’t panic. Immediately fill the errant scratch with CA glue. An accelerator will cure it instantly, and you can sand the spot smooth and try again.
A restored panel line that is clean and consistent will reintegrate the seam area back into the overall model, making the repair truly invisible. It’s the final step in the illusion, turning a repaired surface back into a convincing piece of miniature engineering.
How to Remove Parts from Sprues Without Gouging the Plastic Surface
The pursuit of a perfect seam begins before the fuselage halves are even joined. It starts the moment you remove a part from its sprue. Every attachment point, or “gate,” is a potential seam that needs to be treated with the same level of care as the main fuselage joint. Using a pair of blunt cutters and snipping the part flush against its surface is a recipe for disaster. This method puts immense stress on the plastic, often creating a white stress mark or a sunken “divot” that is just as difficult to hide as a seam. Furthermore, as highlighted by professional modelers, every gouge or stress mark from part removal creates texture differences that will be glaringly visible through silver paint.
The correct approach is the two-cut method. This technique isolates the part from the stress of the initial cut, preserving the integrity of the plastic surface. It treats the final gate nub not as waste to be ripped away, but as a micro-seam that requires a precise finishing process.
The process is simple and methodical:
- The Relief Cut: Make your first cut on the sprue runner itself, a few millimeters away from the part. This removes the bulk of the sprue and relieves all tension. Use any basic pair of side cutters for this.
- The Flush Cut: Now that the part is free from the tension of the main sprue, use a high-quality, single-blade nipper to cut the remaining gate nub as close to the part’s surface as possible without touching it. The goal is to leave a tiny, raised stub.
- The Shave: Treat this remaining stub as a miniature seam. Using a fresh, sharp hobby blade, gently slice—do not push—the stub away in thin slivers, holding the blade at a shallow angle.
- The Final Polish: Once the nub is flush, there will be a tiny area with a different texture. This must be polished out using the same progressive sanding sequence you would use for a fuselage seam (e.g., 1200-grit, then 2000-grit, wet) until it is optically identical to the surrounding plastic.
This zero-tolerance approach to parts removal sets the standard for the rest of the build. By eliminating surface flaws at their source, you dramatically reduce the amount of corrective work needed later and set a flawless foundation for your silver finish.
Understanding Polystyrene Grades: Why Some Kits React Poorly to Lacquer Thinners
Not all plastic is created equal. The type and quality of polystyrene used by a manufacturer can have a dramatic impact on your finishing process, especially when dealing with “hot” or aggressive lacquer-based paints and thinners often used for metallic finishes. A lacquer thinner that works perfectly on a modern Tamiya kit might cause the surface of an older Revell kit to “craze” or develop a network of fine cracks, instantly ruining the finish. This is especially problematic around a seam filled with CA glue.
The issue is a combination of plastic composition and filler hardness. The CA glue is very hard and completely impervious to the lacquer thinner. The surrounding plastic, however, might be soft and porous. When the hot thinner is applied, it can slightly dissolve or “eat” into the soft plastic, but not the CA. This creates a microscopic trench along the edge of the seam, effectively revealing the very line you worked so hard to hide. This is why a filled seam can look perfect under a gentle acrylic primer, but then reappear as soon as a lacquer topcoat is applied.
A barrier coat is the solution. Before applying any aggressive lacquer paint, you must seal the entire surface—plastic and filler alike—with a primer that is impervious to lacquer thinners once cured. A good quality acrylic polyurethane primer or a specific “barrier” primer like Mr. Surfacer thinned with leveling thinner works well. This creates a neutral, uniform foundation that isolates your delicate surface preparation from the aggressive solvents of the final color coat.
The following table, based on general observations in the modeling community, gives an idea of how different plastic types can react. When in doubt, always test on a hidden area or a piece of scrap sprue.
As this guide to painting techniques highlights, knowing your material’s compatibility is essential for a predictable outcome, especially with unforgiving metallic paints.
| Brand | Plastic Type | Lacquer Compatibility | Primer Required |
|---|---|---|---|
| Tamiya | Stable ABS-like | Good | Optional |
| Revell (older) | Soft & porous | Poor (crazing risk) | Essential |
| Short-run kits | Brittle plastic | Very poor | Essential barrier coat |
By understanding the variable nature of polystyrene and always using a protective barrier coat, you take control of the chemistry involved. This prevents nasty surprises and ensures your perfect seam work is protected all the way to the final clear coat.
Key Takeaways
- A seamless finish under silver paint is an optical challenge, not just a physical one. The goal is a homogenized surface that reflects light uniformly.
- Chemically curing fillers like CA glue are superior to evaporative putties because their zero-shrinkage property prevents “ghost lines” from appearing after painting.
- Progressive wet sanding is a polishing process, not an abrasive one. It is essential for creating a glass-smooth surface without introducing deep scratches.
Raised vs. Recessed Panel Lines: How to Handle Older Kits for a Modern Look
Working on an older kit often presents a unique challenge: raised panel lines. While modern kits feature finely recessed lines, many kits from the 1970s and 80s represented paneling with thin, raised plastic ridges. Dealing with a seam that crosses these raised lines requires a completely different strategy, as standard sanding techniques would simply obliterate them, leaving a bald patch on the fuselage.
You have a few strategic options, ranging from careful preservation to complete replacement. The path you choose depends on your comfort level and the desired final look. It’s a critical decision, as professional modeling standards indicate that raised panel lines create an uneven light reflection that can make an otherwise well-finished model look toy-like, especially under silver paint.
Here are the primary strategies for modernizing the look of a kit with raised panel lines:
- The Preservation Method: This is the most delicate approach. Mask off the fuselage on either side of the seam, leaving only a very narrow channel to work in. Use narrow, specialized sanding tools or folded sandpaper to work only within this channel, preserving the raised lines just millimeters away. This is difficult and time-consuming.
- The Blank Canvas Method: The most drastic, but often cleanest, solution. Sand off *all* the raised panel lines on the entire model. This gives you a perfectly smooth, uniform surface to work on. You can then choose to leave it as-is for a very clean look or completely rescribe the entire aircraft with recessed lines—a major undertaking.
- The Shadow Method: A clever compromise. Sand the seam area smooth, removing the raised lines in the process. After painting, use a very sharp 0.3mm mechanical pencil to carefully draw in the “shadow” where the panel line used to be, simulating a recessed line.
- The Stretched Sprue Method: For the dedicated modeler. After sanding the seam smooth, replace the lost section of raised panel line by gluing a piece of “stretched sprue” (a piece of plastic sprue heated and pulled thin) in its place, carefully blending it in.
Ultimately, tackling an older kit with a silver finish forces you to become not just a builder, but a surface restoration specialist. By choosing a clear strategy for handling its unique quirks, you can elevate a vintage piece of plastic into a modern, realistic masterpiece.