The terrifying wrinkling of a decal under solvent is not a sign of failure, but a necessary chemical reaction you can master.
- Solvent “heat” is determined by its chemical base (mild acetic acid vs. aggressive alcohols), not magic.
- Wrinkling is the “plasticization” phase where the decal becomes liquid-like; touching it at this stage is catastrophic.
Recommendation: Always test your chosen solution on a scrap decal and a painted test piece before applying it to your final model to avoid irreversible damage.
That heart-stopping moment: you apply a drop of decal solution, and the perfect marking on your model’s wing suddenly shrivels into a horrifying, wrinkled mess. Every modeler has felt this panic. The immediate impulse is to fix it, to smooth it out, but that often leads to a torn, ruined decal. The common advice is to simply “walk away” or “use a milder solution,” but this advice misses the fundamental point. It treats decal solutions like a mysterious art form when, in fact, it is a predictable science.
The fear you feel comes from a lack of understanding. This is not about having a “magic touch”; it’s about understanding the chemical reactions you are initiating on your model’s surface. The difference between a mild solution like Micro Sol and a “hot” one like Mr. Mark Softer isn’t just about brand names; it’s about their core chemical composition and how they interact with both the decal film and the paint underneath. By understanding this chemistry, you replace fear with control.
This guide will demystify the process from a chemist’s perspective. We will break down what’s actually happening when a decal wrinkles, explain the precise order and purpose of two-part systems, and provide clear protocols to prevent damage to your paint or the plastic itself. You will learn to see that wrinkle not as a disaster, but as a sign that the chemical process of “film plasticization” is working exactly as intended.
For those who prefer a visual guide, the following video offers an excellent demonstration of the principles of applying waterslide decals, which complements the chemical explanations we will explore.
To navigate this deep dive into decal chemistry, the article is structured to build your knowledge logically. We will begin with the foundational science of the solutions themselves and progress through application techniques, troubleshooting, and prevention strategies.
Summary: The Science and Strategy of Perfect Decal Application
- Vinegar vs Alcohol base: understanding which brands are “hot” or “mild”?
- Why you must NEVER touch a decal while it is wrinkling under solution?
- Setter vs Softer: in what order to use the two-bottle systems?
- Can strong decal solutions stain or dissolve your acrylic floor wax coat?
- The hot towel compress: how to force a thick decal down when chemicals fail?
- How to Save a Tearing Decal Before It Ruins Your Wing Marking?
- Understanding Polystyrene Grades: Why Some Kits React Poorly to Lacquer Thinners?
- How to Prevent Decal Silvering on Matte Paint Surfaces?
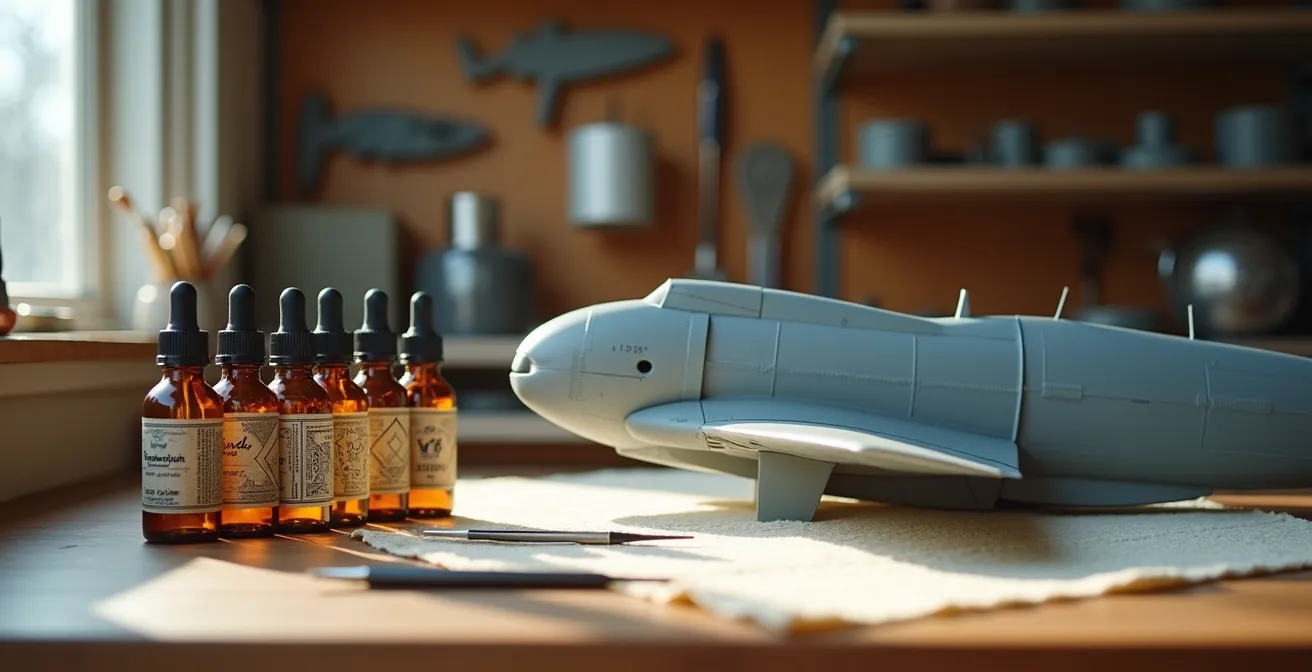
Vinegar vs Alcohol base: understanding which brands are “hot” or “mild”?
The distinction between a “hot” and “mild” decal solution isn’t marketing jargon; it’s a direct reflection of its underlying chemical reactivity. Understanding this is the first step to mastering decal application. The “strength” is primarily determined by the active solvent used in the formula, which dictates how aggressively it will plasticize the decal film.
Mild solutions, like the popular Micro Sol, typically use a weak acid as their active ingredient. Its formula is based on acetic acid—the same component found in vinegar—at a very low concentration. This makes it gentle and forgiving, ideal for the delicate, thin decals produced by brands like Cartograf or Eduard. It softens them just enough to conform to details without a high risk of complete dissolution. In contrast, “hot” solutions are formulated to tackle the thick, stubborn decals often found in older kits or from manufacturers like Tamiya and Hasegawa. These products, such as Mr. Mark Softer, employ more aggressive solvents. The key ingredient in Mr. Mark Softer is butyl cellosolve, a type of glycol ether that is a far more powerful plasticizer than acetic acid. This is why it works so well on thick decals but also carries a much higher risk of melting thin ones or damaging underlying paint if not used with care.
This spectrum of chemical reactivity is crucial for selecting the right tool for the job. Using a very hot solution like Solvaset on a thin Eduard decal is like using a sledgehammer to crack a nut—it will likely destroy it. The following table provides a clear comparison of common solutions, their chemical bases, and their intended uses.
| Solution Brand | Chemical Base | Strength Level | Best For | Risk Factor |
|---|---|---|---|---|
| Micro Sol | Acetic acid (mild) | Mild-Medium | Cartograf, Eduard thin decals | Low |
| Mr. Mark Softer | Complex alcohols, butyl cellosolve | Hot | Tamiya, Hasegawa thick decals | Medium-High |
| Tamiya Mark Fit Strong | Alcohols, propylene glycol ether | Hot | Stubborn thick decals | High |
| Solvaset | Methoxy-propanol | Very Hot | Extreme curves, thick decals | High |
| AK Interactive | Water-based mild acids | Mild | Delicate aftermarket decals | Very Low |
As a comprehensive test by the Decal Solutions Testing Team at Exito Model Store confirms, ” The key factor with Micro Sol isn’t just that it contains acetic acid – it’s the low concentration that makes it safe yet effective. In contrast, solutions like Mr. Mark Softer contain butyl cellosolve, which is significantly more aggressive.” This expert analysis reinforces the importance of matching the solution’s chemical power to the decal’s resilience.
Why you must NEVER touch a decal while it is wrinkling under solution?
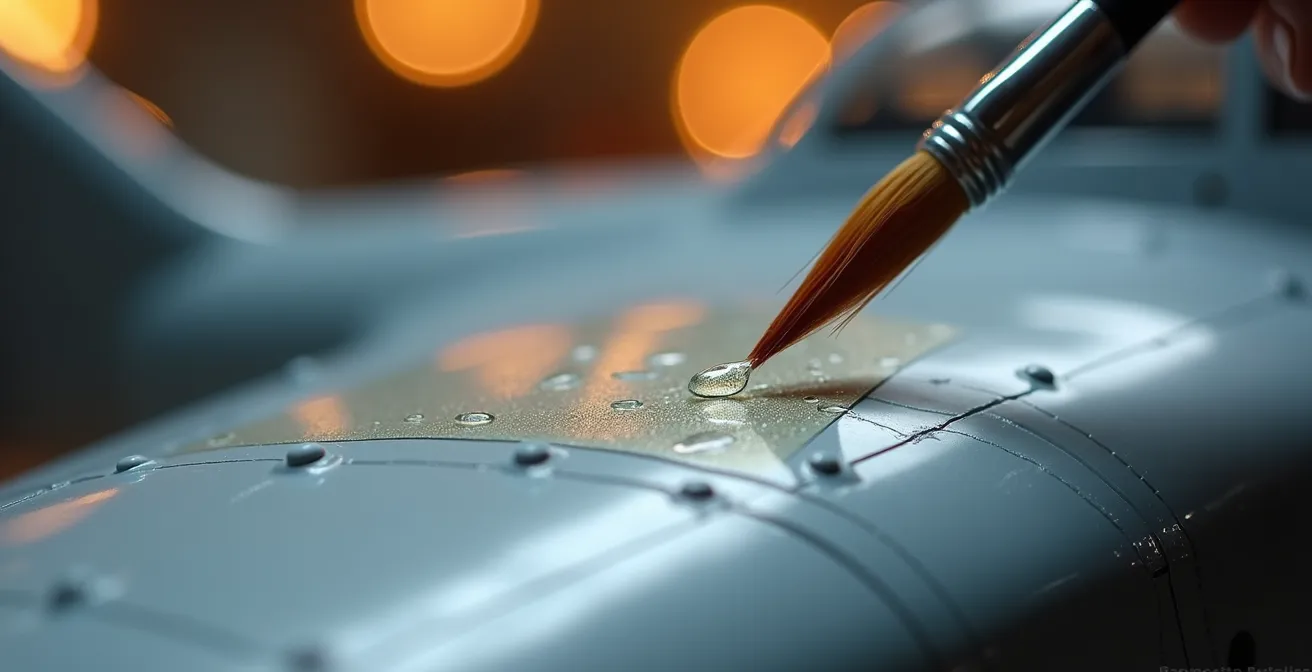
The wrinkled state is the most misunderstood and crucial part of the decal application process. When you see the decal shrivel, the solution isn’t destroying it; it’s performing its primary function: film plasticization. The solvent is temporarily breaking down the polymer bonds of the decal’s clear film, turning it from a solid sheet into a semi-liquid, gel-like state. This is what allows the decal to stretch and conform perfectly over complex surfaces like rivets, panel lines, and compound curves.
During this phase, the decal has virtually no structural integrity. Touching it with a brush, a cotton swab, or even a finger will cause the semi-liquid film to tear, stretch, or fold onto itself irreversibly. This critical reaction phase is surprisingly short; a forum analysis of modeler experiences shows the danger zone typically lasts from 30 to 90 seconds after the solution is applied. The key is to be patient and trust the chemical process. As the solvent evaporates, the polymer bonds in the decal film will reform, and the decal will pull itself taut and smooth over the details underneath. It is a self-correcting process.
Your role as the modeler is simply to be an observer during this phase. If you’ve applied the right amount of solution, the decal will settle on its own. Resisting the urge to “help” it is the single most important skill to develop. The correct procedure is one of controlled patience:
- Apply a small drop of softening solution to the decal.
- Watch it wrinkle. Do not touch it. Step away if you must.
- Wait for the solvent to evaporate and the decal to smooth itself out. This can take several minutes.
- If stubborn wrinkles or air bubbles (silvering) remain after it has completely dried, you can then intervene. Carefully prick the bubble or crease with a sharp hobby knife point and apply another small drop of solution to that specific spot.
- Let the process repeat. You can apply multiple coats of solution, but always allow the decal to dry fully between applications.
Setter vs Softer: in what order to use the two-bottle systems?
Two-bottle systems like Microscale’s Micro Set and Micro Sol are designed to tackle two different physical challenges in decal application. Confusing their roles is a common source of problems. They are not interchangeable, and their application order—Set, then Sol—is based on fundamental principles of surface physics and chemistry.
Step 1: The Setter (e.g., Micro Set). The primary job of a “setter” solution is not to soften the decal, but to prepare the surface. It is essentially a wetting agent that reduces the surface tension of the water on the model. This prevents the water droplet from beading up and allows the decal to slide easily into its final position without folding or sticking prematurely. It also contains a small amount of mild adhesive to help secure the decal and prevent it from moving after it’s positioned. You apply the setter to the model’s surface before you slide the decal on.
Step 2: The Softer (e.g., Micro Sol). The “softer” is the powerful chemical agent we’ve already discussed. Its sole purpose is film plasticization. It is applied after the decal is in its final position and you have blotted away the excess water and setter solution. The softer melts the decal into the surface details, making it look painted on. The two solutions work in a sequence: the setter puts the decal in the right place, and the softer makes it conform to the surface it’s on. For extremely complex surfaces, modelers use a “Solution Sandwich” technique: applying setter, the decal, a coat of softer, letting it dry, and then applying a second, lighter coat of softer to finish the job.
Mixing brands of setter and softer is generally discouraged for beginners. While often possible, the chemical formulations can be proprietary. A setter from one brand might react unpredictably with a softer from another, potentially causing clouding or insufficient softening. Sticking to one brand’s ecosystem ensures a predictable, tested chemical reaction.
Can strong decal solutions stain or dissolve your acrylic floor wax coat?
Yes, absolutely. A common “pro-tip” is to use an acrylic floor polish like Future or Pledge as a gloss coat. While this works beautifully for creating a smooth surface for decals, these acrylic coats are not impervious to the aggressive solvents found in “hot” decal solutions. The alcohols and glycol ethers in products like Mr. Mark Softer or Solvaset can re-activate and dissolve an acrylic layer, leading to clouding, staining, or a soft, gummy surface that ruins the finish.
The key factor is the curing window of the acrylic coat. An acrylic paint or varnish feels dry to the touch in under an hour, but it is not fully chemically cured. The polymerization process, where all the solvent carriers evaporate and the acrylic molecules cross-link into a hard, durable shell, takes much longer. Applying a hot decal solution onto a partially cured surface is a recipe for disaster. Most experienced modelers agree that a not-fully-cured acrylic coat needs at least 48-72 hours to develop sufficient chemical resistance to withstand an aggressive decal solvent. Rushing this step is one of the most common ways modelers damage an otherwise perfect paint job.
Because every combination of paint, clear coat, and decal solution can behave differently, the only way to be completely safe is to conduct a controlled experiment. Before committing a solution to your finished model, you must perform a compatibility test. This is a non-negotiable step for any cautious modeler.
Action plan: Foolproof compatibility test protocol
- Prepare a Test Mule: Select a piece of scrap plastic (an old model part or sprue). Paint it with the exact same primer, color coat, and gloss varnish you used on your model.
- Respect the Curing Window: Allow the test mule to cure for the same amount of time as your model—ideally, 48-72 hours.
- Select a Sacrificial Decal: Choose an unused decal from the same sheet you are working with. A manufacturer’s logo or a spare number is perfect.
- Run the Test: Apply the test decal to the mule using the exact setter/softer combination and technique you plan to use on the final model.
- Observe and Document: Let the test decal dry completely. Monitor it for 24 hours, checking for any signs of gloss coat clouding, paint staining, decal dissolution, or surface softening. If any of these occur, your system is incompatible, and you must switch to a milder solution.
The hot towel compress: how to force a thick decal down when chemicals fail?
Sometimes, even the hottest chemical solutions struggle to make a thick, cardboard-like decal conform to a sharp compound curve or a deeply recessed panel line. In these extreme cases, modelers can turn to a technique that uses physics instead of chemistry: the hot compress. This method uses heat and moisture to make the decal film pliable, effectively shrink-wrapping it to the surface.
The technique is straightforward but requires a gentle touch. Professional modelers report success using a lint-free microfiber cloth, which won’t leave fibers embedded in the softened decal. The cloth is dampened with water heated to a temperature that is hot to the touch but not boiling, typically around 50-60°C (120-140°F). After applying the decal and a coat of your preferred solution, you wait for the initial wrinkling to subside. Then, you gently lay the hot, damp cloth over the decal and apply light, even pressure for 10-15 seconds. The combination of heat and moisture makes the decal film extremely soft, while the gentle pressure forces it down into every underlying detail.
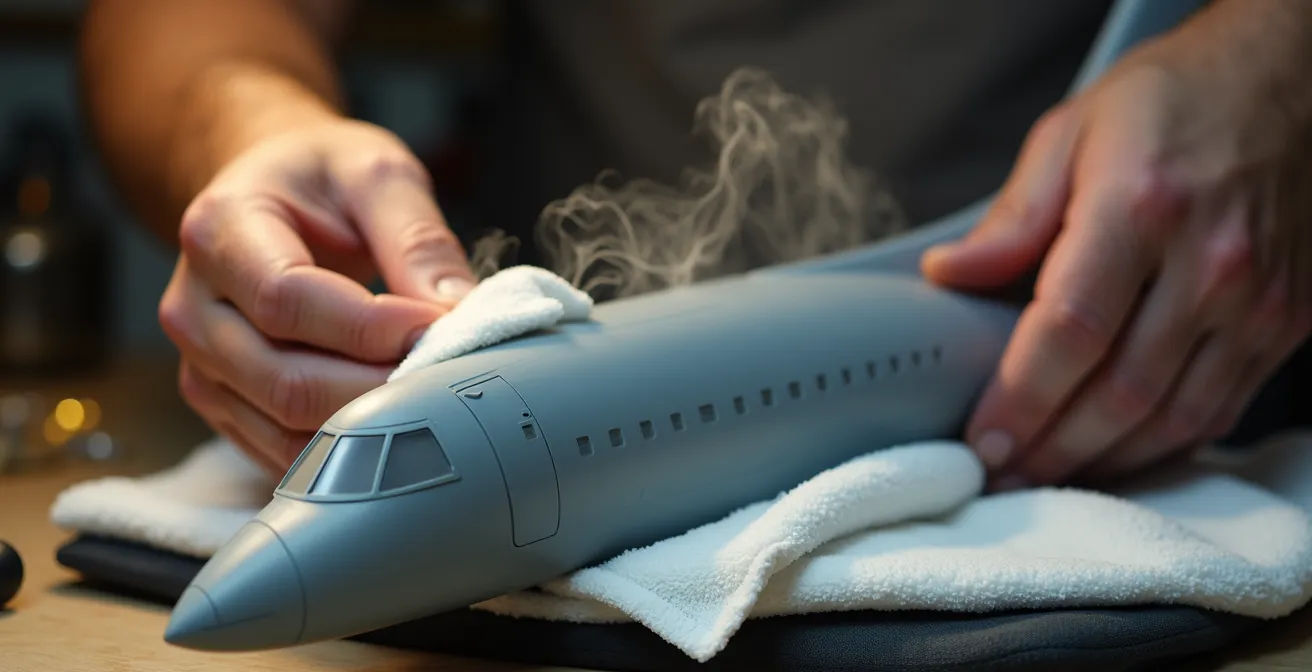
This method is particularly effective for large decals on curved fuselages or spines. The key is to apply pressure evenly and not to “wipe” or “rub” the cloth, as this will tear the super-softened decal. It’s a method of last resort, but it is remarkably effective when chemical solutions alone are not enough to conquer a stubborn marking. It’s a testament to the idea that sometimes a simple physical approach can solve a complex chemical problem.
How to Save a Tearing Decal Before It Ruins Your Wing Marking?
Even with careful handling, a tear can happen. A decal might catch on a sharp edge during positioning, or an overly aggressive solution might weaken it too much. The key to a successful repair is to act quickly and appropriately based on whether the decal is still wet or has already dried.
If the tear occurs while the decal is still wet and pliable from a recent application of solution, you can often perform an invisible “wet weld.” According to advice shared within the Scale Modeling Community, ” When a tear appears during application, applying a tiny drop of softer solution directly onto the tear melts the edges slightly, allowing them to fuse back together as it dries.” The trick is to use a fine-tipped brush to apply the smallest possible amount of solution just to the torn edges. As the solvent works, the two sides of the tear will become semi-liquid and merge. Capillary action will often pull the gap closed. Do not touch it; let the chemistry do the work.
If you discover the tear after the decal has already dried, re-wetting it with a strong solvent is risky, as it can cause the entire decal to shift or dissolve. A safer approach is a “gap-filling” repair using clear varnish. This method treats the tear like a small crack to be filled and sealed.
- Do Not Re-wet: Resist the temptation to apply more decal solution to the dried, torn decal.
- Choose Your Filler: Select a thin, clear filler. A gloss varnish works well, as does a clear canopy glue like Micro Kristal Klear, which dries perfectly transparent.
- Apply Carefully: Using the tip of a toothpick or a size 00 paintbrush, apply a tiny amount of the clear filler directly into the gap of the tear.
- Smooth the Excess: Gently wipe away any excess filler from the decal surface with a cotton swab lightly dampened with water, working from the center of the decal outwards.
- Cure and Seal: Allow the filler to cure completely. The gloss of the repair will be visible, but once you apply your final matte or satin clear coat over the entire model, the repair will become virtually invisible.
Understanding Polystyrene Grades: Why Some Kits React Poorly to Lacquer Thinners?
Not all plastic is created equal. The reason a hot solvent might be perfectly safe on a Tamiya kit but wreak havoc on a short-run kit from a smaller manufacturer lies in the grade of the polystyrene polymer matrix itself. Manufacturers use different formulations of plastic, resulting in varying degrees of hardness and chemical resistance. This is a critical factor often overlooked by modelers.
Hard, high-quality styrene, like that used by Bandai in their Gundam kits or Tamiya in their aircraft models, has a very dense polymer structure. It is highly resistant to chemical attack. You can use aggressive lacquer-based paints and hot decal solutions on these kits with little risk of the plastic itself being damaged. Conversely, the softer plastic used in many older kits or by some Eastern European “short-run” manufacturers like MPM or Special Hobby is much more porous and vulnerable. An aggressive solvent can not only damage the paint but can actually craze or melt the surface of the plastic underneath, causing permanent damage.
A good quality primer is your single best defense. It acts as a chemical barrier, isolating the plastic from subsequent layers of paint and decal solutions. A properly applied and cured primer coat can provide a significant safety margin. Indeed, data from modeling guides suggests that a properly applied primer coat provides approximately a 95% protection rate against solvent-induced plastic damage. This makes priming a non-negotiable step when working with kits of unknown or questionable plastic quality.
| Manufacturer | Plastic Type | Chemical Resistance | Safe with Hot Solutions | Notes |
|---|---|---|---|---|
| Tamiya | Hard styrene | High | Yes | Can handle most aggressive solutions |
| Bandai | Hard ABS/styrene mix | Very High | Yes | Extremely durable against chemicals |
| Hasegawa | Medium-hard styrene | Medium-High | Yes with care | Test hot solutions first |
| MPM/Special Hobby | Soft styrene | Low-Medium | Use mild only | Short-run kits more vulnerable |
| Academy | Medium styrene | Medium | Usually safe | Quality varies by production run |
Key takeaways
- Decal solution “strength” is pure chemistry: mild acids (Micro Sol) are for thin decals, while aggressive alcohols (Mr. Mark Softer) are for thick ones.
- The essential step for preventing “silvering” (air bubbles under the decal) is to apply a gloss varnish coat before decaling.
- Never trust a new combination of paint, varnish, and solution. Always perform a compatibility test on a painted scrap part first.
How to Prevent Decal Silvering on Matte Paint Surfaces?
Decal “silvering” is the appearance of a silvery sheen or tiny air bubbles under the clear film of a decal, making it look like a sticker instead of a painted-on marking. This frustrating issue has a simple cause rooted in physics: it is the result of light scattering. A matte paint surface is, at a microscopic level, very rough. When you place a decal over it, the decal film cannot make perfect contact, trapping microscopic pockets of air between the film and the paint’s “peaks and valleys.” When light passes through the clear decal film, it hits these air pockets and the rough surface and is scattered in all directions, making the clear film visible to your eye as a silvery haze.
The solution is not to use more decal solution to force it down; the solution is to eliminate the air pockets entirely. This is achieved by creating a perfectly smooth, non-porous surface for the decal to adhere to. The “silvering-proof” workflow involves sandwiching the decal between two layers of gloss varnish. The gloss coat fills in all the microscopic pits in the matte paint, creating a surface as smooth as glass. The decal can then be applied with no possibility of trapping air. Once the decal is dry, another gloss coat seals it in, and a final matte coat over the top restores the desired finish, making the gloss layers completely invisible.
This is the universally accepted, gold-standard procedure for achieving a painted-on look:
- Apply your base color coats (matte, satin, etc.) and allow them to fully cure.
- Apply a uniform gloss clear coat over the entire area where decals will be placed. Let this coat cure for at least 24-48 hours.
- Apply your decals onto the gloss surface using your preferred setting and softening solutions. The decal will now adhere perfectly with no silvering.
- Once the decals are fully dry, apply another thin gloss coat to seal their edges and protect them.
- Finally, apply your desired final finish (matte, satin, or semi-gloss) over the entire model. This will hide the gloss underlayer and unify the model’s sheen.
While some advanced modelers use spot applications of oil washes or floor polish just under the decal area, the full gloss coat method is the most reliable and foolproof technique for anyone looking to permanently eliminate silvering from their results.
Now that you understand the chemical reactions and physical principles at play, you can approach decaling not with fear, but with the confidence of a chemist in their lab. To apply this knowledge with confidence, start by creating your own compatibility test kit using the protocol outlined and never again be at the mercy of an unknown reaction.
Frequently Asked Questions about Decal Solvents
Can I mix different brands of setter and softer solutions?
While it is sometimes possible, it’s not recommended for achieving predictable results. Each brand formulates its system to work together. Mixing a setter from one brand with a powerful softer from another can lead to unexpected chemical reactions, like clouding the finish or insufficient softening. For guaranteed performance, it’s best to stick within one brand’s ecosystem.
When should I skip the setter solution entirely?
On an extremely high-gloss surface, a setter solution can sometimes be redundant. The primary purpose of a setter is to reduce surface tension and provide “slip” for positioning. A very glossy surface, like one coated with a high-quality acrylic gloss, already has low surface tension and allows the decal to be moved easily. In these cases, you can often apply the decal with just water and then proceed directly to the softer solution once it’s in place.
What’s the ‘Solution Sandwich’ technique?
This is an advanced method for tackling very complex curves or extremely stubborn decals. It involves a controlled escalation of solvent application. The sequence is: 1. Apply setter to the surface. 2. Position the decal. 3. Apply a coat of softer solution and let it dry completely. 4. Assess the result. If more conformity is needed, apply a second, lighter coat of softer solution. This multi-layer approach allows you to gradually melt the decal into place without overwhelming it with one heavy application, reducing the risk of damage.