
The superiority of slide-molding isn’t just about creating a hollow barrel; it’s an engineering philosophy that trades higher upfront tooling costs for near-perfect part integrity out of the box.
- This technology uses lateral-moving pins (‘slides’) to form complex internal shapes in a single piece, eliminating the primary cause of sanding and filling.
- While it may lead to a higher kit price, the time and effort saved on tedious seam correction represent a greater value for the builder.
Recommendation: Prioritize kits advertising “slide-mold” or “single-piece” components. The increase in price is a direct investment in a more enjoyable and efficient building experience.
For any scale modeler, the moment of truth often arrives with a pair of plastic tube halves. The gun barrel, the exhaust, the missile body—all promise a satisfying assembly, but so often deliver a tedious cycle of gluing, clamping, and the dreaded sanding of a stubborn seam line. We’ve all been there, carefully trying to restore a perfect cylindrical shape from two imperfect halves, losing detail and patience in the process. We accept this as a fundamental part of the hobby, a necessary chore on the path to a finished model.
The common advice is to get better at sanding, to invest in specialized fillers, or to simply buy expensive aftermarket metal barrels. These are workarounds, not solutions. They address the symptom—the seam—but not the root cause: an outdated manufacturing method that is simply not optimized for creating seamless cylindrical parts. This approach forces the modeler to correct a flaw that was built into the kit from the very beginning.
But what if the fundamental problem wasn’t the builder’s skill, but the limitation of the tool itself? The real revolution isn’t in how we fix these parts, but in how they are manufactured. Slide-mold technology represents a profound shift in engineering philosophy. It’s a deliberate choice by manufacturers to invest in vastly more complex and expensive tooling to deliver a component with superior part integrity. This article will deconstruct the engineering elegance of slide-molding, demonstrating why it’s not just a feature, but a fundamental change that shifts the builder’s effort away from tedious correction and back toward the pure joy of assembly and finishing.
This guide will explore the mechanics behind this technology, how to identify it before you buy, and why it justifies its cost. We will delve into the specific techniques for handling these advanced parts, ensuring you get the most out of this manufacturing marvel.
Contents: The Engineering of Modern Model Kits
- Seamless definition: why slide molds allow for hollow muzzles?
- Is it still necessary to drill out slide-molded exhausts?
- How to spot the “Slide Mold” icon on kit boxes before buying?
- The subtle seam line on slide-molded parts that everyone misses
- Does slide-mold technology justify a 20% higher kit price?
- How to Identify Quality Injection-Molded Kits Before Opening the Box?
- Why You Must Treat Resin Parts Differently Than Plastic to Avoid Lung Damage?
- How to Remove Parts from Sprues Without Gouging the Plastic Surface?
Seamless definition: why slide molds allow for hollow muzzles?
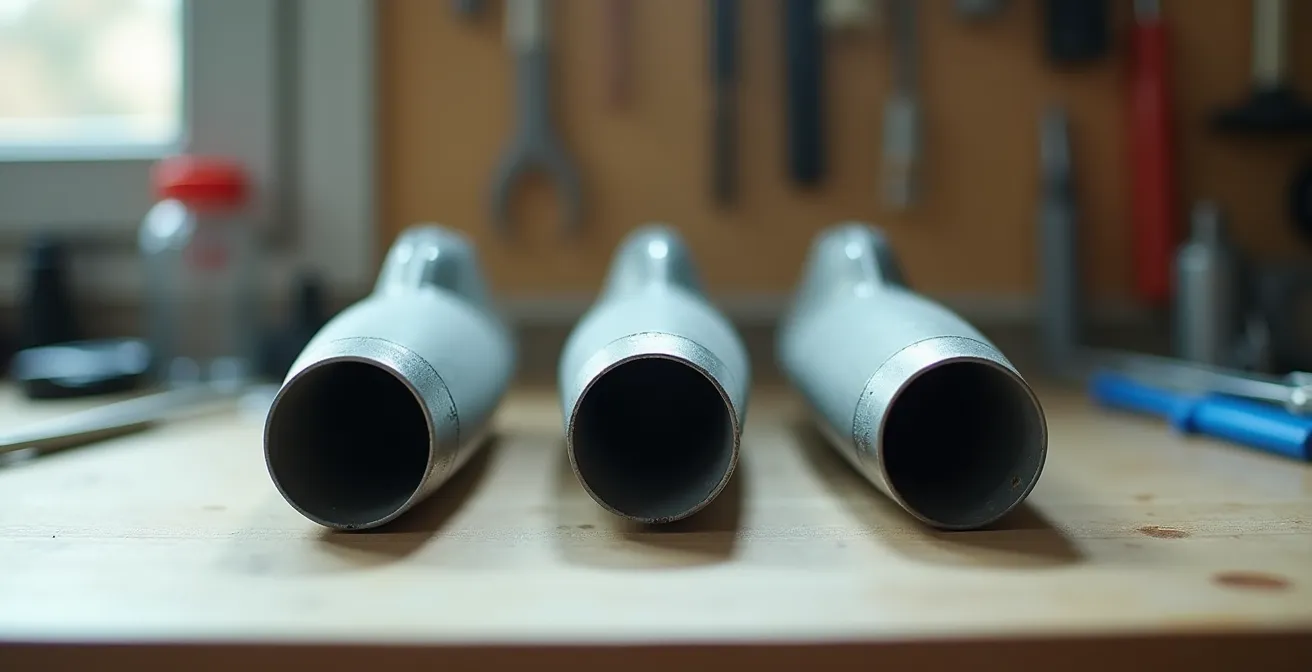
To appreciate the superiority of slide-molding, one must first understand the elegant mechanics at its core. A traditional injection mold is a two-part system (a “core” and a “cavity”) that clamps together, much like a waffle iron. Molten plastic is injected into the space between them. This is perfectly adequate for solid objects or parts that can be formed in two halves. However, creating a hollow, single-piece tube like a gun barrel is physically impossible with this setup; there’s no way to form the inside and then remove the part.
Slide-molding introduces a third, and sometimes fourth or fifth, dimension of movement. As a technical expert on the Missing-Lynx modeling forum aptly described it:
Slide molding is basically a variation of regular injection molding, but it features additional ‘inner’ molds that slide in and out of the assembled mold from the sides to produce hollow parts
– Missing-Lynx Forum Technical Expert, Missing-Lynx Model Forum Discussion
This “inner mold” is a precision-engineered pin or block—the ‘slide’—that moves laterally into the main mold cavity after it has closed. The molten plastic is then injected, flowing around this slide. The slide forms the hollow interior of the barrel. The crucial step is the retraction: before the main mold halves open, the slide pulls back out, leaving a perfectly formed, single-piece hollow part. This process allows for undercuts and complex details that are simply unachievable with a static two-part mold, ensuring exceptional part integrity from the start.
This single-piece construction completely eliminates the primary longitudinal seam line that plagues traditional kits, freeing the builder from the most time-consuming and frustrating step of preparing cylindrical components.
Is it still necessary to drill out slide-molded exhausts?
A common question that arises with slide-molded parts, particularly exhausts and gun muzzles, is whether they still require enhancement. The technology provides a hollow opening, but is the depth and sharpness sufficient for a discerning modeler? The answer, from an engineering perspective, is “it depends.” The depth of the hollow is determined by the length of the slide pin, which is limited by tooling constraints and the risk of the pin bending or breaking under injection pressure.
Therefore, a modeler is often faced with three choices: accept the part as-is, attempt to improve it, or replace it entirely. The part’s initial quality is the deciding factor. A well-engineered slide-molded exhaust may have sufficient depth and a sharp lip, requiring no work at all. A shallower molding, however, might benefit from careful reaming with a drill bit to increase its apparent depth and thin the edges for a more scale-realistic appearance.
The final option is replacing the part with a resin or metal aftermarket component. This often provides the ultimate level of detail but comes at an additional cost. The decision is a trade-off between time, cost, risk, and the desired level of quality, a calculation every modeler must make based on their personal standards. The following analysis breaks down this decision.
This cost-benefit analysis, supported by data from a recent guide on injection molding pricing, helps quantify the decision-making process for the modeler.
| Option | Time Investment | Material Cost | Risk Level | Final Quality |
|---|---|---|---|---|
| Keep slide-molded exhaust as-is | 0 minutes | $0 | None | Good (80%) |
| Drill and refine existing part | 15-30 minutes | $0 | Medium (damage risk) | Very Good (90%) |
| Replace with aftermarket part | 5 minutes installation | $8-15 | Low | Excellent (95%+) |
For most builders, a good slide-molded part is more than adequate and represents a massive improvement over traditional two-piece alternatives, making any further work a matter of personal choice rather than necessity.
How to spot the “Slide Mold” icon on kit boxes before buying?
Identifying kits that leverage this superior technology before purchase is the key to a better building experience. Manufacturers who invest in complex slide-mold tooling are proud of it and often advertise it directly on the box art. Look for specific icons or text callouts like “Slide-Molded,” “Single-Piece Gun Barrel,” or “New Tooling.”
Pioneering companies like Dragon Models have built a reputation on this technology. Their “Smart Kits” and “Gen2” series heavily feature slide-molding to produce incredibly detailed parts with high fidelity while ingeniously reducing the part count. This allows modelers to achieve a high level of detail directly out of the box without needing complex photo-etched parts or aftermarket replacements. These kits are engineered for a smoother, more enjoyable build.
Case Study: Dragon Models’ Technology Evolution
Dragon Models has been a leader in using slide molds to enhance authenticity. By employing multi-directional slides, they can produce complex parts like an entire aircraft fuselage as a single piece, eliminating major assembly gaps. This technology, developed over a decade of research, shifts the effort from basic construction to fine detailing, which is a testament to the power of investing in advanced tooling.
However, be wary of “re-boxings.” A kit with brand new box art from 2024 might contain plastic from molds created in 1995. The most reliable indicator of quality is the original tooling date. When assessing kit quality, check the original tooling date, as research shows that kits from 2020 and later frequently feature slide-molding technology, while re-boxings of older molds do not. Look for reviews on sites like Scalemates.com, which meticulously track the lineage of kit toolings, to ensure you’re buying modern engineering, not just a modern box.
Paying attention to these details transforms you from a simple buyer into an informed consumer, capable of selecting kits based on their engineering merit.
The subtle seam line on slide-molded parts that everyone misses
While slide-molding eliminates the prominent, ugly seam of a two-part assembly, it is an engineering truth that no molding process is entirely without artifacts. A slide-molded part does have a “seam,” but it’s of a completely different nature. Instead of a ridge where two halves meet, a slide-molded part has incredibly faint lines, known as witness marks, where the moving slide component meets the fixed mold halves. These typically appear at the 3 and 9 o’clock positions on a cylindrical part.
These witness marks are not a ridge of excess plastic but are more like a hairline shadow or a subtle change in surface texture. On a high-quality molding, they can be nearly invisible. However, on some parts, or under a coat of primer, they can become noticeable. The critical difference is that correcting them requires finesse, not brute force. Aggressive sanding, the go-to method for traditional seams, will ruin the part’s perfect shape and destroy surrounding detail.

Treating these marks requires a delicate touch. The goal is to polish, not remove material. Often, gently scraping the line with the back of a new hobby knife blade held perpendicularly is sufficient. This “burnishes” the plastic without gouging it. Following up with ultra-fine polishing sponges (3000 grit or higher) or even a tiny application of extra-thin cement to chemically melt the line can make it vanish completely. It’s a process of refinement, not reconstruction—a perfect example of the effort shift this technology provides.
Your Action Plan: Advanced Correction for Slide-Mold Seams
- Avoid aggressive sanding which can damage surrounding detail.
- Gently scrape with the back of a hobby knife blade held at 90 degrees.
- Polish with ultra-fine sanding sponges (3000-4000 grit).
- Apply a tiny amount of extra-thin cement to chemically melt and smooth the line.
- Check for other artifacts: look for faint ejector pin marks in the hollow sections or subtle mold shift lines.
Mastering this technique allows you to achieve a truly flawless finish that honors the precision of the original part.
Does slide-mold technology justify a 20% higher kit price?
The sticker price of a slide-molded kit is often noticeably higher, leading many to question if the benefit is worth the cost. From a manufacturing engineering standpoint, the price is entirely justified. The tooling complexity of a multi-part slide mold is exponentially greater than a simple two-part mold. Designing, machining, and maintaining these intricate tools with their precisely synchronized moving parts represents a significant capital investment for the manufacturer.
While some industry analysis shows that standardized slide assemblies can help manufacturers save on time and replacement component costs, the initial design and creation of a complex, custom mold for a scale model remains a costly endeavor. Factors like achieving tight tolerances and high-quality surface finishes further drive up the tooling effort and, consequently, the final cost of the kit. The price reflects the engineering hours and advanced machinery required to produce that perfect part.
For the modeler, the justification is not in the plastic itself, but in the “total cost of ownership” of the project. This concept includes not just money, but also time and frustration. A 20% higher kit price of, say, $10 might save you two hours of tedious sanding and filling. What is your hobby time worth? Furthermore, it eliminates the need to purchase a $15 aftermarket metal barrel, making the slide-molded kit the more economical option outright. The cost of effort is a real, though unquantified, factor. The higher price is an investment in a more enjoyable, efficient, and rewarding building experience.
When you buy a slide-molded kit, you’re not just buying plastic; you’re buying time, precision, and the satisfaction of working with a component that is engineered for excellence from the start.
How to Identify Quality Injection-Molded Kits Before Opening the Box?
Beyond just looking for slide-mold technology, a builder can develop an eye for overall kit quality by scrutinizing the packaging and available online resources. A high-quality kit is a product of modern engineering, and the signs are often visible before you even break the shrink-wrap. Think of yourself as an inspector, evaluating the product based on a series of green and red flags.
Green flags are positive indicators. As Squadron.com’s description for a modern Dragon kit notes, breakthrough engineering can produce a fuselage in a single piece, a clear sign of advanced tooling. Crisp, clear CAD renderings on the box that show complex parts as single pieces are another great sign. Red flags, conversely, signal potential trouble. Blurry sprue shots on the back of the box, or photos showing significant “flash” (thin webs of excess plastic) around the parts, suggest an old, worn-out mold. A warped-looking part visible through a clear bag is a major warning sign.
Perhaps the most critical check is to ensure the box art matches the plastic inside. It’s common for manufacturers to put old plastic in a new box with exciting artwork. Use online resources like Scalemates to verify the tooling’s origin year. A kit tooled in 2022 is worlds apart from one tooled in 1982, even if they depict the same subject. This pre-purchase diligence is the single best way to guarantee a pleasant build.
Action Plan: Pre-Purchase Kit Quality Checklist
- Check for Tech Callouts: Look for “Slide Mold,” “New Tooling,” or “Gen2” icons on the box. These are strong green flags.
- Analyze Sprue Shots: Examine any photos of the plastic parts. Are they sharp and clean (green flag) or blurry with visible flash (red flag)?
- Verify Tooling Date: Use a resource like Scalemates.com to check the original tooling year. Anything after 2015 is generally a good sign.
- Compare Box Art to Contents: Do the parts depicted in online reviews match the promise of the box art? Mismatches indicate a re-boxing of an old mold.
- Assess Part Complexity vs. Count: Look at CAD images. If complex parts like gun barrels or engine cowlings are shown as single pieces, it’s a mark of modern, quality engineering.
This disciplined approach transforms kit buying from a gamble into a calculated decision, ensuring your workbench is filled with projects that inspire, not frustrate.
Why You Must Treat Resin Parts Differently Than Plastic to Avoid Lung Damage?
While discussing advanced plastic parts, it’s crucial to address a common companion in high-end modeling: polyurethane resin. Often used for aftermarket details or by smaller artisan producers, resin offers a level of sharpness that can surpass even slide-molded plastic. However, from a material science and safety perspective, it is a completely different animal. Plastic is a thermoplastic; when you sand it, you create relatively large, inert shavings. Resin, on the other hand, is a thermoset plastic.
When you sand, cut, or grind resin, you create a cloud of extremely fine, sharp dust particles. These particles are a significant respiratory hazard. Unlike plastic dust, resin dust can be inhaled deep into the lungs, where it can cause chronic irritation, allergic reactions (sensitization), and long-term lung damage similar to silicosis. This is not a theoretical risk; it is a well-documented danger in the prop-making and garage-kit communities. Treating resin dust lightly is a serious mistake.
Therefore, a strict safety protocol is not optional; it is mandatory. The goal is to prevent the dust from becoming airborne or being inhaled. This involves a multi-layered approach. First, always wear a properly-rated respirator, not a simple paper or cloth dust mask. An N95 or, even better, a P100-rated respirator is essential. Second, control the dust at the source by using wet-sanding techniques. A few drops of water on your sandpaper will trap the dust in a slurry, preventing it from becoming airborne. Working in a well-ventilated area or using a downdraft sanding box is also highly recommended. Finally, cleanup is critical. Never dry-brush or blow resin dust away. Clean your workspace with a damp cloth or a vacuum equipped with a HEPA filter.
Your health is more important than any model. Adopting these safety habits ensures you can enjoy the hobby for decades to come.
Key Takeaways
- Slide-molding is an advanced engineering process that creates superior, single-piece hollow parts, eliminating the need for sanding major seams.
- The higher price of slide-molded kits is justified by the complex tooling and the immense time and effort it saves the builder.
- Always inspect a kit box for “slide-mold” callouts and verify the tooling date online to ensure you’re buying modern engineering.
How to Remove Parts from Sprues Without Gouging the Plastic Surface?
The final step in appreciating modern molding technology is handling the parts with the care they deserve. A beautifully engineered, slide-molded part can be instantly marred by clumsy removal from the sprue. The attachment points, or “gates,” on modern kits are often located in unconventional places to preserve delicate surface detail. Furthermore, the plastic chemistry used in these kits can sometimes be harder or more brittle than in older models. Ripping or twisting a part from the sprue is guaranteed to cause damage.
The solution is a simple but disciplined technique known as the two-cut method. This approach minimizes stress on the part and gives you maximum control. For the first cut, use a standard pair of sprue cutters to snip the gate 2-3mm away from the part’s surface. Do not cut flush against the part. This cut frees the component from the main sprue without transferring any cutting pressure or torque to the delicate part itself.
Now, with the part free, you can perform the second, more delicate cut. For this, a pair of high-quality, single-blade flush cutters is essential. These tools are designed to make a perfectly flat cut from one side. Position the flat side of the blade directly against the surface of the part and snip off the remaining gate nub. The result is a clean separation with minimal or no blemish to clean up. Using a sharp blade is critical; a dull blade will crush or pinch the plastic, creating white stress marks that are difficult to remove. This methodical approach is the final piece of the puzzle, ensuring the engineered perfection of the part is preserved all the way to assembly.
By applying this technique, you honor the precision of the manufacturing process and set the stage for a truly clean and professional build, allowing the quality of the engineering to shine through in your finished model.