
The best aftermarket upgrades are not the most detailed, but those that fix a kit’s most visible flaws or dominate the viewer’s eye.
- Focus spending on high-visibility areas like landing gear, canopies, and prominent weapon systems.
- Factor in the “skill cost”—a complex part you ruin has an infinite cost and zero return.
Recommendation: Prioritize “corrective” upgrades (fixing a shape or scale error) over purely “enhancement” upgrades (adding detail) for the highest possible visual return on your investment.
For any budget-conscious model builder, the wall of aftermarket upgrades can be daunting. Shimmering brass photo-etch, crisp resin ejection seats, and turned metal gun barrels all promise to elevate your plastic kit into a museum-quality piece. The common advice is often to add a detailed cockpit or intricate landing gear, but this approach overlooks the most critical factor: return on investment. With a finite budget, every purchase must be a strategic decision. The market for these enhancements is substantial; in fact, market research indicates the plastic model kit aftermarket is expanding at a 6% annual growth rate, flooding builders with even more choices.
This guide departs from the simple cataloging of parts. Instead, we will adopt the mindset of a value analyst, focusing on a core principle: Visual Dominance. This is the idea that certain areas of a model naturally command the viewer’s attention. An upgrade in these zones delivers a disproportionately high aesthetic return. We will assess upgrades using a “Fidelity-to-Cost Ratio” (FCR), weighing the increase in realism against not just the price tag, but also the skill and time required for successful installation. Forget asking “what’s the most detailed part?” The right question is, “which upgrade provides the most visible impact per dollar spent?”
This article provides a framework to help you make informed decisions, ensuring every dollar in your hobby budget contributes directly to a more impressive and convincing final replica. We will dissect common upgrade scenarios, from the cockpit to the engine, and provide practical techniques for handling these delicate and expensive components.
Summary: A Strategic Guide to Model Kit Upgrades
- Ejection seats or weighted tires: where should you prioritize detail spending?
- How to cut vacuum-formed canopies without crushing them?
- Turning brass vs Plastic: is the difference visible on 1:How to Start Building Static Aircraft Models Without Spending Over $100?
- Why aftermarket cockpits designed for Kit A rarely fit Kit B without surgery?
- How to clean mold release from resin parts to ensure paint sticks?
- How to Fold Photo-Etched Parts Without Ruining the Delicate Brass?
- What Defines a High-Fidelity Replica for Serious Aviation Collectors?
- How to Install Resin Engines Without Destroying the Plastic Cowling?
Ejection seats or weighted tires: where should you prioritize detail spending?
This classic dilemma is the perfect test case for the principle of Visual Dominance. An aftermarket ejection seat is a marvel of miniature engineering, packed with belts, levers, and placards. However, its visual impact is entirely conditional. If the model’s canopy is closed, 90% of that exquisite detail is lost, resulting in a very poor Fidelity-to-Cost Ratio. Conversely, weighted tires—which simulate the sag of a real aircraft tire under load—are always visible. They ground the model in reality, subtly telling the viewer that this is a heavy machine at rest, not a weightless toy.
The decision, therefore, isn’t about which part is more detailed in absolute terms, but which part’s detail is more accessible to the viewer. For most display scenarios, weighted tires offer a superior visual ROI because their effect is constant and immediately perceived. An ejection seat only becomes a high-ROI investment if you are committed to displaying the model with an open canopy, making the cockpit a focal point. This strategic thinking is essential for allocating a limited budget effectively.
To better quantify this trade-off, we can analyze the key factors for common upgrades. The following table, based on an analysis from modeling experts, provides a clear framework for these decisions.
| Upgrade Type | Average Cost | Visibility Score | Skill Level Required | ROI Rating |
|---|---|---|---|---|
| Weighted Tires | $10-20 | High (Always visible) | Beginner | Excellent |
| Ejection Seats | $15-40 | Medium (Canopy open) | Intermediate | Good |
| Metal Gun Barrels | $8-15 | High | Beginner | Excellent |
| Photo-Etch Cockpit | $20-50 | Low-Medium | Advanced | Variable |
How to cut vacuum-formed canopies without crushing them?
A vacuum-formed (vacuform) canopy is a high-risk, high-reward upgrade. It replaces the often thick, distorted plastic of a standard kit with a crystal-clear, scale-thin canopy that can dramatically improve the model’s appearance. This is an upgrade with enormous Visual Dominance, as the canopy is a primary focal point of any aircraft model. However, its fragility introduces a significant “skill-as-a-cost” factor. A crushed or poorly cut canopy means a 100% loss of your investment.
The key to success is to eliminate flexing during the cutting process. The thin plastic is prone to cracking under the pressure of a blade. The secret is to provide internal support and use patience, scoring the cut line repeatedly rather than trying to cut through in a single pass. This methodical approach transforms a nerve-wracking task into a manageable procedure, protecting your investment and unlocking the huge visual payoff of a perfectly clear canopy.
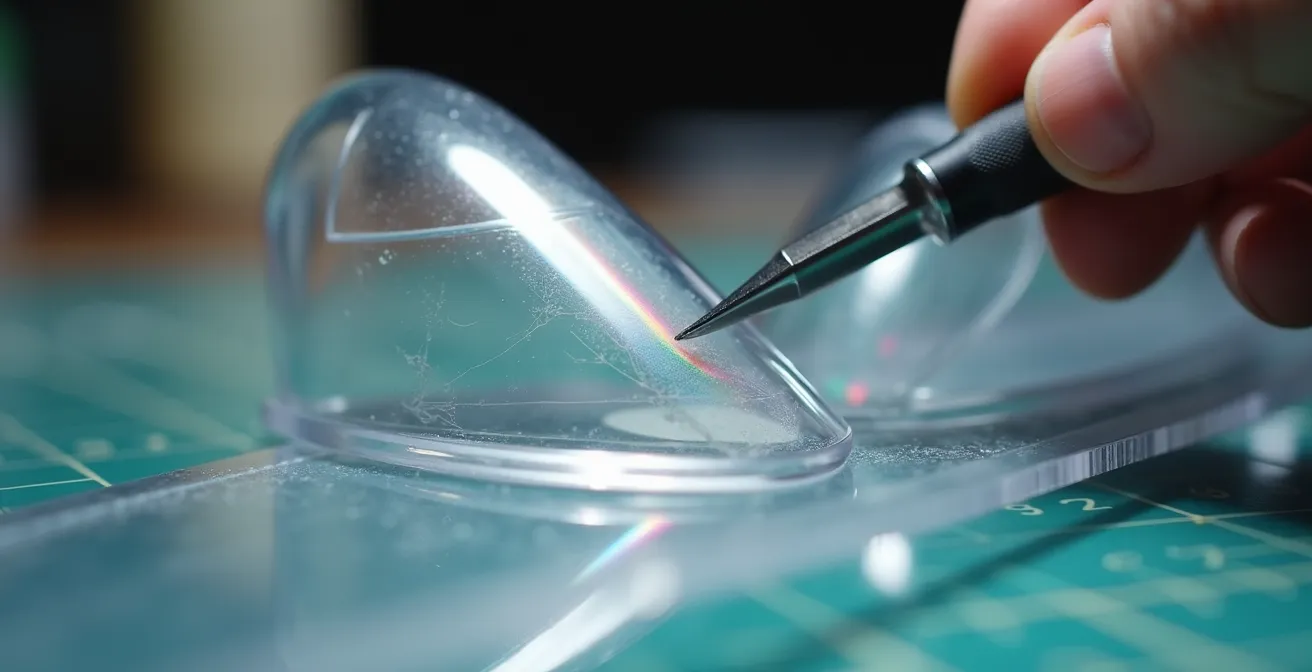
As the image demonstrates, the process is one of precision and control. By using a fresh blade and a light touch, you gradually weaken the plastic along the desired line until it separates cleanly. Rushing this stage is the number one cause of failure. The following plan details the professional method for achieving a perfect cut every time.
Action Plan: Safe Vacuum-Formed Canopy Cutting
- Internal Support: Fill the canopy interior completely with modeling clay or Blu-Tack. Press it firmly against all surfaces to prevent any flexing.
- Score, Don’t Cut: With a brand new #11 blade, gently score the cutting line. Repeat this motion a minimum of 20-30 times, applying minimal pressure. Let the blade do the work.
- Bulk Removal: Make your first true cut about 2mm *outside* the final line. This removes the bulk of the waste material and reduces stress on the final trim line.
- Sand to the Line: Use sanding sticks of progressively finer grits (starting with 400) to carefully sand away the excess material until you reach the scored line.
- Polish for Clarity: Once the shape is perfect, polish the cut edge with very fine grits (up to 2000) and a polishing compound to restore its transparency.
Turning brass vs Plastic: is the difference visible on 1:How to Start Building Static Aircraft Models Without Spending Over $100?
When evaluating upgrades, the “Two-Foot Rule” is an invaluable mental model: does the enhancement remain noticeable from a normal viewing distance of about two feet? For turned metal parts like brass gun barrels, pitot tubes, and landing gear oleos, the answer is a definitive yes. Injection-molded plastic struggles to replicate perfect roundness and sharpness, especially on small-diameter parts. Plastic barrels often have faint seam lines and slightly soft muzzles. A turned brass barrel, by contrast, is perfectly concentric with a crisp, hollowed-out tip. This difference is not subtle.
This is a prime example of a corrective upgrade. It fixes a fundamental limitation of the plastic molding process. The sharp, metallic glint of a brass part provides a textural contrast that elevates the realism of the entire model. For this reason, metal barrels and pitot tubes often have one of the highest Fidelity-to-Cost Ratios of any aftermarket product. They are relatively inexpensive, easy to install (usually a simple replacement), and their visual impact is immediate and undeniable.
The market is vast, with thousands of aftermarket detail parts available from specialized retailers, but metal barrels consistently stand out for their value. As noted by manufacturers like ResKit, metal components are engineered to provide superior scale accuracy, replicating the original components with a sharpness that plastic simply cannot match. This commitment to fidelity is what serious builders and collectors seek.
Why aftermarket cockpits designed for Kit A rarely fit Kit B without surgery?
The frustrating experience of a beautifully detailed resin cockpit refusing to fit inside a fuselage is a costly lesson for many modelers. The reason is rooted in the subtle and proprietary engineering of each model kit manufacturer. Even when two companies produce a model of the same aircraft in the same scale, their approach to parts breakdown, plastic thickness, and internal locator pins will be completely different. A resin cockpit is not a generic upgrade; it is a highly specialized part designed to mate with the specific interior geometry of one particular kit.
Reputable aftermarket companies invest significant time in 3D scanning or measuring a specific kit (e.g., the Tamiya 1/48 F-16C) before designing a cockpit set for it. As the team at ResKit has learned from producing over 1,000 sets, each manufacturer’s unique design philosophy requires a custom-tailored solution. An aftermarket set designed for the Tamiya kit will not account for the different fuselage thickness or internal bracing of a Hasegawa or Kinetic F-16C kit. Attempting to force a fit often requires extensive grinding of either the resin part or the kit’s plastic, a high-risk “surgery” that can easily result in damage.
This highlights a hidden cost: the cost of incompatibility. An ill-fitting part has a negative ROI, consuming time and adding frustration. To avoid this, rigorous pre-purchase verification is non-negotiable. Before adding that stunning cockpit to your cart, work through the following checklist:
- Verify Kit Specificity: Does the product description explicitly state it is “designed for” your exact kit manufacturer and catalog number (e.g., “Tamiya #61101”)?
- Check Build Reviews: Search online forums and modeling sites for build reviews of the specific aftermarket set you’re considering. Builders will almost always mention severe fit issues.
- Understand the Purpose: Is the set a “correction” (fixing a shape error) or an “enhancement” (adding detail)? Correction sets sometimes require more modification by design.
- Consult the Community: Ask on model-specific forums or Facebook groups if anyone has experience mating that specific resin set to your specific kit.
How to clean mold release from resin parts to ensure paint sticks?
Purchasing a high-detail resin upgrade is an investment in your model’s final appearance. Allowing that investment to be ruined by flaking or peeling paint is a critical error. The culprit is almost always mold release agent, a greasy or waxy substance used in the casting process to prevent the resin from sticking to its silicone mold. This residue is invisible but creates a barrier that paint and primer cannot adhere to securely. Proper cleaning is not an optional step; it is essential for realizing the value of your aftermarket parts.
The goal of cleaning is to create a “water-break free” surface. This means that when you rinse the part, the water sheets off in a smooth, unbroken film. If the water beads up into droplets, like on a waxed car, it’s a clear sign that release agent is still present. Different manufacturers use different types of release agents, some of which are more stubborn than others, requiring a tiered approach to cleaning.

The image above illustrates the perfect result: a continuous sheet of water flowing off the part. Achieving this ensures your primer will have a strong, permanent bond with the resin surface, safeguarding the meticulous paint job to come. The following protocol outlines three levels of cleaning intensity to handle any type of mold release.
How to Fold Photo-Etched Parts Without Ruining the Delicate Brass?
Photo-etched (PE) brass parts offer a level of scale finesse that plastic cannot achieve, but they also introduce the highest “skill-as-a-cost” of almost any aftermarket medium. These delicate metal components can transform a model, but one clumsy fold or a slip of the pliers can turn an expensive fret of parts into a mangled scrap of brass. The key to success lies in control, using the right tools, and understanding the properties of the metal. You cannot simply bend PE with your fingers and expect a sharp, precise result.
Specialized PE folding tools exist, but excellent results can be achieved with a simple steel ruler and a flat blade. The principle is to secure the part firmly along the fold line and use a hard, straight edge to create a clean, sharp crease. For complex curves or rounded shapes, annealing the brass is a critical technique. This involves briefly heating the part with a lighter flame to soften the metal, making it more pliable and less likely to snap. This requires a delicate touch but is the secret to forming parts like curved instrument panel shrouds.
The precision of these parts is a testament to the manufacturers who produce them. For example, Detail Master has been creating precision scale model accessories for over 34 years, perfecting the art of miniature metalwork. To honor that precision, a methodical approach is required.
- Secure the Part: Place the part on a hard surface and hold it down firmly with a steel ruler, aligning the ruler’s edge with the etched fold line.
- Use a Blade for Bending: Instead of pliers, use the flat side of a scalpel blade or a specialized bending tool to push the part up against the ruler’s edge. This creates a much sharper and more controlled fold.
- Anneal for Curves: For any part that needs to be curved, hold it with tweezers and pass it through a lighter flame for just 2-3 seconds. Let it cool completely. The brass will now be much softer and easier to shape without kinking.
- Glue Sparingly: Use micro-drops of cyanoacrylate (CA) glue applied with a toothpick or fine wire to tack the part in place. Wicking in thin CA or PVA glue can then create a stronger, more permanent bond.
What Defines a High-Fidelity Replica for Serious Aviation Collectors?
For a serious collector, “high-fidelity” moves beyond simply adding more detail. A truly high-fidelity replica is defined by its accuracy and authenticity. It’s not about the number of parts in the box, but how well the final model captures the essence, stance, and specific technical details of the real aircraft. This means prioritizing corrective upgrades over purely enhancement ones. For example, a resin nose that corrects the inaccurate profile of a kit is a greater contribution to fidelity than an ultra-detailed but invisible avionics bay.
This pursuit of accuracy is the driving force behind a large segment of the hobby. While the overall plastic model kit market was valued at $3.36 billion in 2024, the nature of this market is nuanced. According to detailed market analysis, a huge portion of this value is concentrated in specific areas. As one report notes, “The Military segment significantly dominates this landscape, being valued at 1,240 USD Million in 2024,” demonstrating the immense focus on authentic military replicas.
A high-fidelity model is the result of careful research and strategic upgrading. Key characteristics include:
- Correct Overall Shape: The model’s core geometry—fuselage cross-section, wing planform, and canopy shape—must be accurate. This is where corrective resin sets provide the most value.
- Scale-Appropriate Details: Panel lines should be fine and crisp, not trench-like. Small details like antennas and vents should be in-scale, a feat often only possible with photo-etch or 3D-printed parts.
- Authentic Stance: The model must sit correctly on its landing gear. Aftermarket gear with proper oleo compression and correctly weighted tires are crucial for achieving this.
- Convincing Finish: The paint job, weathering, and decals must accurately reflect a specific aircraft at a specific point in time, based on photographic evidence.
Ultimately, a high-fidelity replica is a well-researched historical document in three dimensions, where every component, whether from the kit or the aftermarket, serves the goal of accurate representation.
Key Takeaways
- Prioritize by Visibility: Invest your budget in upgrades for areas with high “Visual Dominance,” like landing gear, canopies, and prominent external stores.
- Correct Before Enhancing: The highest ROI comes from “corrective” parts that fix a fundamental shape or scale error in the base kit.
- Calculate the “Skill Cost”: A complex upgrade that you might ruin is a riskier investment than a simpler one. Be honest about your skill level before you buy.
How to Install Resin Engines Without Destroying the Plastic Cowling?
Installing a full resin engine is one of the most ambitious and visually rewarding upgrades a modeler can undertake. It replaces a simplified kit part with a complex, multi-layered replica that can become the centerpiece of the entire model. However, it also presents a significant technical challenge: fitting a solid, heavy resin casting inside a thin, flexible plastic cowling without causing damage. This procedure requires precision measurement and a methodical approach to material removal. It’s the ultimate test of a builder’s skills.
The core of the problem is tolerance. The resin engine is designed for a perfect fit, but slight variations in the plastic cowling’s thickness or roundness can make installation impossible without modification. The goal is to remove material from the *inside* of the cowling, slowly enlarging its diameter until the engine can slide in snugly. This must be done evenly to avoid creating thin spots or distorting the cowling’s shape. The process hinges on one rule: measure twice, cut once. Using digital calipers is non-negotiable for this task.
This corner of the hobby is constantly evolving, with the rise of 3D printing set to revolutionize what’s possible. As technology improves, the plastic model kit market is expected to reach $0.8 billion by 2032, with much of that growth driven by these high-tech, precision-printed components. To install them correctly, follow these steps:
- Measure Precisely: Use digital calipers to measure the maximum diameter of the resin engine. Then, measure the inner diameter of the assembled (or taped-together) plastic cowling at multiple points to find its narrowest dimension.
- Calculate Removal: Subtract the cowling’s inner diameter from the engine’s outer diameter. This tells you exactly how much material you need to remove.
- Grind Slowly: Use a rotary tool with a sanding drum at low speed. Remove material only from the inside surface of the cowling, working evenly around the circumference. Stop frequently to test fit.
- Create a Strong Bond: Resin engines are heavy. Do not rely on a simple butt-joint. Drill corresponding holes in the back of the engine and the fuselage bulkhead, and insert a strong metal rod (like a cut paperclip) to act as a load-bearing spar.
- Final Assembly: Once the fit is perfect and the support pin is in place, you can glue the engine to the bulkhead and then attach the cowling around it.
By applying this analytical framework to your next project, you move from being a simple assembler to a savvy “visual investor,” ensuring every aftermarket part you purchase delivers the maximum possible impact on the shelf.