Paint flaking off photo-etched brass is not a paint problem; it is a fundamental surface adhesion failure.
- Brass is a non-porous metal with low surface energy that requires chemical and mechanical etching, not just cleaning, for paint to bond.
- Standard plastic primers are chemically incompatible with metal and will always delaminate and flake off under stress.
- Proper surface preparation with a self-etching metal primer is the only method to create a permanent, durable bond.
Recommendation: Treat your brass parts like industrial metal components, not plastic, by following a strict scour, clean, and etch protocol before any paint is applied.
For any modeler dedicated to detail, there is no greater frustration than watching a perfectly painted photo-etched seatbelt or instrument panel shed its color like a snake sheds its skin. You spend hours cutting, folding, and painting these tiny, intricate parts, only to have the paint flake off during final assembly. This common failure leads many to blame the paint, the primer, or their airbrush technique. The conventional wisdom to “just clean it first” or “use a good primer” is frustratingly vague and often ineffective.
The root of the problem lies in the material itself. Photo-etched parts are typically made from true brass, a smooth, non-porous metal alloy. Unlike polystyrene plastic, which has a surface that primers can chemically “bite” into, brass offers almost no natural grip. Its surface is inert and has a low surface energy, causing paint to sit on top rather than bond with it. Without a proper understanding of surface science, you are not painting a part; you are just creating a fragile film of color waiting to fail.
But what if the solution wasn’t found in hobby paint bottles, but in industrial adhesion principles? The key is to stop thinking like a painter and start thinking like a surface engineer. This guide will shift the focus away from the paint and onto the critical, non-negotiable process of substrate preparation. We will explore how to permanently transform the brass surface, creating a chemical and mechanical lock that makes paint flaking a thing of the past.
This article will break down the science of adhesion failure and provide a systematic, professional-grade workflow. We will cover why your current methods are failing, explore chemical alternatives to paint, detail the correct surface preparation methods, and address the specific challenges of handling, folding, and gluing these delicate metal parts without compromising the finish.
Contents: The Science of a Permanent Bond on Brass
- Why Standard Plastic Primer Fails on Brass Surfaces
- Blackening Fluid vs. Paint: How to Darken Brass Chemically Without Adding Thickness
- PVA or Superglue: Which Adhesive Won’t Fog Your Painted Details?
- How to Spray Paint on Mesh Screens Without Blocking the Holes
- Why You Must Sand or Acid-Etch Brass Frets Before Priming
- How to Fold Photo-Etched Parts Without Ruining the Delicate Brass
- How to Paint Realistic Cockpit Instruments
- Why You Must Treat Different Materials With Different Safety Protocols
Why Standard Plastic Primer Fails on Brass Surfaces
The primary reason your paint job fails on brass is a fundamental mismatch between your primer and the substrate. Standard hobby primers are formulated for polystyrene plastic. Their adhesion mechanism relies on solvents that slightly melt or “craze” the plastic surface, creating a micro-welded bond. When you apply this type of primer to brass, it has nothing to react with. It simply dries into a separate layer with no physical or chemical connection to the metal underneath, a classic case of adhesion failure.
Metal, unlike plastic, is a non-porous substrate. For a primer to adhere, it must work in one of two ways: create a powerful chemical bond or grip onto a physical texture (known as mechanical bite). A quality metal primer, often labeled as “self-etching,” contains acidic components. These acids microscopically etch the smooth brass, creating a rough, textured surface for the primer’s binder to lock onto. Plastic primers lack this etching capability entirely.
This critical difference in formulation is why paint will inevitably flake off a plastic-primed brass part. Any handling, bending, or even slight temperature change will cause the metal and the paint layer to expand or contract at different rates. Without a true bond, the paint film simply cracks and detaches. The difference is not just in name but in the fundamental chemistry of adhesion.
The following table, based on insights from experienced modelers, breaks down the essential differences between these two types of primers and why one is doomed to fail on metal surfaces.
| Characteristic | Plastic Primer | Metal Primer |
|---|---|---|
| Adhesion Method | Slightly melts plastic surface | Chemical/acid etching components |
| Binder Type | Formulated for polystyrene | Lacquer or epoxy-based |
| Surface Requirement | Works on smooth plastic | Needs abraded/etched surface |
| Durability on Brass | Will flake and fail | Long-lasting bond |
Blackening Fluid vs. Paint: How to Darken Brass Chemically Without Adding Thickness
For certain photo-etched parts, especially fine meshes, grilles, and gun barrels, even the thinnest coat of paint can obscure critical detail. In these cases, the best approach is not to add a layer on top of the brass, but to chemically alter the surface of the brass itself. This is achieved using a chemical blackening fluid, a solution that reacts with the copper in the brass alloy to form a dark, stable patina.
Unlike paint, this process adds virtually zero thickness, preserving every microscopic opening in a radiator screen or the delicate rifling on a machine gun barrel. The finish is a deep gunmetal black that is part of the metal, not a film sitting on it. This makes it impossible to chip or flake. Furthermore, the resulting oxidized surface is slightly rougher than bare brass, creating an excellent pre-primed substrate if you decide to paint over it for a specific color.
Case Study: The Ship Modeler’s Mesh Dilemma
A ship modeler reported a common issue where painting fine mesh parts with an airbrush, no matter how thinned, resulted in some of the holes being filled. By switching to “Blacken-It” chemical blackener, they were able to achieve a perfect, dark finish while preserving all openings. They also noted the blackened surface provided superior paint adhesion compared to bare brass when a top coat was required, effectively acting as both a finish and a primer.
The choice between blackening and painting depends entirely on the part’s function and desired finish. Consider the following guidelines:
- Use blackening for: Machine gun barrels, mesh grilles, radiator screens, and any part where preserving the finest detail is the absolute priority.
- Use painting for: Cockpit panels, seatbelts, and parts that require specific, non-metallic colors (e.g., interior green, canvas).
- Use a hybrid approach: For maximum durability on colored parts, blacken the brass first to act as an infallible primer, then apply your color coats on top.
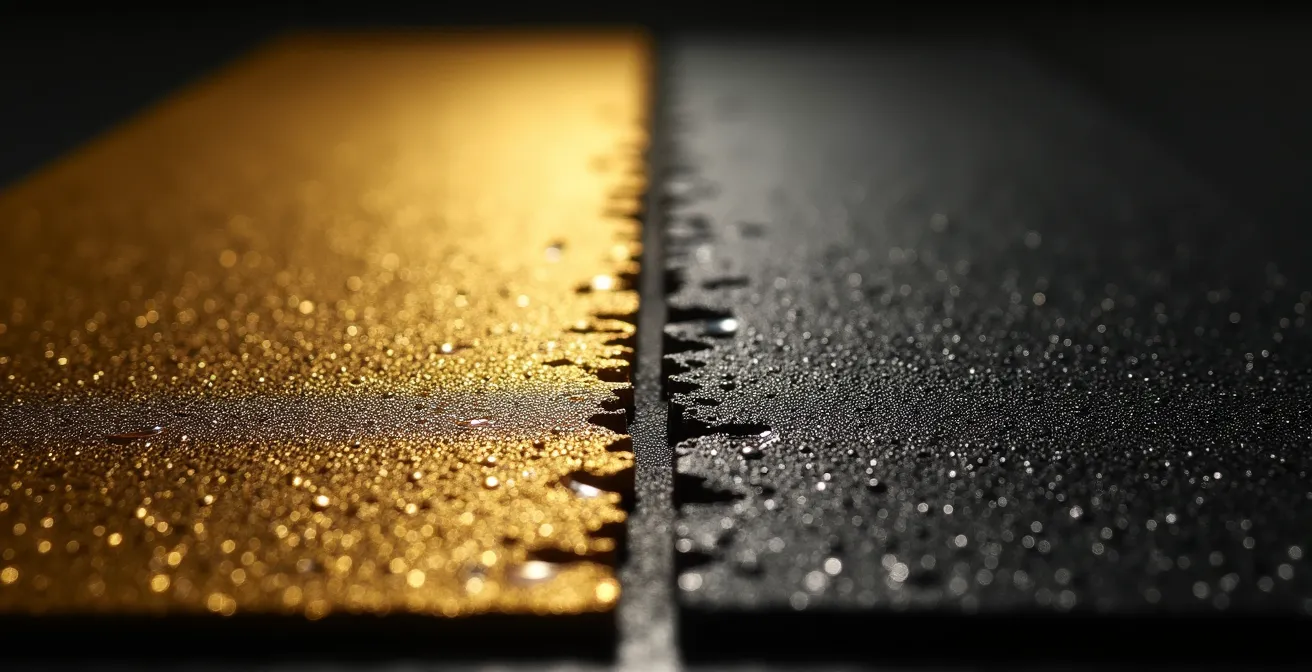
As the image demonstrates, the chemical transformation darkens the material while perfectly retaining the intricate structure of the mesh, a result paint can rarely achieve. This technique is a cornerstone of professional metal finishing.
PVA or Superglue: Which Adhesive Won’t Fog Your Painted Details?
After successfully preparing and painting your photo-etched parts, the final step—attachment—can be the source of yet another failure. The most common adhesive used by modelers, cyanoacrylate (CA or “superglue”), is often the worst choice for this task. CA glue cures by reacting with moisture in the air, a process that releases vapors. When used in a semi-enclosed space or near a non-porous surface like a painted part, these vapors can settle on the surrounding area, leaving a white, hazy residue known as “fogging” or “frosting.” This can instantly ruin a clear canopy or a detailed instrument panel.
While CA glue offers a strong, fast bond, the risk of fogging is extremely high unless a CA accelerator is used, which can sometimes be too aggressive for painted surfaces. A much safer and more forgiving alternative is Polyvinyl Acetate (PVA) glue. This category includes white glue or specialized clear-drying “canopy glues.” PVA cures through the evaporation of water, a process that releases no harmful vapors. It dries completely clear and will never fog your parts.
While PVA’s bond is not as instantaneous or strong as CA, it offers a significant advantage: repositioning time. You have several minutes to perfectly align the part before the glue sets, a luxury not afforded by instant-bonding superglue. For structural joints requiring maximum strength, a two-part epoxy or a modern UV-curing glue are also excellent, fog-free options, though they require more mixing or special equipment.
This comparative table clarifies the trade-offs, making it clear why PVA or canopy glue is the professional’s choice for attaching delicate, painted details.
| Adhesive Type | Fogging Risk | Bond Strength | Repositioning Time |
|---|---|---|---|
| CA/Superglue | High (without accelerator) | Very Strong | None |
| PVA/Canopy Glue | Zero | Moderate | Several minutes |
| 2-Part Epoxy | Zero | Strongest | 5-10 minutes |
| UV Glue | Zero | Strong | Until UV exposure |
How to Spray Paint on Mesh Screens Without Blocking the Holes
Painting fine photo-etched mesh, such as radiator grilles or anti-grenade screens, presents a unique fluid dynamics challenge. The goal is to deposit pigment on the metal strands without allowing the paint to bridge the gaps and clog the openings. Standard airbrushing techniques, designed for solid surfaces, will almost certainly fail here. The key is to use a method that prioritizes atomization and speed over heavy coverage, often called the “dust coat” technique.
This technique involves changing several variables in your airbrush setup. First, the paint must be thinned significantly more than usual, often to a 50/50 ratio of paint to thinner or even thinner. This reduces the viscosity and surface tension of the paint droplets. Second, the air pressure (PSI) should be increased, sometimes as high as 50-60 PSI. This ensures the thinned paint is atomized into a much finer mist. Finally, the spraying distance is increased to 10-12 inches, and the airbrush is moved in very rapid passes across the part.
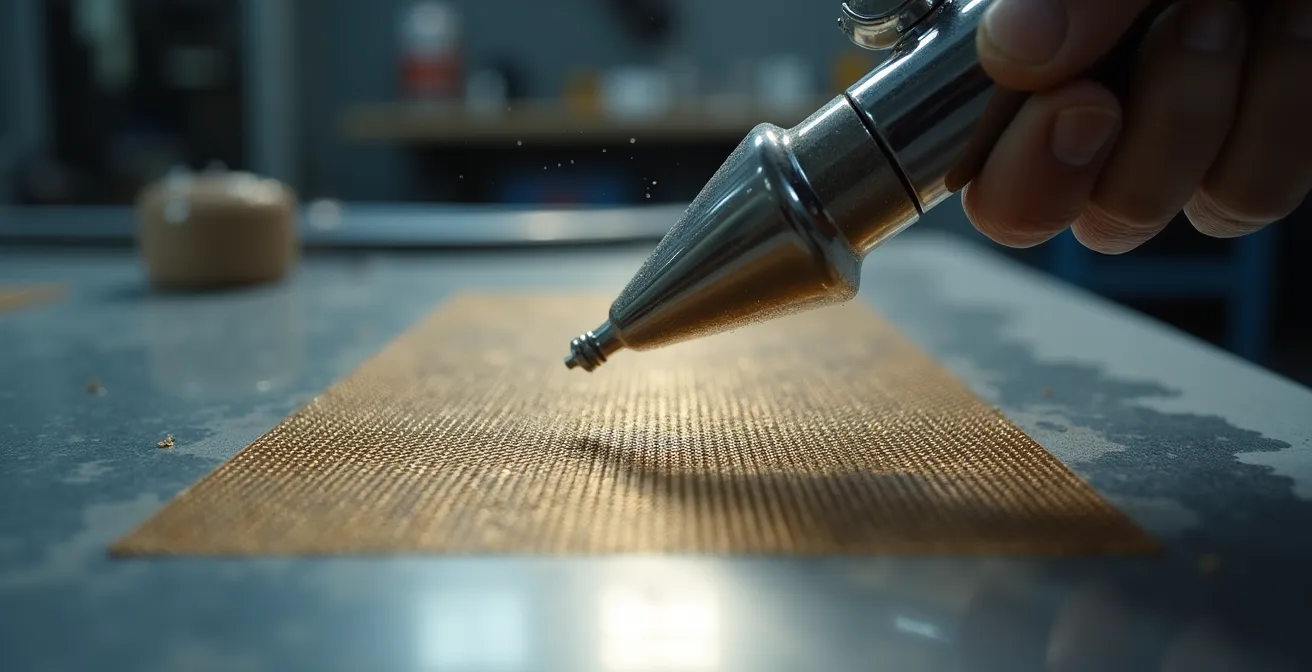
As shown in the diagram, spraying at an angle is crucial. This prevents you from spraying directly into the holes. The complete process is a multi-step application designed to build up color gradually without flooding the surface.
- Thin your paint more than usual, aiming for the consistency of skim milk (at least 50% thinner).
- Increase your airbrush pressure to 50-60 PSI for maximum atomization.
- Spray from a distance of 10-12 inches in very fast, light passes or “dust coats.”
- Apply the paint at a 45-degree angle to the mesh, then rotate the part 90 degrees and repeat from the opposite angle to ensure even coverage on all sides of the strands.
- If you notice a hole starting to block, immediately stop spraying paint and blast the area with pure air from your airbrush to clear the opening before the paint cures.
Why You Must Sand or Acid-Etch Brass Frets Before Priming
We’ve established that smooth brass is an unsuitable substrate for paint. Therefore, the most critical step in the entire process is creating a surface texture, or “tooth,” for the primer to mechanically lock onto. Simply wiping the fret with alcohol is insufficient; it may remove finger oils but does nothing to alter the physical surface. You must physically or chemically abrade the brass. There are two primary professional methods for this: light sanding and acid-etching.
Lightly sanding the parts while they are still on the fret using a very fine grit (1000-4000) sandpaper or sanding sponge is an effective way to create micro-scratches that act as anchors for the primer. This method offers great control but carries a slight risk of softening very sharp, delicate details if done too aggressively. The alternative, acid-etching, is often preferred for highly complex parts. Soaking the fret in a mild acid solution, such as white vinegar or a citric acid bath, chemically eats away at the surface layer of the brass, creating a uniform, microscopically pitted texture that is ideal for primer adhesion. This method perfectly preserves even the most fragile details.
Case Study: The 25-Year Durability Test
The proof of proper preparation is in its longevity. A modeler reports having models with photo-etched parts that were prepared and primed with Alclad grey lacquer primer nearly 25 years ago. Today, those parts show absolutely no evidence of flaking or peeling paint. This demonstrates that when the substrate is correctly prepared, lacquer-based metal primers shrink and cure around the surface contours, creating a bond so strong that it is unlikely to flake unless the part itself is bent or stressed to failure.
This level of durability is not accidental; it is the direct result of a systematic preparation process. For a truly bulletproof finish, follow this comprehensive workflow before any primer touches the metal.
Action Plan: The Ultimate ‘Scour, Clean, Etch’ System
- Scour the Surface: While parts are still on the fret, lightly sand them with 1000 to 4000-grit sandpaper. The goal is to dull the shiny surface, not to remove material. This creates the initial mechanical anchors.
- Degrease Thoroughly: Use a soft brush to scrub the fret with isopropyl alcohol or lacquer thinner. This removes any residual sanding dust and, more importantly, the invisible release agents and oils from the manufacturing process.
- Perform an Acid Etch: For the ultimate mechanical bite, immerse the fret in a bath of white vinegar for 10 minutes, or for a faster etch, a solution of 40g citric acid to 120ml water for 5-10 minutes. You should see the brass lose its shine.
- Neutralize the Acid: After the acid bath, you must stop the chemical reaction. Rinse the fret thoroughly in water, then give it a brief bath in a water-and-baking-soda solution to neutralize any remaining acid. Rinse one final time with clean water.
- Dry Completely and Prime: Let the fret air dry completely, or use a hairdryer on a low setting. Do not touch the parts with your bare fingers. Apply a thin coat of a high-quality, metal-specific self-etching primer.
How to Fold Photo-Etched Parts Without Ruining the Delicate Brass
Even with a perfectly primed and painted surface, the physical act of folding the brass part can be the point of failure. The paint film, even when well-bonded, can be less flexible than the metal itself. Bending the part can stretch this film to its breaking point, causing cracks or chips right at the fold line. The key to preventing this is to control exactly *where* and *how* the brass bends.
A dedicated photo-etch bending tool is a near-essential investment. This device acts like a miniature sheet metal brake, holding the part firmly while you use a razor blade or a specialized “finger” to create a perfectly straight, crisp fold along the intended line. For those without a dedicated tool, using the edge of a steel ruler as a fulcrum can work. Never attempt to fold a part by hand; this will create a rounded, uncontrolled bend that puts maximum stress on the paint.
Case Study: The Annealing Technique for Difficult Folds
Professional modelers have noted that attempting to bend thick or complex painted photo-etched parts often causes paint to chip and fall off, regardless of preparation. The industrial solution is to anneal the brass *before* painting. This involves heating the unpainted brass part with a small torch or even a lighter until it glows a dull red, then allowing it to cool. This process softens the metal, making it much easier to bend without work-hardening. Once the softened part is folded into its final shape, the standard surface preparation and painting process can begin.
For pre-painted parts where annealing isn’t an option, follow a precise bending sequence to minimize stress on the paint layer:
- Before folding, lightly score the back side of the fold line with a sharp hobby knife. This creates a controlled weak point that encourages the metal to bend exactly where you want it to.
- Use a PE bending tool or a steel ruler as a fulcrum to apply even pressure along the entire fold line.
- For box shapes, fold the part slightly past 90 degrees initially. This compensates for the natural spring-back of the brass.
- Press the folded part flat against a hard steel block or surface to create a crisp, perfectly aligned corner.
- If any tiny chips do occur at the fold, they can be easily touched up with a fine-tipped brush after the part is assembled.
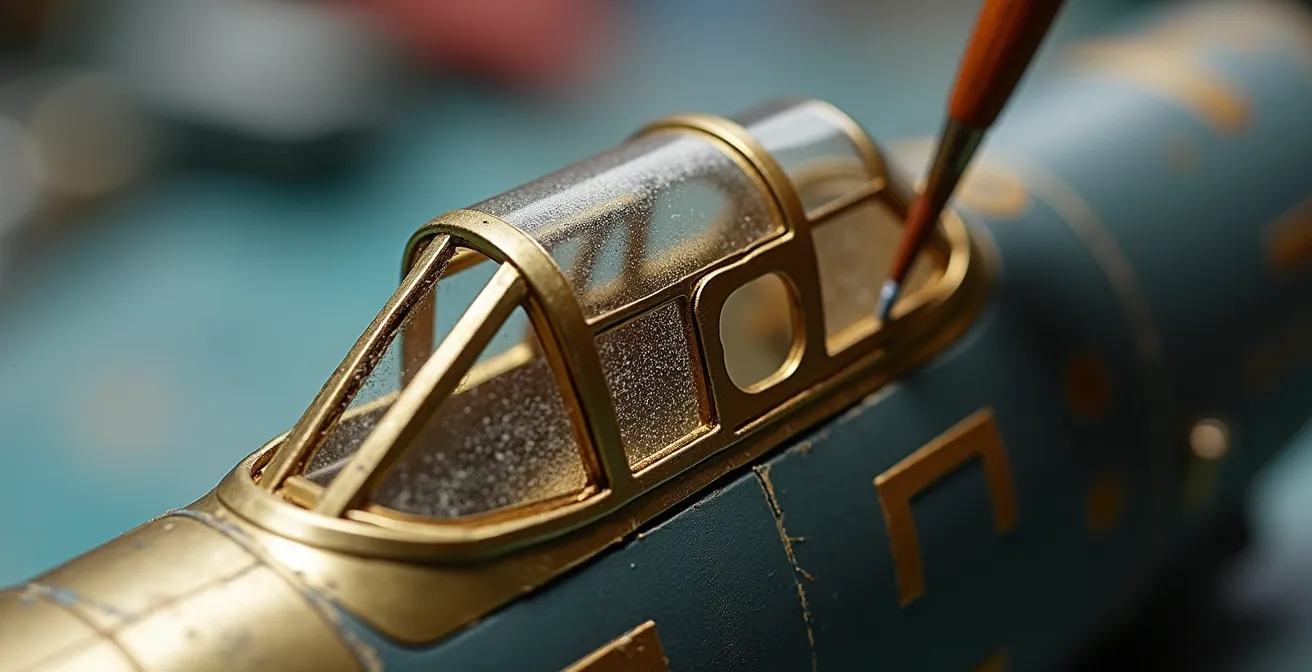
How to Paint Realistic Cockpit Instruments
Painting a photo-etched instrument panel is the ultimate test, combining all the principles of preparation, painting, and assembly. The goal is to create a sense of depth and realism, simulating a metal bezel, a glass cover, and the instrument face behind it. This cannot be achieved with a single layer of paint; it requires a layered, multi-media approach.
The most realistic results come from creating a “sandwich” of materials. The process begins with the photo-etched bezel itself, which is prepared and painted in the appropriate cockpit color (typically black or dark grey). A critical step is to then apply a layer of clear acetate sheet behind the bezel to represent the instrument glass. The instrument decals are then applied to the *back* of this clear acetate. This small detail creates a convincing illusion of depth, as you are looking through the “glass” to see the dial.
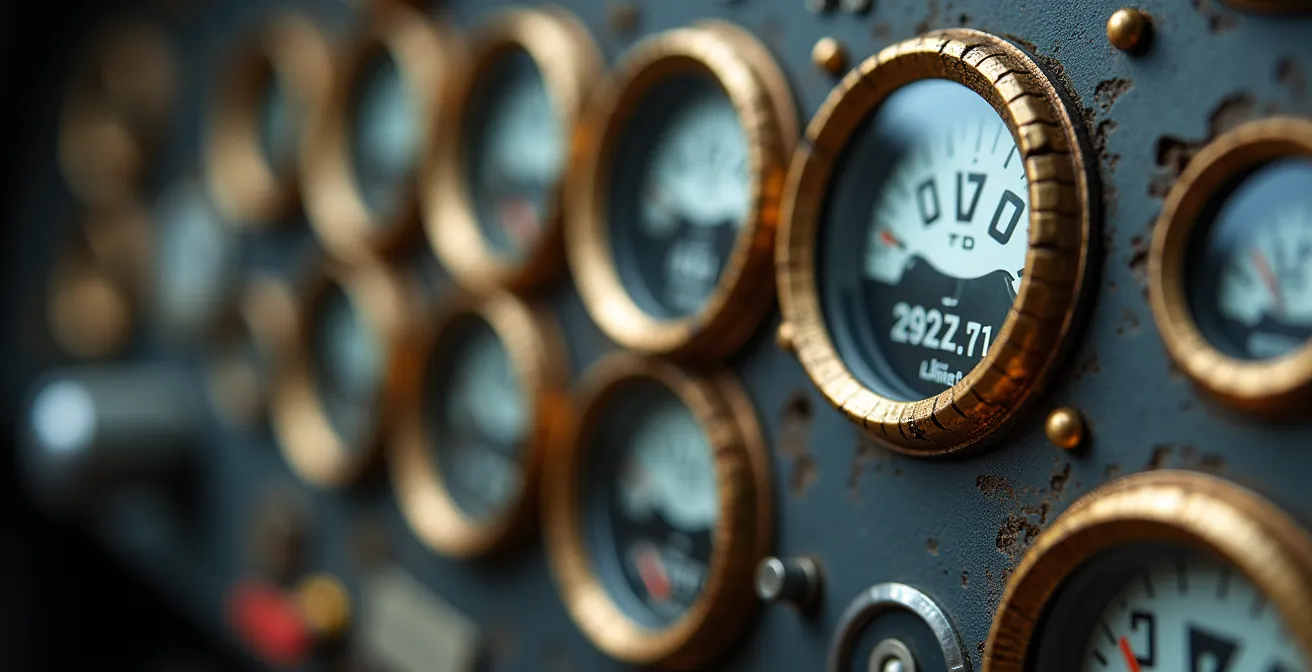
This macro view of a finished panel reveals the subtle but powerful effect of these layers. The light refracts differently off the bezel, the clear acetate, and the decal behind it, creating a realism that a simple decal on a flat surface could never match. To take it one step further, a drop of clear epoxy or a specialized product like Krystal Klear can be applied to each dial to simulate the curved lens of the gauge.
Follow this layered sequence for unparalleled instrument panel realism:
- Prepare the brass fret using the ‘Scour, Clean, Etch’ system and paint the PE bezel in its base color (e.g., black, grey).
- Apply a gloss clear coat over the painted bezel. This not only protects the paint but creates a smooth surface for the next layers.
- Cut a piece of thin, clear acetate sheet to fit behind the bezel and glue it in place with canopy glue to prevent fogging.
- Apply the individual instrument decals to the back side of the acetate sheet, so they are viewed through it.
- For the ultimate touch, apply a tiny drop of clear 2-part epoxy or a clear gloss medium into each bezel to simulate the curved glass lens.
Key Takeaways
- Paint failure on brass is an adhesion problem, not a paint problem. The solution lies in surface engineering.
- You must create a mechanical “tooth” on the smooth brass surface through physical sanding or chemical acid-etching.
- Standard plastic primers are chemically incompatible with metal. Always use a dedicated self-etching metal primer.
- For fine-detail parts like mesh, chemical blackening is superior to painting as it adds zero thickness.
- Use PVA or canopy glue to attach painted parts, as CA/superglue will release vapors that can fog and ruin the finish.
Why You Must Treat Different Materials With Different Safety Protocols
Mastering photo-etch is part of a broader expertise: understanding how to work with different materials, each with its own properties and risks. The meticulous approach required for brass is a mindset that should extend to all non-plastic materials in modeling, such as resin. Just as you cannot treat brass like plastic, you cannot treat resin like plastic. Ignoring the specific nature of each material not only leads to assembly failures but can also pose significant health risks.
Resin dust, for instance, is a well-known sensitizer and irritant. Unlike plastic shavings, fine resin particles can linger in the air and, if inhaled, can cause long-term respiratory damage. This is why wet sanding and wearing an N95-rated mask are non-negotiable safety requirements when working with resin. Similarly, the chemicals used for cleaning brass, such as acetone or MEK, require proper ventilation and gloves. The failure mode for ignoring these protocols is not a chipped part, but potential harm to your health.
An expert modeler understands that their workbench involves basic material science. They maintain separate tools for different materials to avoid cross-contamination—for example, ensuring the files used for soft resin are not the same as those used for hard brass. This holistic understanding of materials is the final step in elevating your skills from amateur to professional.
The following table highlights the distinct risks and prevention methods associated with the three most common materials in advanced modeling, emphasizing why a one-size-fits-all approach is inadequate and unsafe.
| Material | Primary Risk | Prevention/Preparation Method | Consequence of Ignoring |
|---|---|---|---|
| Resin Dust | Lung damage | N95 mask, wet sanding | Long-term health issues |
| Brass Surface | Paint failure | Chemical cleaning/etching | Guaranteed flaking |
| Plastic | Minimal | Basic ventilation | Minor adhesion issues |
By adopting this industrial-grade methodology—understanding the substrate, preparing it meticulously, and selecting the right chemicals for the job—you can move beyond frustration and achieve a flawless, durable finish on every photo-etched part you use.