In summary:
- Achieving a splatter-free soft edge relies on a trinity of control: highly thinned paint, low air pressure, and precise trigger discipline.
- Your paint must be thinned to the consistency of milk, often a 70% thinner to 30% paint ratio, to atomize correctly at low PSI.
- Low pressure (around 10-15 PSI) is non-negotiable for getting close to the model and creating tight, feathered lines.
- Master the “air on, paint on, paint off, air off” trigger sequence to eliminate the dreaded initial paint spit.
- Your equipment (a fine 0.2mm needle) and movement (smooth motions from the arm, not the wrist) are as critical as the paint and air.
The quest for the perfect, freehand soft-edge camouflage—the subtle mottle on a Luftwaffe fighter or the feathered demarcation on an RAF Spitfire—is a defining challenge for any intermediate modeler. You have the airbrush, you have the model, but the result is a frustrating mess of splatters, spiderwebs, and hard, uncontrolled lines. The surface of your pristine model becomes a testament to failed attempts, forcing you back to the tedious process of masking with putty or tape, defeating the entire purpose of freehand control.
Common advice often circles around two points: “thin your paint” and “use low pressure.” While true, this is like telling a chef to “use heat and good ingredients.” It omits the crucial technique, the feel, and the deep understanding of the physics at play. Many guides list settings but fail to explain the dynamic relationship between paint viscosity, air velocity, distance, and the mechanical precision of your own hand. They treat airbrushing like a formula, when it is, in fact, a physical skill.
But what if the secret wasn’t just following a recipe, but learning to feel the process? The key to mastering freehand work is not in memorizing ratios, but in developing a physical intuition for how the paint atomizes. It’s about understanding the “spray cone,” the delicate balance of trigger control, and the muscle memory required to make the airbrush an extension of your hand. This is not about rules; it’s about control and a deep understanding of your tools.
This guide will deconstruct the process, moving beyond generic advice. We will explore the exact science of paint consistency, the critical role of low pressure, the hardware that enables fine lines, and the physical techniques—the very movements of your hand and finger—that separate the masters from the apprentices. We will build your understanding from the ground up, transforming your airbrush from a source of frustration into a precision instrument.
To navigate this deep dive into advanced airbrushing, the following guide breaks down each critical component. We will cover everything from the material science of your paint to the historical accuracy of your subject, providing a complete roadmap to achieving mastery.
Summary: The Art of Freehand Airbrush Camouflage
- Milk consistency: finding the exact paint-to-thinner ratio for low pressure work
- 10 PSI vs 20 PSI: why lower pressure is critical for close-up detail work?
- 0.2mm vs 0.4mm: which needle allows for tight camouflage lines?
- Why paint dries on the needle tip instantly (and how to retard it)?
- Wrist vs Arm: how to move your hand to create consistent mottle patterns?
- Mastering Trigger Control: Why Your Double-Action Airbrush Spits Paint?
- Pre-shading vs Black-basing: Which Technique Creates More Realistic Tonal Variation?
- How to Research Historical Liveries When Archival Photos Are Black and White?
Milk consistency: finding the exact paint-to-thinner ratio for low pressure work
The most common directive in airbrushing, “thin your paint to the consistency of skim milk,” is both the most crucial and the most misunderstood. For freehand camouflage, this isn’t a suggestion; it’s the absolute foundation. A thick paint mix requires high pressure to atomize, creating a wide, uncontrollable spray pattern that is the enemy of fine detail. To achieve the tight, soft-edged lines needed for mottling, you must use a significantly higher thinner-to-paint ratio than you would for a base coat. This allows the paint to atomize into a fine mist at very low pressures.
The ideal ratio is not universal and depends heavily on the paint brand, the specific color’s pigment density, and even your workshop’s ambient humidity. However, a solid starting point for this type of work is a dramatic shift from the typical 50/50 mix. As noted by experienced modelers like Jon Bius, a ratio of 70% thinner to 30% paint is a good starting point for freehand camouflage. This highly thinned mixture may seem counter-intuitive—it will be very translucent—but this is by design. You will build up the color in several light, controlled passes rather than one heavy coat.
Testing your mix is non-negotiable. Before you touch your model, spray a line onto a scrap piece of plastic or a plastic spoon. The paint should flow smoothly without sputtering. If it forms “spiderwebs,” your paint is too thin or your pressure is too high for your distance. If it “spits” or has a grainy texture, it’s too thick. The goal is a fine, consistent mist that you can control with precision.
To help you find the right starting point for your preferred brand, the following table outlines common thinning ratios for soft-edge work.
| Paint Brand | Standard Ratio | Soft-Edge Ratio | Recommended Thinner |
|---|---|---|---|
| Tamiya X/XF | 1:1 (50%) | 30:70 | X20A or Lacquer |
| Vallejo Model | 70:30 | 30:70 | Airbrush Thinner + Flow Improver |
| Mr. Hobby/Gunze | 60:40 | 40:60 | Mr. Leveling Thinner |
| AK Interactive | 1:1 | 30:70 | AK Thinner + Retarder |
Ultimately, achieving the perfect consistency is less about a fixed formula and more about developing a feel for how the paint behaves through your airbrush at low pressures.
10 PSI vs 20 PSI: why lower pressure is critical for close-up detail work?
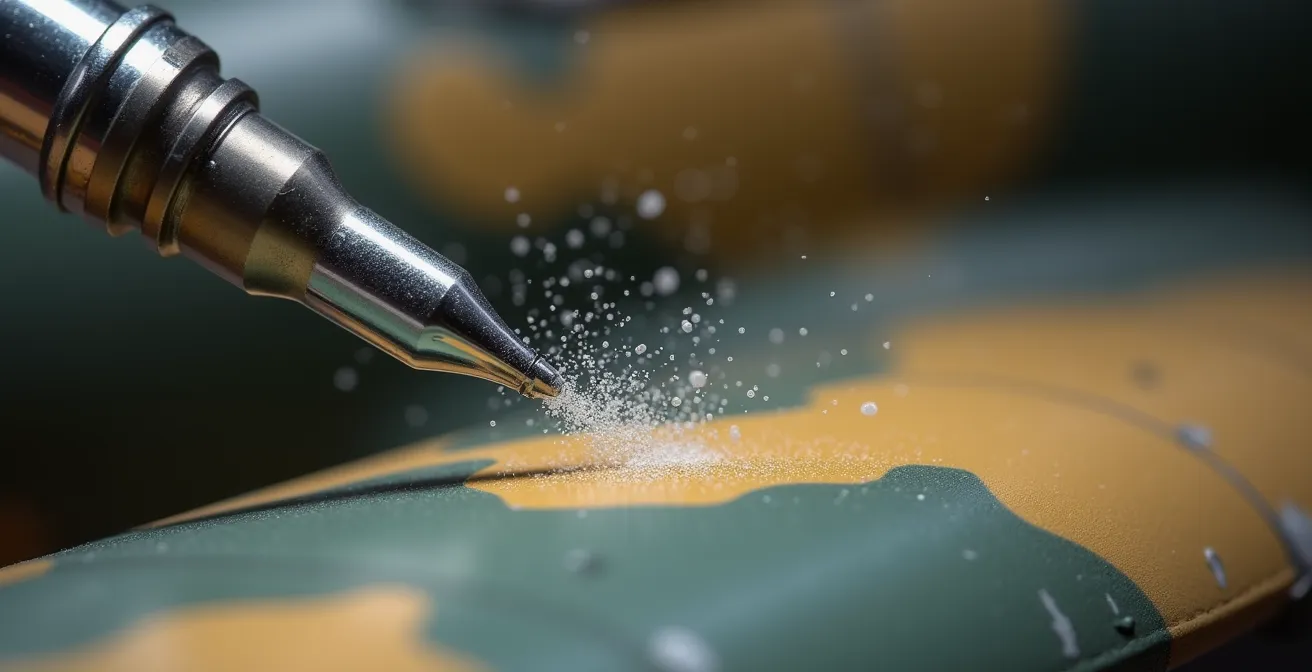
Air pressure is the engine of your airbrush. For general coverage, a pressure of 20-25 PSI (pounds per square inch) works well, forcefully atomizing paint and covering a wide area quickly. However, for freehand soft-edge camouflage, this level of force is your enemy. High pressure creates a turbulent, wide spray cone that pushes paint away from the needle, making fine lines impossible and causing overspray and splatter. To gain control, you must significantly reduce the force and get closer to the model.
This is where low pressure becomes critical. Dropping your PSI to the 10-15 PSI range fundamentally changes the physics of your spray. The airflow becomes gentler, or more ‘laminar’. This allows you to bring the airbrush nozzle much closer to the surface—sometimes within a centimeter—without the air blast causing the paint to spiderweb. At this proximity, the spray pattern becomes incredibly tight and controllable, allowing you to “draw” with the airbrush. While general airbrushing guides suggest that the air pressure for perfect results typically ranges from between 10 psi to 25 psi, for the specific task of freehand mottling, the lower end of that spectrum is where you will live.
It’s vital to work with a compressor that has a regulator and a moisture trap. A regulator allows you to dial in the exact pressure you need, and a moisture trap prevents condensed water from being blasted into your paint stream, which is a common cause of sputtering. Remember to set your pressure while the air is flowing (trigger pressed down), as this “working pressure” is what truly matters, not the static pressure shown on the gauge when idle.

As the image demonstrates, high pressure creates a wide, chaotic pattern, while low pressure allows for a tight, controlled cone of paint. This control is the essence of freehand work. Lowering the pressure tames the airbrush, transforming it from a spray gun into a fine-detail instrument. It forces a slower, more deliberate pace, but the payoff is an unparalleled level of precision.
Be aware that as you lower the pressure, the risk of tip-dry increases, a challenge we will address next. The dance of freehand work is a constant balance between these competing variables.
0.2mm vs 0.4mm: which needle allows for tight camouflage lines?
If paint is the fuel and pressure is the engine, the needle and nozzle assembly is the transmission—it dictates how that power is delivered. The size of the nozzle opening is the single most important factor in determining the finest line an airbrush can produce. While a 0.35mm or 0.4mm nozzle is a versatile workhorse for base coats and primers, it is physically incapable of producing the pencil-thin lines required for intricate mottling on a 1/72 or 1/48 scale model. For this kind of work, a finer tool is not a luxury, but a necessity.
A 0.2mm needle/nozzle combination is the ideal choice for tight, freehand camouflage. The smaller aperture constricts the paint flow and shapes the air, creating a much narrower spray cone. This allows you to produce sharp, fine lines with minimal overspray, even when working very close to the surface. Trying to achieve the same effect with a 0.4mm nozzle would require you to pull the trigger back so slightly that control becomes nearly impossible, often leading to inconsistent flow and splattering as the needle “jitters” at the edge of the paint-flow threshold.
However, this precision comes with a trade-off. A smaller nozzle is far more susceptible to clogging, especially with the highly-thinned acrylic paints used for this technique. This makes proper paint thinning and regular cleaning even more critical. Metallic paints or paints with large pigments are generally unsuitable for a 0.2mm nozzle. As one professional modeler states, “Your choice of airbrush will be controlled by how fine a line you need…If you want to freehand camouflages in 1/72 or 1/144, you will need a very fine nozzle.” The scale of your work directly dictates the hardware you must use.
The table below breaks down the practical applications for different nozzle sizes, highlighting why a smaller diameter is superior for fine-detail camouflage.
| Nozzle Size | Line Width | Clogging Risk | Best For | Paint Types |
|---|---|---|---|---|
| 0.15mm | Hair-thin | Very High | Panel lines, rivets | Highly thinned only |
| 0.2mm | Pencil-thin | High | Fine mottle, 1/72 scale | Well-thinned acrylics |
| 0.35mm | Medium | Moderate | General camo, 1/48 scale | Most paint types |
| 0.4mm | Broad | Low | Soft edges, primers | All types including metallics |
Switching to a finer needle is a leap in capability, but it demands a higher level of discipline in paint preparation and airbrush maintenance to function correctly.
Why paint dries on the needle tip instantly (and how to retard it)?
You’ve achieved the perfect paint consistency, dialed in your low pressure, and are working with a fine 0.2mm needle. You begin spraying a beautiful, tight line, and then… it stops. A tiny, semi-dry blob of paint has formed on the very tip of your needle, a phenomenon known as “tip-dry.” This is the primary frustration of low-pressure work with acrylics. It happens because the constant airflow over the needle causes the water or solvent in the paint to evaporate almost instantly, leaving behind a solid pigment deposit that blocks the nozzle.
Tip-dry is the nemesis of smooth, continuous lines and a major cause of splattering. As the blockage builds, you instinctively pull the trigger back further to compensate. When the pressure finally dislodges the clog, a sudden burst of paint is released, ruining your soft edge. The solution is not to fight it, but to manage it proactively through chemical and mechanical means. Chemically, you can slow the drying time by adding a paint retarder or a flow improver to your mix. A few drops (typically 5-10% of your total mix) can make a significant difference, especially in low-humidity environments.
Mechanically, you must practice diligent “tip hygiene.” Keep a small brush (like a micro-brush or a cheap, stiff-bristled craft brush) soaked in airbrush cleaner or thinner at your workstation. Every minute or two, or as soon as you notice a change in the spray pattern, briefly stop and gently wipe the needle tip. A quick swipe is all it takes to remove the buildup before it becomes a problem. Some modelers even apply a tiny amount of airbrush needle lubricant to the needle shaft (never the tip) before a session to help prevent paint from adhering.
Managing tip-dry is an active, not a passive, process. It’s a rhythm you develop: spray, observe, clean, repeat. Ignoring it will inevitably lead to frustration and flawed results.
Action Plan: Preventing Tip-Dry During Low-Pressure Work
- Clean the needle every 1-2 minutes with a micro-brush soaked in thinner to remove early buildup.
- Run the cleaning brush perpendicular to the needle; never brush parallel to the tip, as this can bend it.
- Add 5-10% acrylic paint retarder to your paint mix, especially if working in low humidity conditions.
- Apply a needle lubricant like Iwata’s “Super Lube” to the needle shaft (not the very tip) before starting a painting session.
- If your workshop is very dry (below 40% humidity), consider running a small humidifier nearby to slow evaporation.
By anticipating and controlling tip-dry, you ensure that your airbrush performs consistently, allowing you to focus on the art of applying the camouflage, not fighting your tool.
Wrist vs Arm: how to move your hand to create consistent mottle patterns?
With the mechanical and chemical variables tuned, the final element is the most complex: you. The way you hold and move the airbrush is the difference between random splotches and a deliberate, consistent camouflage pattern. The most common mistake beginners make is painting from the wrist. This creates tight, jerky arcs and leads to an inconsistent distance from the surface, resulting in unevenly sized mottles and a “shaky” appearance. To create smooth, flowing lines and consistent patterns, you must learn to paint from your arm.
Lock your wrist and initiate movement from your elbow and shoulder. This transforms the airbrush into a plotting arm, allowing for smooth, sweeping motions and consistent curves. Your hand simply holds the tool steady while your arm dictates the path. For added stability, especially during long sessions, use your non-painting hand to support the model on a holder or jig. You can also anchor the pinky finger of your painting hand on a stable part of the model or your work surface, creating a pivot point for extremely fine, controlled adjustments.
Developing this muscle memory requires practice. Don’t use your prize model as a testbed. Grab some plastic milk bottles, prime them, and practice the fundamental movements. Draw dots, then connect them. Spray straight lines, then curves, then “S” patterns. This is what’s known as “ghosting”: perform the complete motion with air only (trigger down, but not back) to rehearse the path before committing paint to the surface.
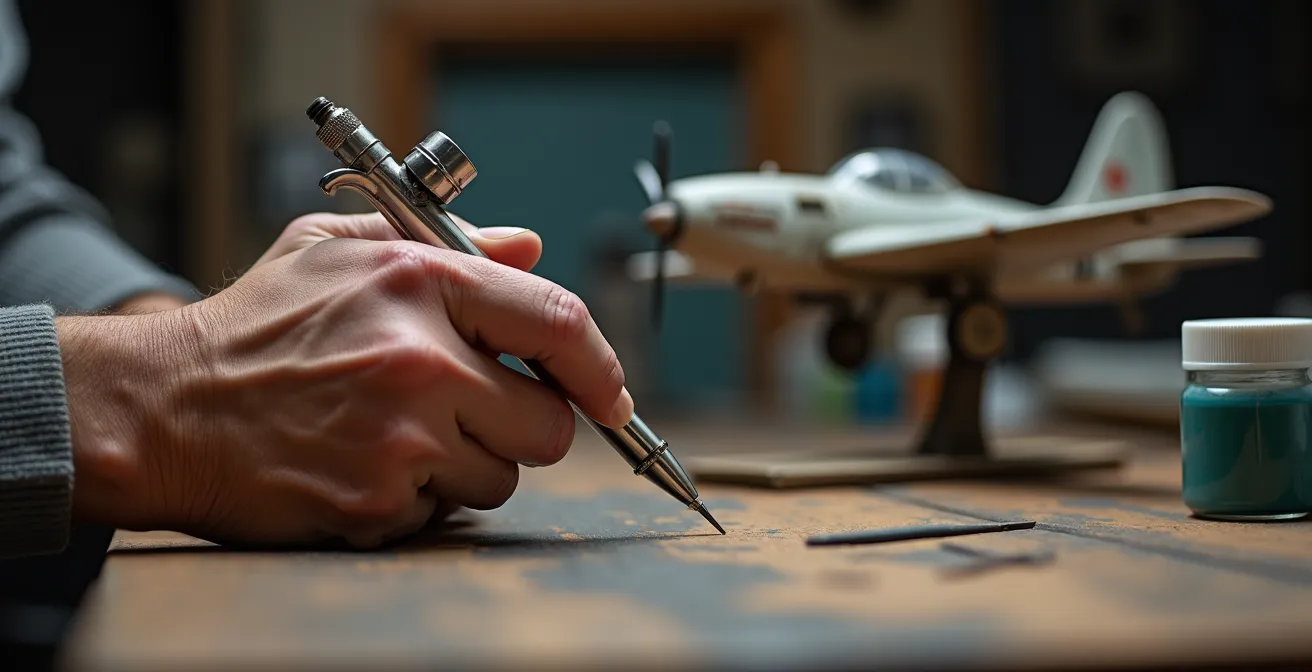
As shown here, the grip is relaxed but firm, and the finger is poised for delicate trigger control. The movement should feel like a dance—a fluid, deliberate motion that you guide across the surface. For variance, some expert modelers introduce a subtle “fanning” of the trigger or vary the distance while moving, but these are advanced techniques built upon the foundation of smooth, arm-driven movement.
Ultimately, your hand and arm become the delivery system for all the technical preparations you’ve made. Smooth, practiced motion is what translates your vision onto the model.
Mastering Trigger Control: Why Your Double-Action Airbrush Spits Paint?
A double-action airbrush offers unparalleled control, allowing you to independently manage airflow (by pressing the trigger down) and paint flow (by pulling the trigger back). However, this control is a double-edged sword. Improper trigger sequencing is the number one cause of the dreaded initial “spit” of paint that ruins a clean start. Many users instinctively press and pull the trigger simultaneously, causing a small, unatomized droplet of paint to be ejected before proper airflow is established. This is what causes that initial splatter you see right where you begin to spray.
The solution is a simple but non-negotiable four-step sequence that must become second nature. It’s a mantra you should repeat until it is pure muscle memory: Air on, Paint on, Paint off, Air off. This discipline ensures that paint is only ever introduced into a stable, established stream of air, and that the flow of paint is stopped before the air is cut off. This simple action cleanly purges the nozzle and prevents a final droplet from pooling at the needle tip, ready to splatter on your next pass.
A common complaint on forums is, “I can get a fine line with the paint but when I spray it on the model there is a splattering… around the area I spray.” This is the classic symptom of flawed trigger discipline. The user is starting the paint flow at the same time as, or even before, the airflow. By starting your spray off the model, moving onto the target area, and ending the spray off the model again, all while adhering to the “Air on, Paint on, Paint off, Air off” sequence, you can completely eliminate this problem.
This level of trigger discipline is the heart of airbrush mastery. It’s a subtle, tactile skill. Practice feeling the two distinct actions of the trigger—the downward press and the backward pull. Learn to feather the trigger back and forth to modulate the paint flow with the same subtlety that you would use a pencil to vary the thickness of a line. This is what separates a novice from an expert.
Checklist for Trigger Discipline: The Four-Step Sequence
- Step 1: Air On. Begin by pressing the trigger straight down to start the flow of air ONLY. Point the airbrush slightly away from your target area.
- Step 2: Paint On. While maintaining downward pressure, begin moving your hand and smoothly pull the trigger back to introduce paint into the airstream.
- Step 3: Paint Off. As you approach the end of your spray line, push the trigger fully forward to stop the flow of paint while continuing to move your hand and keeping the air on.
- Step 4: Air Off. Once the paint flow has ceased and you are off the target area, release the downward pressure on the trigger to stop the airflow. This prevents any final sputtering.
When this four-step process becomes an unconscious habit, you will have unlocked the true potential of your double-action airbrush and eliminated the primary source of splatter.
Pre-shading vs Black-basing: Which Technique Creates More Realistic Tonal Variation?
Before you even begin spraying your camouflage colors, the underlying base coat technique you choose will profoundly impact the final result. The two most common methods for creating tonal variation are pre-shading and black-basing. While both aim to break up the monochromatic flatness of a single color, they produce very different effects, and one is far better suited for the translucent layers used in soft-edge camouflage work.
Pre-shading is the traditional method: you start with a light-colored primer and spray black or a dark color along panel lines, recesses, and shadow areas. You then apply your camouflage color over the top, allowing the dark lines to subtly show through. The main drawback of this technique is that it requires a relatively opaque topcoat to avoid completely obscuring the shading. This works against the highly thinned, translucent paint needed for freehand work. The effect can also look very uniform and “cartoonish” if not done with extreme subtlety.
Black-basing, also known as “color modulation” or the “marble coat” technique, is a more advanced and arguably more realistic approach. You begin with a solid black primer coat over the entire model. Then, using a light color like white, light gray, or a tan, you create a random, mottled, or “marbled” pattern within the center of the panels, leaving the edges and panel lines black. When you then apply your very thin camouflage color over this chaotic undercoat, the underlying light and dark patches create a non-uniform, naturally weathered tonal variation that is far more convincing. This technique is perfectly suited for soft-edge camouflage because it is *designed* to be used with thin, translucent layers of paint.
The choice between them often comes down to the desired effect. As one modeler notes when discussing hard-edge vs. soft-edge camo, “A soft-edge camo cannot be highlighted or darkened. Conversely, soft-edge camos are somehow more realistic.” Black-basing leans into this realism, creating built-in highlights and shadows that work with the soft-edge pattern, not against it.
| Technique | Base Application | Opacity Required | Effect on Soft-Edge | Skill Level |
|---|---|---|---|---|
| Pre-shading | Dark lines on light primer | Medium to High | Linear, predictable contrast | Beginner |
| Black-basing | Light mottle on black primer | Low (Translucent) | Random, natural variation | Intermediate |
| Color-basing | Tinted marble on black | Very Low | Rich, complex tonal shifts | Advanced |
| Marble coat | Black and white mottle | Multiple thin passes | Highly complex variation | Expert |
For the ultimate in realistic, soft-edge camouflage, black-basing provides a superior foundation that enhances, rather than fights, the subtle, translucent nature of freehand airbrushing.
Key Takeaways
- The holy trinity of freehand control is a 70/30 thinner-to-paint ratio, an air pressure of 10-15 PSI, and a fine 0.2mm needle.
- Mastering the “Air on, Paint on, Paint off, Air off” trigger sequence is the single most effective way to eliminate splatter and spitting.
- Develop muscle memory by practicing smooth movements from the arm and shoulder, not the wrist, and proactively manage tip-dry with retarder and frequent cleaning.
How to Research Historical Liveries When Archival Photos Are Black and White?
Applying a beautiful, technically perfect camouflage pattern loses its impact if the colors are historically inaccurate. A significant challenge for modelers focusing on WWII-era subjects is that the vast majority of reference photos are black and white. Interpreting the correct shades of green, brown, or gray from a monochrome image is a research skill in itself, a form of “digital archaeology” that requires cross-referencing multiple sources to build a complete picture.
The first step is to understand the limitations of the photograph itself. The type of film used drastically affects how colors are rendered. Orthochromatic film, common before the 1940s, was insensitive to red light, making reds appear almost black and blues appear very light. Panchromatic film, which became standard during the war, provides a more accurate grayscale representation, but can still be misleading. For example, RLM 70 (Black-Green) and RLM 71 (Dark Green) can appear nearly identical in tone on panchromatic film.
Therefore, you cannot rely on a single photo. The key is to cross-reference with official documentation. Aviation ministries like the British Air Ministry (issuing RAF specifications) and the German Reichsluftfahrtministerium (issuing RLM standards) published detailed directives on camouflage patterns and colors for specific aircraft types at specific times. These documents are your primary source of truth. You can then use the black and white photo to interpret how that official pattern was applied—was it a hard edge or soft edge? Was the mottle dense or sparse?—rather than trying to guess the colors.
Another powerful technique is to compare the unknown tones in the photo to known colors. National markings like RAF roundels or Luftwaffe crosses had standardized colors. By comparing the grayscale value of a wing’s camouflage to the blue or red in a roundel, you can make an educated inference about its true color. Finally, leveraging the collective knowledge of expert communities is invaluable. Specialized forums like Britmodeller or WW2Aircraft.net have threads where enthusiasts and historians have spent decades analyzing specific aircraft, often identifying individual machines by their serial numbers and documenting their entire service history and color schemes.
Checklist: Interpreting Black and White Reference Photos
- Identify Film Type: Determine if the photo is likely orthochromatic (pre-1940s) or panchromatic to understand potential color distortions.
- Consult Official Directives: Cross-reference the aircraft type and time period with official paint specifications (e.g., RLM, RAF, USAAF documents).
- Compare Relative Tones: Analyze the grayscale values of the camouflage relative to known colors on the aircraft, such as national insignia or squadron codes.
- Research Serial Numbers: Search for the specific aircraft’s serial number, as its individual history and paint scheme may be well-documented.
- Engage with Communities: Consult specialized modeling and historical forums to leverage collective expert knowledge and existing research on the subject.
By combining photographic analysis with official documentation and community knowledge, you can move beyond guesswork and apply your freehand camouflage skills with historical confidence.