The secret to stunningly detailed cockpits, even with changing eyesight, isn’t perfect vision—it’s using clever “compensatory techniques” that make details pop without microscopic work.
- Swap pure black for dark greys to reveal, not hide, molded-in detail.
- Choose between sharp photo-etch for structure and vibrant 3D decals for modern glass displays.
Recommendation: Start by mastering the “less is more” painting approach; it provides the biggest visual impact with the least amount of strain on your eyes.
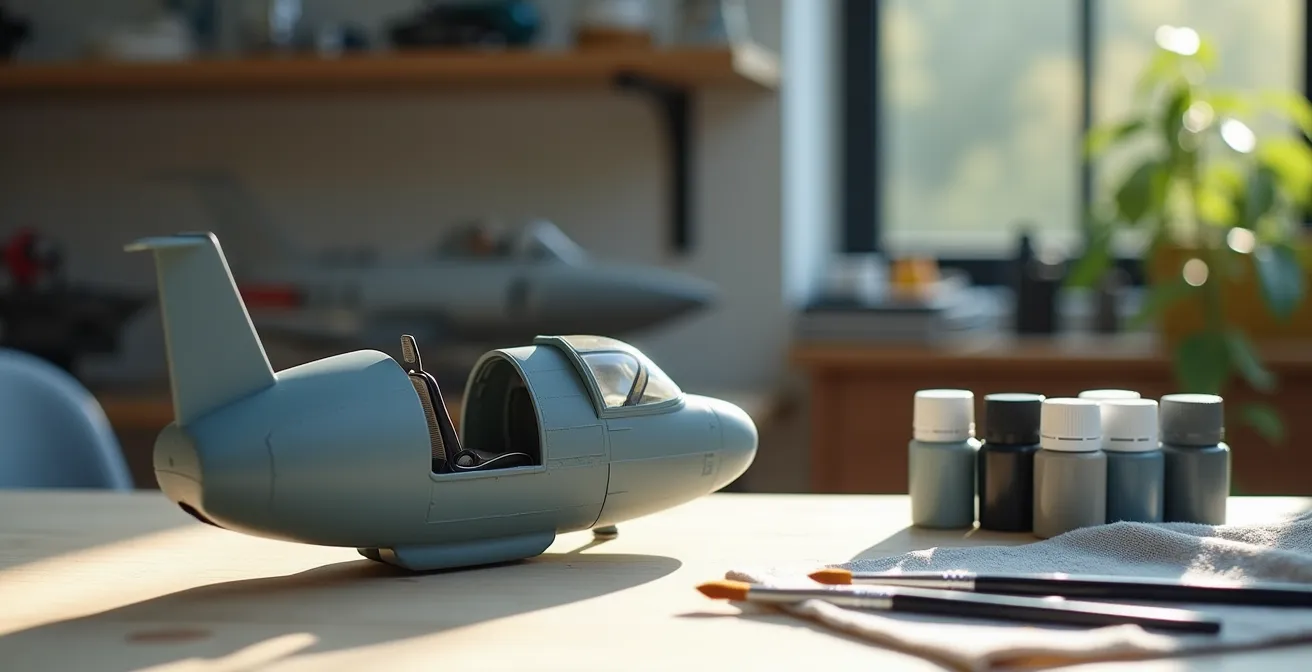
For many passionate scale modelers, the cockpit is the heart and soul of an aircraft project. It’s where the story of the machine and its pilot begins. Yet, as the years go by, a common frustration emerges: our eyesight changes, and the once-joyful task of painting tiny switches and dials becomes a daunting challenge. The conventional wisdom of slathering on black paint and hoping a bit of dry-brushing saves the day often leads to a dark, lifeless “black hole” that hides all the beautiful detail the kit manufacturer provided. This can feel discouraging, as if our best modeling days are behind us.
We see inspiring work online, with cockpits so real you could almost step inside, and wonder how it’s possible. The answer often seems to involve expensive aftermarket parts and skills that feel out of reach. We’re told to use photo-etch, but the parts are impossibly small. We try superglue on a canopy and watch in horror as it fogs over, ruining hours of work. It’s easy to feel that maintaining high standards is simply no longer possible.
But what if the true key to a breathtaking cockpit wasn’t about having the steadiest hand or the sharpest eyes? What if it was about working smarter, not harder? This guide is built on that very principle. We will explore a series of adaptive, compensatory techniques designed specifically for the modeler who wants to maintain exceptional standards. We will move beyond the platitudes and dive into the “why” behind each method—from manipulating light to make canopies look like real glass to understanding the chemistry of glues and primers.
This article will show you how to transform your cockpit detailing from a source of frustration into a field of mastery again. You will learn to create depth, realism, and visual interest that your eyes can easily appreciate, proving that incredible results are still well within your grasp.
Explore the following sections to rediscover the joy of creating a truly immersive and realistic aircraft cockpit. Each part builds upon the last, offering practical solutions to the most common challenges.
Summary: A Guide to Adaptive Cockpit Detailing
- The “less is more” rule: how to pop raised details with grey paint?
- 3D Decals or Photo-Etch: which looks more realistic for modern jets?
- Why standard superglue ruins clear parts instantly?
- The “Future” dip: how to make canopies look like thin glass?
- Inside or Outside: when should you paint the internal canopy frame color?
- How to Fold Photo-Etched Parts Without Ruining the Delicate Brass?
- How to Route Fiber Optics Inside a Model?
- How to Paint Photo-Etched Brass So the Color Doesn’t Flake Off During Handling?
The “less is more” rule: how to pop raised details with grey paint?
The single biggest mistake modelers make is painting cockpits pure black. It seems logical, but in scale, pure black absorbs light and flattens every subtle detail, creating an unrealistic, toy-like void. The secret is to use an “off-black” or very dark grey. This simple change allows light to play across the surfaces, naturally revealing the shape of instrument panels, consoles, and side walls. This technique is a gift for changing eyesight because it does the hard work for you, making details visible without needing perfect vision to pick them out.
The goal is to create contrast and depth through layers. By starting with a dark grey base, you establish a foundation that looks like “black” to the eye but still has room for shadows and highlights. The most experienced modelers rely on this principle; in fact, a deep dive into their practices shows that NATO Black, German Grey and Tyre Black are the 3 most commonly used off-black shades for this very reason. These are your best friends for creating a “visual scale” effect that looks far more convincing.
Once the base coat is down, you can easily add depth. A darker wash will settle into the recesses, creating shadows, while a careful dry-brush with a very light grey will catch the raised edges of switches and bezels. This final step is especially forgiving, as the brush naturally finds the high points. To finish, a tiny drop of clear gloss on each dial face creates the illusion of glass—an incredibly effective detail that requires no intricate painting skills.
Action Plan: Achieving Depth in Your Cockpit
- Apply a base coat using a dark grey (not pure black) to all instrument panels and raised details.
- Apply a darker pin wash using thinned oil paint or an acrylic wash to flow into panel lines and deepen recesses.
- Dry-brush raised details with a very light grey or off-white, using a soft brush with minimal paint to catch the high points.
- Apply a drop of clear gloss paint on each instrument face to simulate the look of glass covers.
- For advanced weathering, add subtle oil dot filtering with browns and blues to create realistic aging and grime.
This layered approach builds a rich, detailed environment that looks complex and realistic, yet each step is simple and manageable on its own.
3D Decals or Photo-Etch: which looks more realistic for modern jets?
Once you’ve mastered the base painting, you might want to elevate your cockpits with aftermarket details. The two main contenders are traditional photo-etched (PE) brass and modern 3D decals. Choosing between them isn’t about which is “better,” but about understanding what each does best—a concept of material honesty. This is another compensatory technique: instead of fighting to paint tiny details, you choose a product that has the detail built-in.
Photo-etch offers incredible scale thickness and sharpness. For things that are actually metal in the real aircraft—like instrument panel bases, levers, and seatbelt buckles—it’s unmatched. A study of advanced techniques reveals that experienced modelers combine photo-etched parts for ultra-thin metal components that replicate scale thickness far more accurately than plastic. However, it requires skill to fold and glue, and painting the tiny details on the panel itself can still be a challenge.
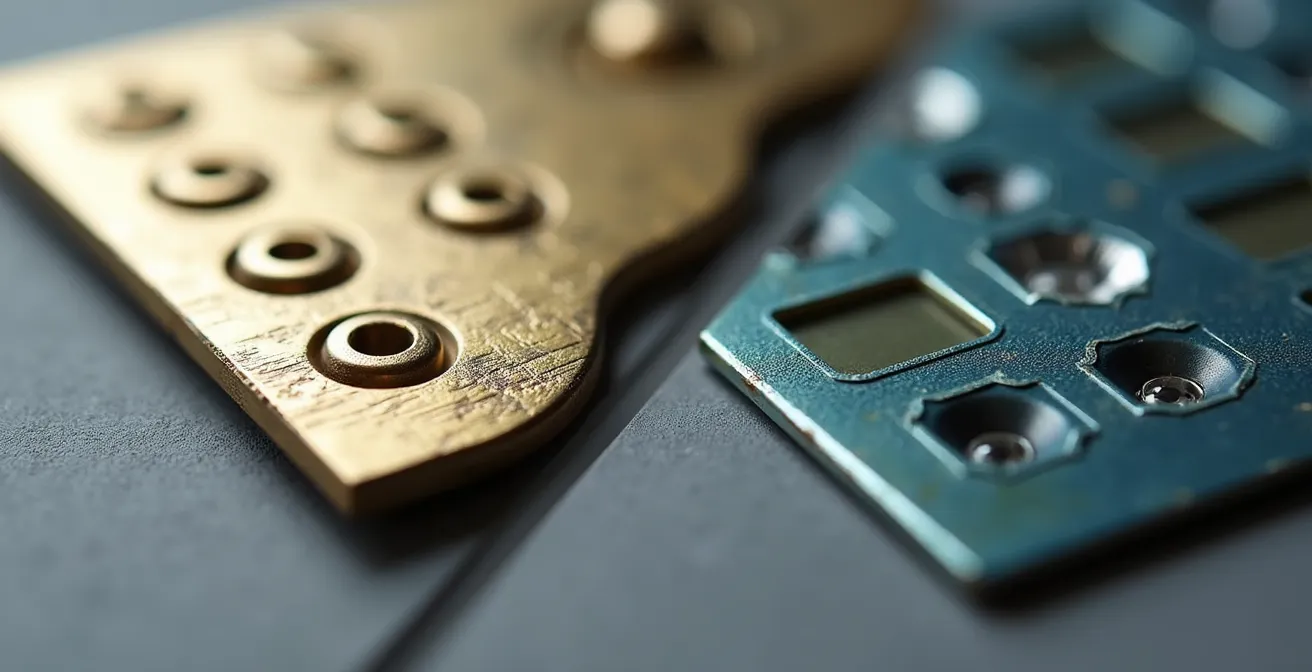
On the other hand, 3D decals are a game-changer, especially for modern “glass cockpits.” These are not flat decals; they are printed in layers to create a tangible, three-dimensional effect with glossy screens and raised buttons. For multi-function displays (MFDs) and complex button arrays, they provide a level of color and precision that is nearly impossible to paint by hand, especially with less-than-perfect vision. They give a “powered on” look that is incredibly convincing.
The best approach is often a hybrid one: use a photo-etched panel for its crisp metal structure and apply 3D decals for the complex digital displays. This lets you leverage the strengths of both technologies for maximum realism with minimum frustration.
To help you decide which is right for your project and skill level, this table breaks down the key differences.
| Criteria | Photo-Etch | 3D Decals |
|---|---|---|
| Cost | Higher ($15-30 per set) | Moderate ($8-15 per set) |
| Skill Required | Advanced (folding, gluing) | Intermediate (precise placement) |
| Time Investment | 2-4 hours | 30-60 minutes |
| Final Effect | Sharp metallic, ‘cold & dark’ | Dimensional, ‘powered on’ glass cockpit |
| Best For | Structural parts, levers, consoles | Digital displays, complex button arrays |
Ultimately, the choice empowers you to add a layer of detail that would otherwise be incredibly difficult, turning a challenge into a simple matter of selection and application.
Why standard superglue ruins clear parts instantly?
There is no faster way to ruin a perfectly polished canopy than by using the wrong adhesive. Many modelers have learned this the hard way: a small touch of standard cyanoacrylate (superglue) near a clear part results in a permanent, ugly white fog. This isn’t a mistake in application; it’s a chemical reaction. Superglue cures by reacting with moisture in the air, and a byproduct of this reaction is a vapor that is drawn to certain plastic surfaces, where it crystallizes. This process, called “blooming” or “frosting,” is irreversible and will permanently mar the clarity of your canopy.
Understanding this controlled chemistry is key to avoiding disaster. The solution is to use an adhesive designed specifically for clear parts. There are several excellent alternatives that provide strong bonds without any risk of fogging. The most common is PVA-based “canopy glue.” According to modeling experts, canopy glue bonds well to nonporous materials and remains flexible when dry, making it ideal for this task. It dries clear and any excess can be wiped away with a damp cloth before it sets.
For a stronger bond, products like Formula 560 Canopy Glue are a step up. This is a reinforced PVA that offers significantly more strength. In fact, some destructive tests have shown that Formula 560 proved 3-5.5 times stronger than standard white glue in tension tests. It provides the security of a strong bond with the safety of a water-based glue. A third option for the more advanced modeler is UV-curing resin, which offers an instant, crystal-clear bond when exposed to a UV light, but this requires specialized equipment.
By choosing the right tool for the job, you turn a high-risk step into a safe and predictable process, ensuring your clear parts remain perfectly transparent.
The “Future” dip: how to make canopies look like thin glass?
Even a brand-new clear canopy straight from the box can have microscopic scratches and imperfections that prevent it from looking like true, thin glass. One of the most legendary techniques in scale modeling for solving this is the “Future dip,” named after the acrylic floor polish it originally used. While the product name has changed over the years (it’s now often sold as Pledge Revive It), the principle remains a brilliant example of light manipulation.
This isn’t just about cleaning the part; it’s about fundamentally changing its surface properties. By dipping the canopy into the liquid acrylic, you apply a perfectly smooth, self-leveling clear coat. As a member of the modeling community explains in a discussion on advanced techniques, “The acrylic floor polish acts as a self-leveling clear coat that fills microscopic scratches and imperfections on the plastic’s surface.” This creates an optically perfect surface that allows light to pass through without distortion, making the plastic seem to disappear and look incredibly thin and clear.
The acrylic floor polish acts as a self-leveling clear coat that fills microscopic scratches and imperfections on the plastic’s surface.
– Scale Modelling Community, Advanced Canopy Techniques Discussion
The process is simple: clean the canopy thoroughly, attach it to a handle (like a toothpick with poster tack), dip it completely into the polish, and wick away the excess from a corner. Then, let it dry under a dust-free cover for at least 24 hours. The result is a dramatic improvement in clarity that no amount of polishing can replicate. For those of us whose eyes appreciate strong, clear results, this technique offers maximum reward for minimal effort. However, a few things can go wrong, so it’s wise to be prepared:
- Dust particles settling: Always work in a clean area and cover the part immediately after dipping. A simple overturned plastic container works well.
- Pooling in corners: Before it dries, use the corner of a paper towel or a fine brush to gently wick away any excess liquid that has pooled in the edges.
- Yellowing over time: The original Future formula could yellow with age. Modern alternatives like Tamiya X-22 Clear or Mr. Color GX100 Super Clear III, thinned with a leveling thinner, are more stable.
- Uneven coating: Dip and withdraw the part slowly and at a consistent speed to ensure the polish flows evenly over the entire surface.
By mastering this simple dipping process, you can achieve flawlessly clear canopies every time, adding a touch of hyper-realism that elevates the entire model.
Inside or Outside: when should you paint the internal canopy frame color?
Painting canopy frames is a source of anxiety for many modelers. Achieving a crisp, clean line between the frame and the clear glass seems to require superhuman masking skills. But here again, a smart process is better than a steady hand. The most realistic and reliable method is the “authenticity sandwich” technique, which replicates how real aircraft are painted and ensures a perfect result every time.
On a real aircraft, the entire airframe, including the canopy framework, is primed and painted before the final exterior camouflage is applied. This means the interior of the canopy frame is usually the same color as the rest of the cockpit (e.g., Interior Green or Dark Gull Gray). The exterior of the frame is the camouflage color. To replicate this, you must paint the canopy in layers, from the inside out. This method is far more forgiving than trying to paint the interior frame last.
The process is straightforward. First, you must mask both the inside and outside of the canopy. The key to success is using high-quality masking tape. As professional modelers advise, quality masking tape, cut to precise shapes, enables clean colour transitions and sharp lines. For complex curves, liquid mask can be a lifesaver, as it’s easier to apply precisely into corners than tape.
Once fully masked, you airbrush the interior color over the entire canopy. Don’t worry about overspray; the masks will protect the clear areas. After this has cured, you apply the exterior camouflage color directly over the top. When you finally remove all the masks, you’ll be left with a perfectly defined frame with the correct interior and exterior colors, just like the real thing. The interior color “sandwiched” underneath gives a subtle but powerful impression of depth and realism when viewed through the clear panes.
This method removes the stress of trying to paint a perfectly straight line by hand. It’s a classic compensatory technique: it relies on a robust process, not on flawless execution, to deliver a professional-grade result.
How to Fold Photo-Etched Parts Without Ruining the Delicate Brass?
Photo-etched (PE) brass offers a level of fine detail that is simply unattainable with injection-molded plastic. However, these delicate metal parts can be intimidating. A moment’s hesitation or a slip of the tweezers can result in a kinked, twisted, or broken part, which is incredibly frustrating. The key to success with PE is not brute force, but precision and support. For modelers with less-than-steady hands, using the right tools and techniques is non-negotiable.
First, you need a way to hold the part securely while bending it along its designated fold line. While specialized “hold and fold” tools are the gold standard and a worthy investment for serious PE work, you can get excellent results with a simple, clever workaround: two single-edge razor blades. By placing the part on a hard surface and aligning one blade with the fold line, you can use the second blade to gently and evenly lift the part, creating a crisp, straight fold.
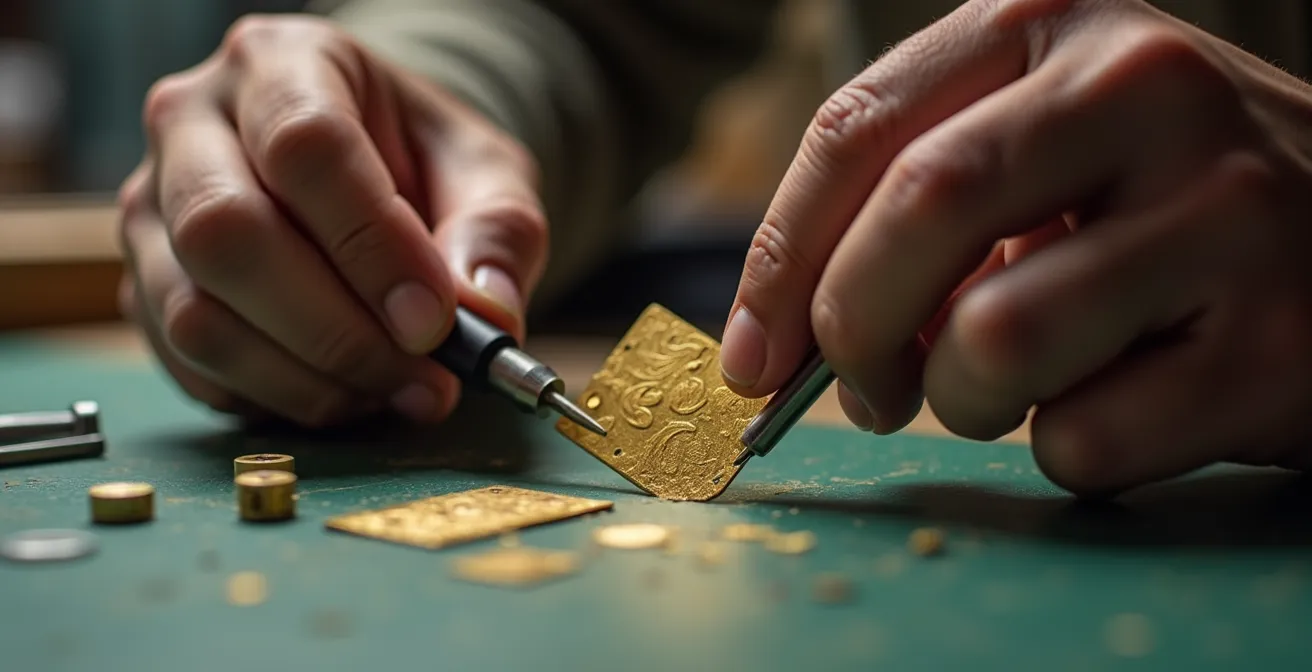
For more complex curves, such as those on an instrument panel shroud, the brass needs to be softened. This is done through a process called annealing. By gently and briefly heating the brass part in the flame of a candle and letting it air cool, you make the metal much more pliable and less prone to kinking when you shape it around a curved form like a drill bit or paintbrush handle.
Here is a step-by-step process for successful folding:
- Identify Fold Lines: Look closely at the part. Fully etched lines are meant for sharp, 90-degree bends, while half-etched lines are for gentler curves.
- Anneal (If Necessary): For any part that requires curving, gently heat the brass in a candle flame for a few seconds until it glows dull red, then let it cool. It will now be much softer.
- Use a Folding Tool: Whether it’s a specialized tool or two razor blades, always ensure the part is supported on both sides of the fold line.
- Apply Even Pressure: Lift the part to be bent with a smooth, continuous motion. Avoid sudden, jerky movements which can cause the brass to kink.
- Test Fit: Always test fit the folded part before committing to glue. It’s much easier to make small adjustments before the adhesive is applied.
By adopting these methods, you replace the need for a surgeon’s steady hand with the reliability of good tools and sound technique, making the world of photo-etched detail fully accessible.
How to Route Fiber Optics Inside a Model?
For the ultimate “wow” factor, nothing beats an illuminated cockpit. Lighting up individual instruments and displays transforms a static model into a living, breathing machine. While micro-LEDs are an option, fiber optics offer a more elegant solution for piping light to multiple tiny points from a single, hidden source. This technique is a perfect example of light manipulation, but success depends almost entirely on one thing: meticulous planning.
Before any glue is applied to the cockpit halves, you must create a detailed wiring diagram. As one case study on advanced builds highlights, successful fiber optic installations require creating a detailed wiring diagram before assembly. This means studying reference photos of the real aircraft to identify every gauge and light that needs illumination. You then drill a tiny hole (the same diameter as your fiber) at each of these locations from the backside of the instrument panel. Each fiber strand will be threaded through a hole, with its end representing a single illuminated point.
The next challenge is routing the bundle of fibers from the cockpit to a hidden location where the light source will be. This path must be carefully planned to avoid interfering with other internal components like landing gear bays, weight compartments, or wing spars. The fibers can be bundled together with heat-shrink tubing and secured to the inside of the fuselage with dabs of canopy glue. At the instrument panel, a tiny drop of superglue on the backside of each hole will secure the fiber strand. Once dry, you can trim the fiber flush with the instrument face. When the light source is turned on, each trimmed end will glow brightly.
Choosing your light source is also a critical decision. While old-school “grain-of-wheat” bulbs work, they generate heat and have a short lifespan. Modern LEDs are far superior, as this comparison shows.
| Light Source | Size | Heat Generation | Lifespan | Power Consumption |
|---|---|---|---|---|
| Micro LEDs | 1-3mm | Minimal | 50,000+ hours | 20mA @ 3V |
| Grain-of-wheat bulbs | 2-4mm | Moderate | 1,000 hours | 50mA @ 1.5V |
| SMD LEDs | 0.8-2mm | Minimal | 100,000 hours | 10mA @ 3V |
While it requires patience, a lit cockpit is a stunning achievement that relies more on careful planning than on intricate skill, making it a highly rewarding project.
Key takeaways
- Avoid pure black paint in cockpits; use dark greys to create depth and reveal detail.
- Choose aftermarket parts strategically: photo-etch for metal structures, 3D decals for illuminated displays.
- Always use a dedicated, non-fogging canopy glue for clear parts to avoid permanent chemical damage from superglue.
How to Paint Photo-Etched Brass So the Color Doesn’t Flake Off During Handling?
You’ve spent hours carefully folding and attaching a beautiful photo-etched instrument panel, only to have the paint flake off with the slightest touch. It’s a common and deeply frustrating problem. The issue isn’t the paint; it’s the surface. Brass is a very smooth, non-porous metal, and standard acrylic model paints have almost nothing to grip onto. The solution lies in controlled chemistry: you must chemically prepare the metal surface so the primer can form a powerful, permanent bond.
Simply washing the PE fret is not enough. To get paint to stick reliably, the brass needs to be “micro-etched.” This creates a microscopic texture on the surface for the primer to bite into. You can achieve this in a couple of ways. The simplest home method is to soak the brass parts in household vinegar for about 15-20 minutes. This mild acid will gently etch the surface. After the soak, rinse the parts thoroughly with water and let them dry completely without touching them with your bare fingers, as skin oils can ruin the adhesion.
Once the surface is prepared, you need the right kind of primer. A standard acrylic primer will still struggle to adhere. The gold standard is a self-etching automotive primer, which is available in spray cans. This type of primer contains an acid that chemically bonds with the metal as it cures, creating the strongest possible foundation for your color coats. As experts in material preparation note, professional modelers chemically micro-etch brass surfaces before applying self-etching automotive primers for the most robust adhesion. Apply a very light mist coat; a thick layer will obscure all the fine detail you paid for.
By taking these preparatory steps, you ensure that your beautifully detailed photo-etched parts will remain beautifully painted, no matter how much handling they endure during the rest of the build. It’s a system that guarantees a lasting finish.
Frequently Asked Questions about Detailing Cockpits
What primer works best on untreated brass?
Self-etching automotive primers create the strongest chemical bond. Lacquer primers are a good alternative, while standard acrylic primers often fail and are prone to flaking off the smooth metal surface.
How long should brass parts cure after priming?
Allow at least 24 hours for the primer to fully cure at room temperature. This ensures maximum adhesion and hardness before you begin applying your main color coats. Rushing this step can compromise the bond and lead to chipping later.