The common advice to rescribe every raised panel line on a vintage kit is often counterproductive; the real art lies in a hybrid approach.
- True modernization involves “Selective Fidelity”: enhancing existing raised details and only scribing new lines where they add crucial visual depth.
- Techniques like reverse washes and controlled post-shading are far more effective than traditional pin washes and pre-shading for the unique topography of raised lines.
Recommendation: Treat your vintage kit as a unique canvas, not a flawed modern one. Use a hybrid strategy to honor its history while elevating its final appearance to a high-fidelity standard.
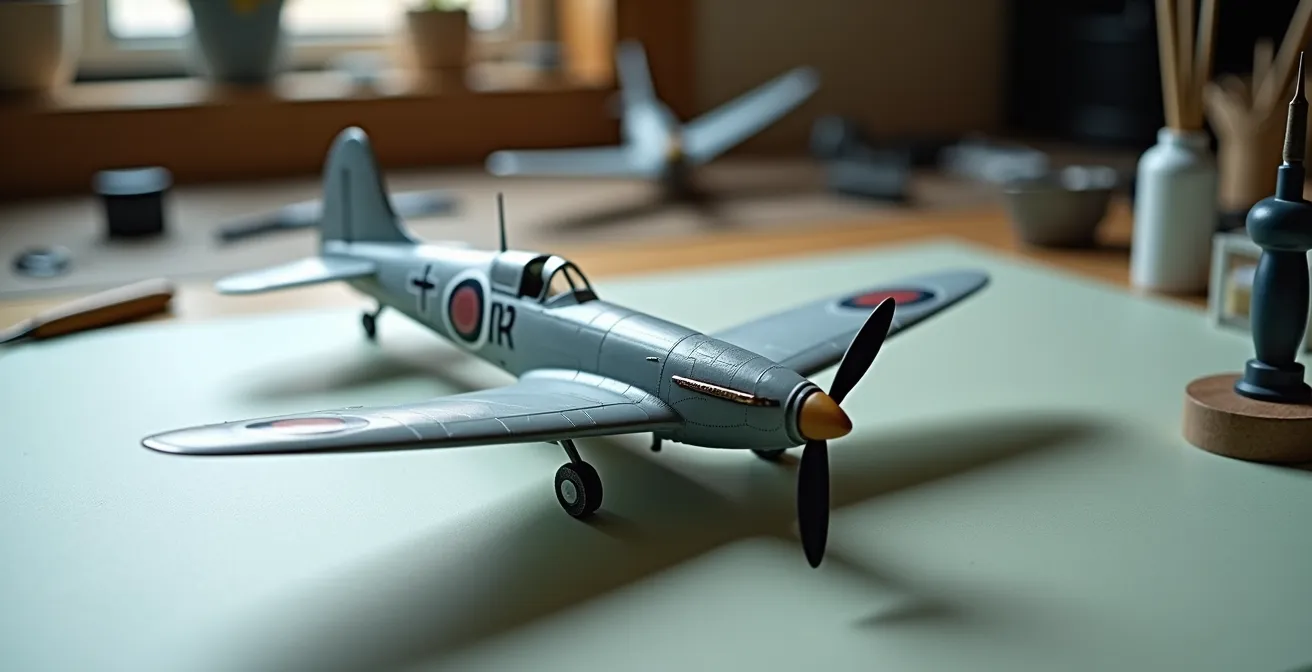
There’s a unique nostalgia in opening a vintage aircraft kit from the 1970s or 80s. It’s a tangible piece of modeling history. But that initial excitement can quickly turn to apprehension when you see them: the thick, prominent raised panel lines. For decades, the prevailing wisdom shouted from forum threads and club meetings has been unequivocal: sand them all off and start the painstaking process of rescribing the entire model with recessed lines. This all-or-nothing approach, however, often ignores the character of the original kit and can be a significant barrier for many modelers.
This mindset frames raised details as a flaw to be eradicated, rather than a different kind of canvas to work with. The truth is, many real-world aircraft feature a mix of raised, flush, and recessed details. The key to modernizing an older kit isn’t to brute-force it into a replica of a brand-new Tamiya offering. Instead, it’s about adopting a renovator’s mindset: respecting the foundation while intelligently applying modern techniques. This philosophy, which we’ll call Selective Fidelity, focuses on enhancing what’s there and only making significant changes where they will have the most visual impact.
Instead of a binary choice between old and new, this guide will explore the hybrid path. We will delve into the right tools for the job, discover weathering techniques that make raised lines pop realistically, and learn how to fix the inevitable mistakes along the way. Ultimately, the goal is to transform that vintage plastic into a high-fidelity replica that tells a story, honoring its origins while showcasing your skill as a modeler.
For those who prefer a visual demonstration of the precision required, the following video offers an excellent deep dive into professional scribing techniques, a foundational skill for this kind of restoration work.
To navigate this nuanced approach, this article breaks down the essential skills and philosophies required. From choosing the correct scribing tool to understanding what truly defines a collector-grade replica, each section provides the practical knowledge to tackle your next vintage project with confidence.
Summary: A Modern Approach to Vintage Panel Lines
- Scribers vs Needles: which tool creates the cleanest recessed line?
- Why pin washes don’t work on raised panel lines (and what to use instead)?
- Dry brushing or Pre-shading: best methods to highlight raised detail
- How to fix a scratch when your scriber slips across the wing?
- How to use photo-etched templates to restore complex access hatches?
- How to Eliminate Fuselage Seams So They Disappear Under a Coat of Silver Paint?
- Why Clean Models Look like Toys: Adding Authentic Weathering to Scale Aircraft?
- What Defines a High-Fidelity Replica for Serious Aviation Collectors?
Scribers vs Needles: Which Tool Creates the Cleanest Recessed Line?
When you decide that rescribing a specific panel is necessary for achieving Selective Fidelity, the choice of tool is paramount. For years, the default was a simple needle held in a pin vise. While affordable, this method has a significant drawback: it doesn’t remove plastic. Instead, it plows a V-shaped furrow, pushing material to the sides and creating a “burr” that must be carefully sanded away. This can be especially problematic on the softer plastics common in vintage kits, leading to messy, uneven lines that are difficult to clean up.
Modern, dedicated scribing tools are designed to solve this problem. They function more like a micro-chisel or hook, cutting and lifting a thin curl of plastic out of the groove. This results in a clean, U-shaped channel with minimal to no burr, creating a perfect recess for washes to settle into. A successful rescribing project on a 1978 Airfix Hurricane demonstrated that using multiple light passes with a hook-blade scriber, guided by a straight edge, yielded far superior results to a single, forceful pass with a needle.
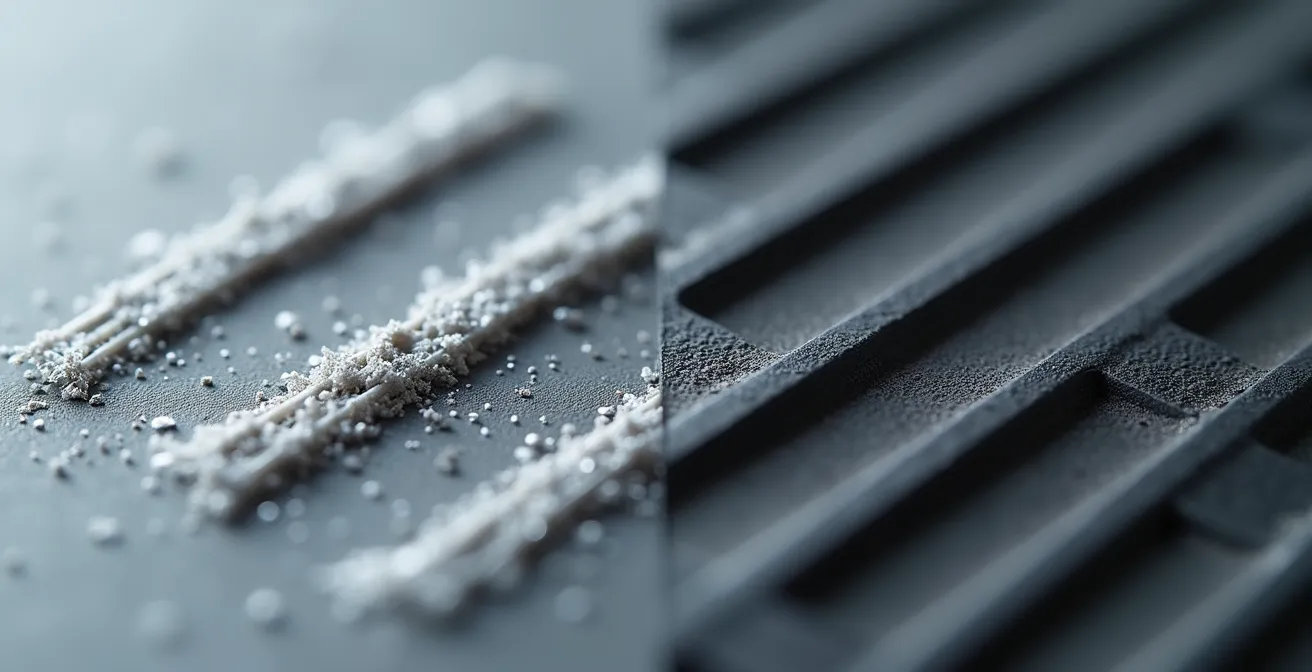
As the close-up image reveals, the difference is stark. The U-shaped groove provides a consistent depth and clean shoulder for weathering effects, whereas the V-groove is less defined. The choice of tool depends on the desired outcome and the type of plastic, but for a crisp, modern look, a dedicated scriber is an essential investment. The following table breaks down the performance of common tool types.
| Tool Type | Groove Profile | Plastic Type Best For | Line Quality | Burr Formation |
|---|---|---|---|---|
| Needle in Pin Vise | V-shaped (60°) | Soft plastic (old Airfix/Heller) | Variable depth | Pushes plastic aside, creates burr |
| Tamiya Scriber | U-shaped channel | Modern hard plastic | Consistent depth | Clean removal, minimal burr |
| UMM-USA Scriber | U-shaped hook | All plastic types | Very clean | Removes thin plastic curl |
| Chisel-type Scriber | Flat-bottom wide | Access panels | Wide channels | Clean edges |
Ultimately, selecting the right tool isn’t just about technique; it’s about setting the stage for all subsequent weathering steps. A clean, well-defined line is exponentially easier to work with, saving you time and frustration later in the build.
Why Pin Washes Don’t Work on Raised Panel Lines (and What to Use Instead)?
A pin wash—the precise application of a dark wash directly into recessed panel lines—is a cornerstone of modern modeling. Its purpose is to use capillary action to flow into a channel and define it. However, applying this same technique to a raised line is fundamentally flawed. There is no channel for the wash to flow into. Instead, the wash pools messily at the base of the raised detail on both sides, creating an unnatural, “outlined” look that makes the model appear more like a drawing than a miniature replica.
This is where our “topographical weathering” approach comes in. We must use a technique that works *with* the raised surface, not against it. The most effective method is the “Reverse Wash” or “Sludge Wash.” Instead of targeting the line itself, you apply a thinned oil or enamel wash over the entire panel area. After letting it dry for a few minutes, you take a cotton swab or makeup sponge lightly dampened with thinner and gently wipe the top surfaces, removing the wash *only* from the flat panels and the top of the raised line. This leaves the pigment settled neatly at the base of the raised detail, realistically simulating the accumulation of grime and shadow.
This technique respects the physical nature of the surface. It’s also worth remembering that not all lines on a real aircraft accumulate dirt. As one expert on the International Scale Modeller forum notes, access panels and doors are primary candidates for weathering, while many other seams are often painted over and remain relatively clean.
Action Plan: The Reverse Wash Technique
- Apply a dark panel liner or oil paint wash over the entire panel area, including the raised lines.
- Let the wash settle for 5-10 minutes until it is partially dry but still workable.
- Use a cotton swab dampened with thinner to carefully wipe ONLY the top surfaces of the raised lines and panels.
- Leave the wash accumulated at the base of the raised lines to create a natural shadow effect.
- For an alternative on metal finishes, trace the lines with a 4B-6B graphite pencil, then gently blend with a tissue.
By switching from a pin wash to a reverse wash, you shift from fighting the kit’s topography to working with it, achieving a far more subtle and convincing effect that enhances the raised detail rather than making it look cartoonish.
Dry Brushing or Pre-shading: Best Methods to Highlight Raised Detail
Just as pin washes fail on raised lines, so too does pre-shading. Pre-shading involves airbrushing dark lines over recessed panel lines *before* the main color is applied. The subsequent light coats of base color allow the dark lines to subtly show through, creating a sense of depth. When applied to raised lines, this technique backfires spectacularly. Instead of a shadow in a recess, you create a dark line *under* the raised detail, which then gets highlighted by the paint on top, resulting in an unrealistic “glow” or checkerboard effect that draws the eye for all the wrong reasons.
A far more effective method for highlighting raised detail is a combination of post-shading and selective dry brushing. Post-shading involves airbrushing a thinned, slightly darker shade of the base color along the raised lines after the base coat is down. This darkens the areas adjacent to the raised line, creating a more realistic shadow. Then, after a gloss coat and basic weathering, a very subtle dry brushing pass can be used. With a flat brush barely loaded with a lighter shade of the base color, you gently drag it *across* the raised lines. This will catch only the very top of the raised detail, simulating paint wear and exposure to light.
The key is subtlety and selectivity. The goal is not to highlight every single line. According to an analysis of award-winning models, the most realistic finishes avoid the trap of treating every line equally. Instead, they focus weathering on prominent features like access panels, cowlings, and control surfaces. This mimics how real aircraft wear and tear, contributing to the “scale effect.” Trying to accentuate every line often breaks this illusion, as most panel seams would be barely visible at common scales anyway.
By abandoning pre-shading in favor of controlled post-shading and targeted dry brushing, you create a layered, nuanced finish that gives the model visual weight and a believable sense of scale, turning those raised lines from a problem into a feature.
How to Fix a Scratch When Your Scriber Slips Across the Wing?
It’s a heart-sinking moment for any modeler: your hand is steady, the guide is in place, and then the scriber jumps, carving a deep, ugly scratch across a pristine wing surface. On a vintage kit, where the plastic can be brittle or soft, this is an all-too-common disaster. Fortunately, a slipped scriber is not a death sentence for your project. With the right technique, the damage can be made completely invisible, even under the most revealing of paint finishes.
The most robust repair method involves using thin cyanoacrylate (CA) glue, or superglue. The trick is to work quickly and precisely. You apply a small drop of thin CA glue directly into the scratch. Immediately after, you spray it with a CA accelerator. This is a crucial step; without an accelerator, the CA glue can shrink as it cures, leaving a depression. The accelerator cures it instantly, creating a hard, stable fill that is proud of the surface. Some modelers have also found success with products like Mr. Dissolved Putty, which can be easier to sand than the rock-hard CA glue.
Once the filler is fully cured, the careful process of sanding begins. This isn’t a job for coarse sandpaper. You should start with a high-grit sanding pad, such as a 3200-grit micro-mesh, and work your way up through progressively finer grits to 8000 or even 12000. The goal is to blend the repair perfectly with the surrounding plastic. A final coat of black primer is the ultimate test; its glossy surface will reveal any remaining imperfections. Only when the surface is flawless should you attempt to re-scribe the lost line, using very light pressure, as the filled area will be a different density than the original plastic.
Checklist: Scribing Slip Repair
- Apply a drop of thin CA glue directly into the scratch or slip mark.
- Immediately spray with a CA glue accelerator to prevent shrinkage and ensure a hard cure.
- Allow the repair to fully cure for at least 10-15 minutes.
- Sand the area smooth, starting with 3200-grit and progressing to 8000-grit micro-mesh pads.
- Apply a coat of black primer to check for any remaining imperfections in the surface.
Mastering this repair process not only saves a model from the shelf of doom but also builds the confidence needed to tackle more complex surface detail restoration, knowing you can fix any mistake along the way.
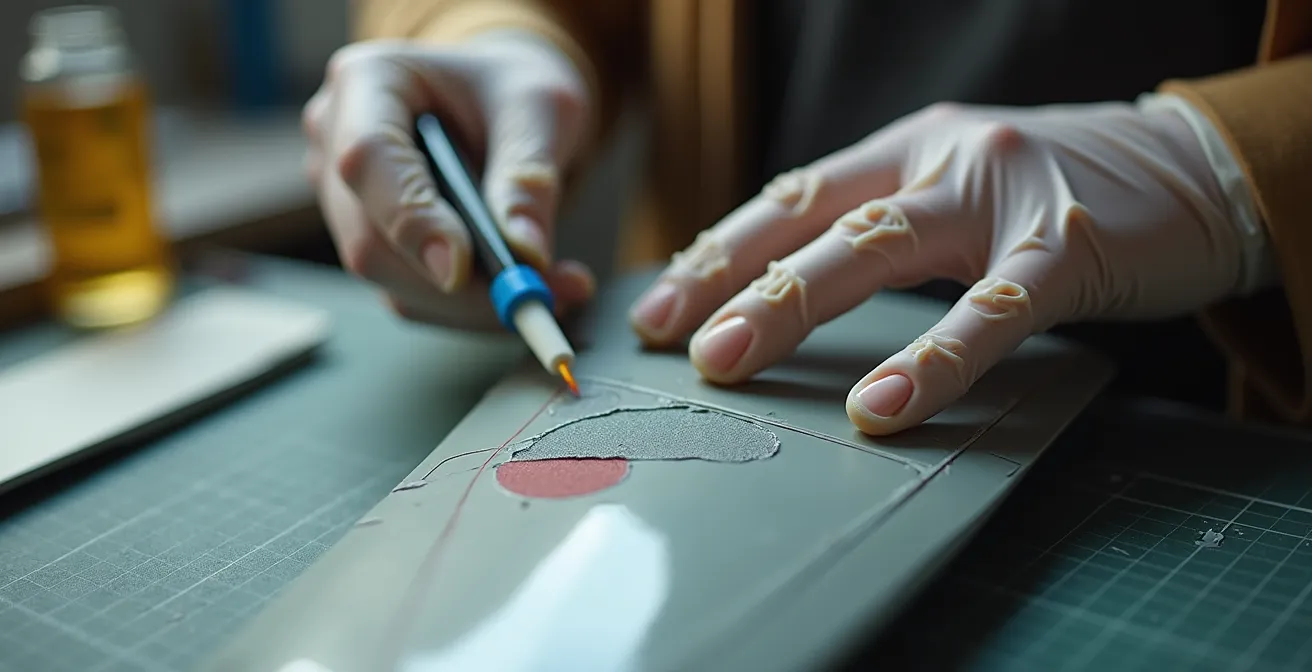
How to Use Photo-Etched Templates to Restore Complex Access Hatches?
Sanding and rescribing can sometimes obliterate complex details like circular access hatches or unusually shaped panels. Restoring these with precision can seem daunting, but photo-etched (PE) scribing templates are designed for exactly this purpose. These thin metal stencils provide a hard, reliable edge for your scribing tool to follow, allowing you to recreate perfect geometric shapes that would be impossible to do freehand.
The main challenge with PE templates is keeping them from shifting during the scribing process, especially on curved surfaces like a fuselage or engine nacelle. A clever solution is the “putty dam” method. After cleaning the surface with alcohol, you press the template firmly into place. Then, you build up walls of modeling putty (like Blu-Tack) around the edges of the template. This dam locks it in position, preventing any slips. For curved surfaces, gently warming the PE template with a hairdryer can make it more pliable, allowing it to conform to the surface before the putty is applied.
These templates unlock advanced possibilities. You can create layered, multi-level panels by using progressively smaller templates in the same location. An innovative technique even uses the negative space of a template; by placing a circular template and building up thick coats of primer inside it, you can create a new *raised* panel on a model that you’ve otherwise converted to recessed lines. This is a prime example of the hybrid approach, using different techniques to create the most realistic and visually interesting surface.
Workflow: Using Photo-Etched Scribing Templates
- Clean the model surface with isopropyl alcohol to remove oils and ensure good adhesion.
- For curved surfaces, gently warm the photo-etched template with a hairdryer to make it slightly flexible.
- Secure the template and build a “putty dam” around its edges to prevent it from shifting during scribing.
- Make an initial light pass with your scriber to establish the groove within the template.
- Complete the shape with 3-4 additional passes, gradually increasing pressure for a clean, consistent line.
Using PE templates elevates your work from simple line scribing to true surface restoration. It allows for a level of precision and complexity that bridges the gap between a basic build and a competition-worthy model.
How to Eliminate Fuselage Seams So They Disappear Under a Coat of Silver Paint?
No amount of skillful weathering or scribing can hide a prominent fuselage seam. This foundational step is absolutely critical, especially when the final coat is a metallic finish like silver or aluminum. These paints are notoriously unforgiving and will highlight even the slightest surface imperfection. The common method of filling a seam with putty often leads to “ghost seams” reappearing months later as the putty shrinks and the paint settles.
A far more permanent solution is the “ridge technique.” Instead of using a filler, you use the kit’s own plastic to create the bond. When gluing the fuselage halves, apply a liquid cement that melts the plastic, and then squeeze the halves together firmly. This should cause a small ridge of molten plastic to ooze out along the entire seam line. Let this ridge cure completely for 24 hours. This molten plastic ridge is then carefully scraped and sanded down until it is perfectly flush with the surrounding surface. Because the seam is filled with the same material as the fuselage itself, there is no risk of shrinkage, and the bond is permanent.

The final, non-negotiable step before applying a metallic coat is the primer check. A standard grey primer can hide minor flaws, but a coat of gloss black primer will reveal everything. As professional modelers attest, gloss black primer reveals up to 95% more surface imperfections than grey. As noted by experts at the Scale Modeling Workshop, this ridge technique ensures the seam is filled with the parent plastic, creating a truly seamless finish. Any remaining dips or scratches will stand out starkly against the gloss black, allowing you to fix them before the revealing silver paint is ever applied.
This meticulous preparation is the true secret behind a stunning natural metal finish. It is tedious but essential work that separates a good model from a great one.
Why Clean Models Look like Toys: Adding Authentic Weathering to Scale Aircraft?
After hours spent perfecting seams and scribing lines, it can be tempting to finish a model with a clean, factory-fresh coat of paint. However, unless the goal is to depict a museum piece on its rollout day, a pristine finish often makes a scale model look less like a miniature replica and more like a toy. Authentic weathering is what breathes life into the plastic, telling the story of the aircraft’s operational history.
The key to believable weathering is context. It should never be a random application of dirt and grime. Instead, it must be story-driven. A detailed analysis shows that aircraft weathering patterns are dictated by their environment. A carrier-based F-14 Tomcat will show heavy salt-fading, fluid stains around folding wing joints, and grime concentrated near catapult attachment points. In contrast, a desert-based F-15 Eagle will exhibit paint worn down to bare metal on wing leading edges from sand abrasion and a fine layer of dust settled in panel recesses. The weathering on each model tells a completely different story.
This “story-driven” approach means researching the specific aircraft you are modeling. Where did it operate? What kind of missions did it fly? The answers will guide your weathering choices, from the color of the panel line wash (burnt umber for general grime, grey for black aircraft) to the placement of oil dot filters, which create subtle variations in color. The final finish should also be varied; real aircraft are not uniformly flat or glossy. Using a satin coat as the main finish, with targeted flat coats on areas like walkways or around exhausts, adds another layer of realism.
Action Plan: Scale-Correct Weathering Workflow
- Apply a gloss coat to protect the base paint and prepare for decals and the initial wash.
- Use an appropriate wash color based on the environment (e.g., burnt umber for general use, grey for black aircraft).
- Apply “dot filtering” by placing tiny dots of various oil paint colors and blending them with a thinner-dampened brush.
- Add operational weathering (exhaust stains, gun residue, fluid leaks) specific to the aircraft’s type and history.
- Seal the weathering with a satin or semi-gloss varnish to create a realistic base sheen.
- Apply a final, targeted flat coat only on specific areas where a dead flat finish is appropriate (e.g., tires, anti-glare panels).
By treating weathering as a storytelling tool rather than a final “dirtying up” step, you elevate your model from a simple collection of plastic parts to a convincing miniature artifact with a tangible history.
Key Takeaways
- Embrace “Selective Fidelity” by enhancing existing raised details rather than defaulting to a complete and laborious rescribe.
- Utilize techniques suited for the unique topography of raised lines, such as reverse washes and post-shading, for more realistic results.
- A flawless surface, free of seams and scratches, is the non-negotiable foundation for any convincing paint job, especially metallics.
What Defines a High-Fidelity Replica for Serious Aviation Collectors?
Ultimately, the journey of modernizing a vintage kit is a quest for fidelity. But what does “high-fidelity” truly mean in the context of scale modeling? It’s a concept that goes far beyond simply having recessed panel lines. A model can have perfectly scribed lines and still look toy-like if other, more subtle aspects are ignored. Fidelity is the sum of many small details that combine to create a convincing overall illusion of a real, full-sized machine in miniature.
This is governed by the principle of “scale effect.” As an expert on the Large Scale Planes forum puts it, this includes thinning the trailing edges of wings and control surfaces to a knife’s edge, drilling out the barrels of guns and engine exhausts to give them depth, and ensuring cockpit details are proportionally correct, not chunky and oversized. It’s the difference between a solid piece of plastic meant to look like a vent and an open vent with delicate, see-through mesh behind it.
Weathering is perhaps the most significant contributor to the scale effect. A toy might have a uniform, heavy black wash in every panel line. A high-fidelity replica, however, will have varied line intensity and color, with weathering that is driven by the aircraft’s operational story, as we’ve discussed. The final surface finish is equally important, moving beyond a single gloss or flat coat to a varied sheen that mimics different materials like painted aluminum, rubber, and heat-stressed metal. The following table from an in-depth modeling analysis highlights these critical distinctions.
| Aspect | Toy-Like Appearance | High-Fidelity Replica |
|---|---|---|
| Panel Lines | Heavy black wash in every line | Varied intensity based on location |
| Surface Finish | Uniform gloss or flat | Varied sheen appropriate to surface |
| Edge Treatment | Thick trailing edges as molded | Thinned to scale thickness |
| Details | Solid gun barrels, closed vents | Drilled out barrels, open mesh vents |
| Weathering | Random dirt application | Story-driven operational wear |
When you approach your next vintage kit, view its raised lines not as a defect, but as the starting point of a unique project. By applying the principles of Selective Fidelity and focusing on the scale effect, you can create a truly impressive replica that honors the kit’s history while showcasing the highest levels of the modeler’s art.