The white stress marks and gouges that ruin a model are not accidents; they are the result of haste and improper technique. This guide rejects brute force, teaching instead a disciplined, two-stage cutting process. By understanding the nature of plastic and honoring the material, a beginner can achieve the clean, perfect separation of a master, ensuring every part is flawless before assembly even begins.
The journey of creating a scale model does not begin with glue and paint. It begins with a single, precise cut. For the novice, the plastic frame—the sprue—is a mere container. You may be tempted to twist a part free, or snip it carelessly, only to find a glaring white mark or a deep gouge on a delicate surface. This is the first, and most common, failure. It is the scar of haste, a permanent flaw born from a moment of impatience.
Many will advise you to simply use a sharp knife or a pair of cutters. They will speak of sanding and filling, treating the symptom rather than preventing the cause. But a master craftsman knows the truth: the perfection of the final form is determined by the purity of its initial components. This is not about fixing mistakes; it is about a discipline that precludes them. The true art lies not in the tool, but in the approach. It is a philosophy of deliberate action and respect for the medium.
The perspective we will embrace is one of disciplined separation. We must unlearn the impulse to tear and instead learn to release. This requires understanding why the plastic scars, choosing the right instrument for a specific task, and mastering a process that leaves no trace. This is the path to transforming a simple cut into an act of precision, ensuring the integrity of every single piece, from the robust fuselage to the most fragile antenna.
This guide will walk you through the essential disciplines required for this foundational skill. We will explore the principles behind clean cuts, the correct application of tools, and the specialized techniques needed for even the most challenging parts, ensuring your journey into model building starts with perfection, not repair.
Summary: A Master’s Guide to Removing Sprue Parts Without a Scar
- Why tearing parts off the runner creates white stress marks?
- Side cutters vs Razor Saws: which is safer for delicate pitot tubes?
- How to sand the nub flush without flattening the surrounding curvature?
- The brittle plastic danger: preventing cracks when cutting canopies
- When to replace your nippers: the 3 signs of a dull blade
- How to Start Building Static Aircraft Models Without Spending Over $100?
- How to Identify Quality Injection-Molded Kits Before Opening the Box?
- How to Eliminate Fuselage Seams So They Disappear Under a Coat of Silver Paint?
Why Tearing Parts off the Runner Creates White Stress Marks?
That white, chalky blemish that appears when you twist a part from its runner is not a surface stain. It is a deep, internal wound in the plastic itself. This scar of haste is the physical manifestation of permanent plastic deformation. Polystyrene, the material of your model, is composed of long polymer chains. When you apply blunt, tearing force, you are not cutting these chains; you are stretching and bending them to their breaking point. This violent separation causes a misalignment of the polymer structure, which changes how it reflects light, resulting in the visible white mark.
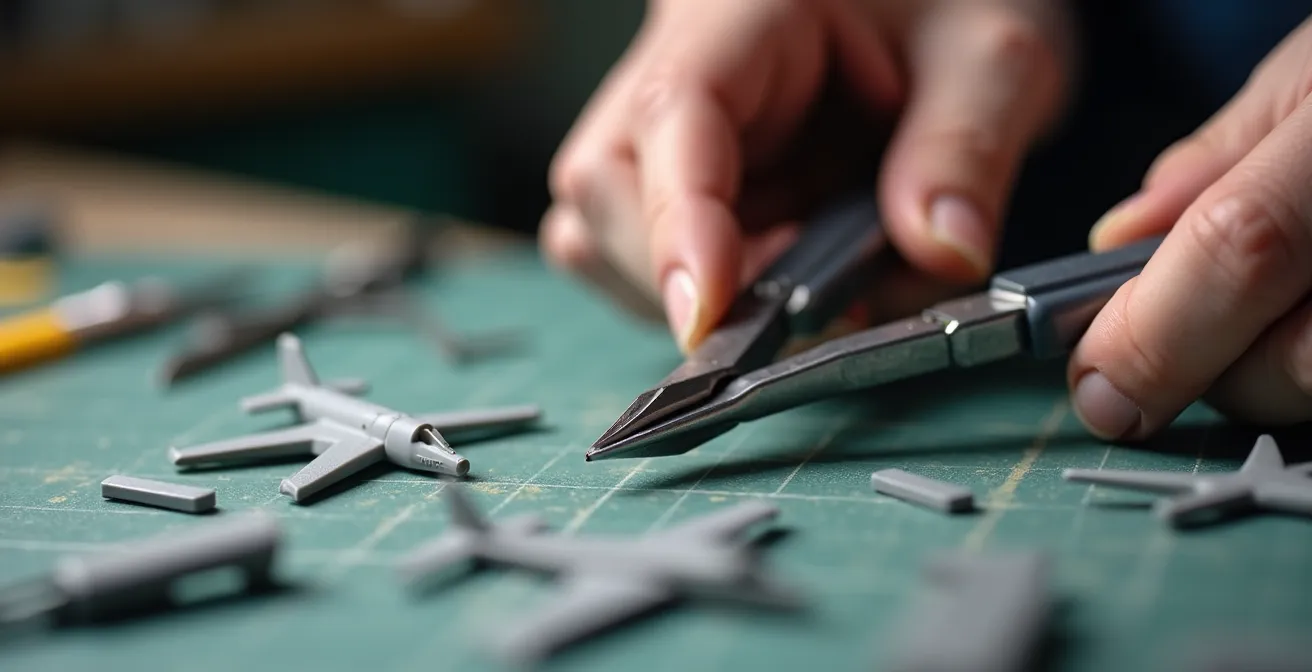
A true craftsman honors the material by understanding its limits. You must never twist or tear. The proper approach is a disciplined process known as the “Path of Two Cuts.” This method isolates the part from the stress of separation. First, use your cutters to snip the runner a few millimeters away from the part itself. This frees the component from the tension of the main frame. Only then do you perform the second, final cut, slicing the remaining gate (the small attachment point) as flush as possible to the part.
This two-stage approach ensures that the pressure of the main cut is absorbed by the disposable piece of runner, not the part itself. As confirmed by professional modelers, this understanding of plastic deformation in model building is the fundamental difference between a scarred component and a pristine one. The goal is a clean release, leaving only a small nub to be carefully removed later, a process we will address with equal discipline.
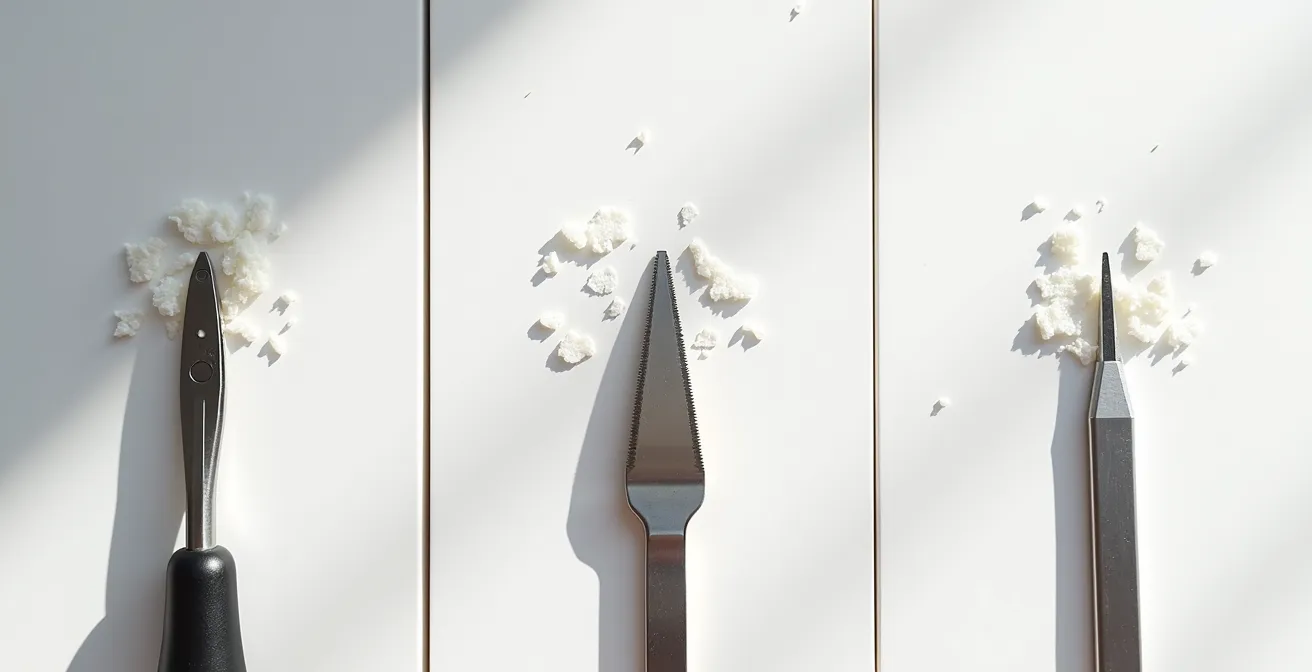
Side Cutters vs Razor Saws: Which Is Safer for Delicate Pitot Tubes?
A tool is an extension of the modeler’s will, and choosing the wrong tool is an act of carelessness. For robust parts with thick attachment gates, standard side cutters or nippers are sufficient. Their pinching action quickly severs the plastic. However, this same action creates a shockwave of pressure. On a delicate part like a pitot tube, an antenna, or landing gear, this pressure can easily cause the part to snap, bend, or fly across the room, lost forever. For such components, a different discipline is required.
A fine-toothed razor saw or jeweler’s saw is the tool of patience and precision. Unlike nippers that pinch and crush, a saw removes material through abrasion, one microscopic shaving at a time. It imparts almost zero stress on the part. When using a saw, you must support the component securely with blu-tack or masking tape to dampen any vibration. The motion should be light and smooth, allowing the saw’s teeth to do the work without any downward pressure.
The correct choice of tool is not a matter of preference, but a calculated decision based on the nature of the part. This methodical approach is the mark of an experienced builder.
This following comparative analysis, based on a consensus of expert modelers, provides a clear guide for your decisions. An examination of various part types reveals a clear hierarchy of tools.
| Part Type | Best Tool | Risk Factor | Pro Technique |
|---|---|---|---|
| Delicate pitot tubes | Fine razor saw or heated blade | Low | Support part with blu-tack while cutting |
| Robust attachment points | Side cutters | Low | Quick snip motion |
| Thick resin parts | Razor saw | Medium | Cut section of sprue first |
| Clear canopies | Scribe and snap method | Low if done correctly | Score deeply then controlled snap |
Action Plan: Safely Freeing Fragile Components
- Assess the Gate: Identify the number, position, and thickness of all attachment points on the part to understand the forces involved.
- Plan the Cut Order: Determine the sequence of cuts that will minimize stress, always freeing the most flexible or non-critical points first.
- Support the Part: Apply masking tape or a small amount of blu-tack to the component to brace it against vibration and torsion during the cut.
- Execute the Separation: Perform the precise cutting action with the chosen tool (saw, blade, or nipper) using a controlled and deliberate motion.
- Inspect the Result: Examine the separation point under good light for any sign of stress or excess material before proceeding to the next part.
How to Sand the Nub Flush Without Flattening the Surrounding Curvature?
After the disciplined separation, a small remnant of the gate—the nub—will remain. The careless builder will attack this with a coarse file or sandpaper, creating a flat spot on a beautifully curved fuselage or wing. This is a second-order failure, a flaw created during the refinement stage. The challenge is to remove the nub while perfectly preserving the original contour of the part. This requires finesse, not force.
The solution lies in a progressive sanding approach combined with a simple, yet ingenious, visual guide. First, take a black permanent marker and completely color the nub. This ink is your guide; your task is finished only when the ink has completely vanished, and not a moment later. This prevents you from sanding away the surrounding plastic. Second, never use a hard, flat sanding block on a curved surface. Instead, wrap your sandpaper or flexible sanding film around a soft, conforming object—your fingertip, a foam earplug, or a piece of rubber. This allows the abrasive surface to follow the model’s curvature precisely.
Begin with a medium grit (like 600) and use gentle, circular motions. As the black mark begins to fade, switch to a finer grit (800, then 1000). The final passes with a 1500 or 2000-grit paper will polish the surface, making the repair invisible. For surfaces with raised panel lines or sharp details, sanding is too clumsy. Here, you must use the back (unsharpened side) of a curved hobby blade as a scraper. Gently pull it across the nub to shave away thin layers of plastic until it is flush. This technique, detailed in guides for advanced model preparation, offers ultimate control. Finally, a touch of polishing compound on a cotton swab will restore the plastic’s original sheen completely.
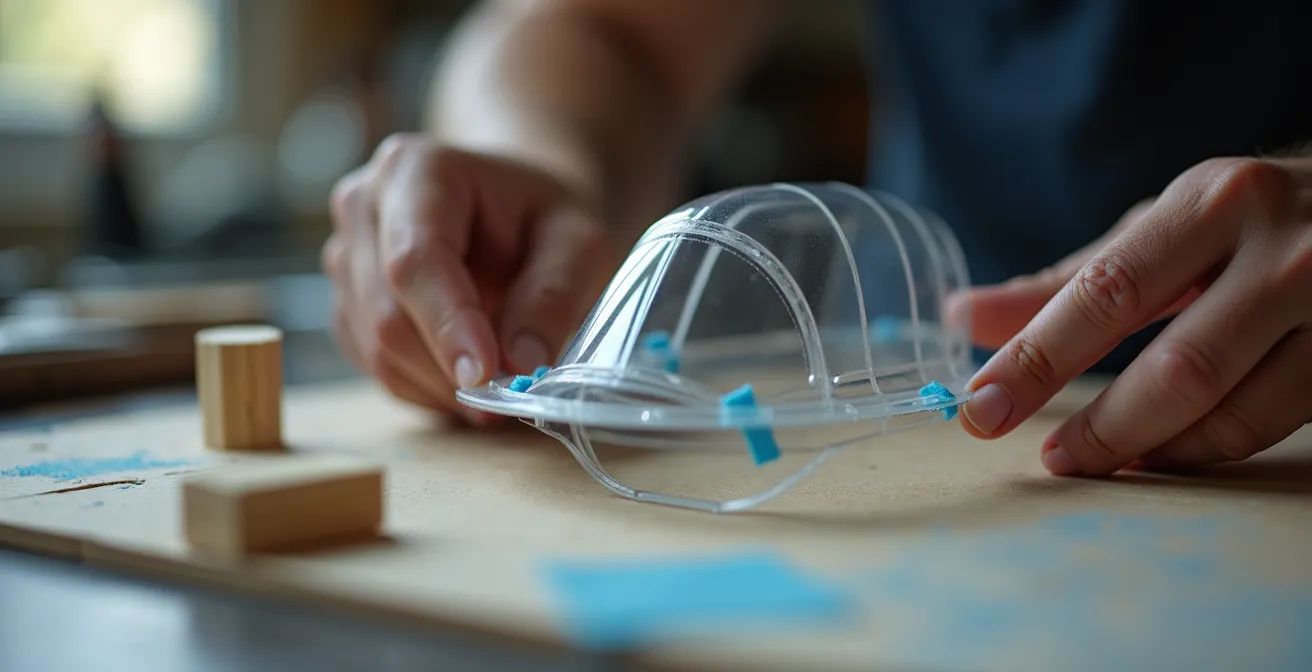
The Brittle Plastic Danger: Preventing Cracks When Cutting Canopies
Clear parts, such as aircraft canopies, are the eyes of your model. They are also notoriously brittle and unforgiving. Unlike the softer polystyrene of the main airframe, clear plastic is hard and prone to cracking under pressure. Using standard nippers on a canopy gate is an invitation for disaster; the pinching force will almost certainly send a fracture spider-webbing across the clear surface. Honoring this material means approaching it with a completely different set of techniques.
First, patience. Allow the kit to acclimate to room temperature for several hours before you begin. Cold plastic is significantly more brittle. Before any cut, protect the pristine surfaces by covering them with Tamiya masking tape. The most refined technique for separating canopies is the scribe and snap method. Instead of cutting through the gate, you use a panel line scriber or a sharp hobby knife to make a deep, clean score line exactly where the gate meets the part. Support the inside of the canopy with blu-tack to absorb vibrations. After making several firm passes to deepen the score, apply gentle, controlled pressure. The part will snap cleanly along the weakened line.
Any remaining nub should be removed with extreme care. Wet sanding with 1,000-grit paper and cold, soapy water minimizes heat and prevents crazing. For any accidental scratches, a progression of polishing compounds is essential to restore perfect clarity. As experts in part restoration confirm, a flawless canopy is achievable by treating it not as plastic to be cut, but as glass to be scored and polished, a process outlined in guides for recovering scratched clear parts.
When to Replace Your Nippers: The 3 Signs of a Dull Blade
Your side cutters, or nippers, are your most-used tool. They are also a consumable. With every cut, the fine cutting edge micro-deforms. A novice builder will use a pair of nippers until they are practically useless, crushing plastic rather than cutting it, and creating more work in the cleanup stage. A master knows that a sharp tool is an investment in time and quality. You must learn to recognize the signs of a dulling blade and have the discipline to replace your tool before it starts damaging your work.
There are several critical tests to determine the sharpness of your nippers. Do not rely on feeling alone. Perform these objective checks regularly:
- The Paper Test: A sharp pair of nippers will cleanly slice a single sheet of standard printer paper held taut. A dull pair will fold, tear, or chew the edge.
- The Sound Test: Listen carefully during a cut on a piece of sprue. A sharp blade makes a crisp, clean ‘snick’. A dull blade makes a dull ‘crunch’ or ‘crack’ sound, which is the sound of plastic being crushed and stressed.
- The Light Gap Test: Carefully close the jaws of your nippers and hold them up to a bright light. If you can see any light passing through the gap where the cutting edges are supposed to meet, they are worn or damaged and will no longer provide a clean, flush cut.
- The Pressure Test: Be mindful of the force required. If you find yourself squeezing noticeably harder than when the tool was new, the mechanical advantage is being lost to dull edges.
Ultimately, the most important sign is an economic one. When the time you spend sanding and cleaning up nubs created by your dull cutters exceeds a few minutes per part, the tool is no longer saving you time. A new pair of nippers, as noted in hobbyist tool guides, is a far wiser investment than the hours spent correcting the flaws of a worn-out tool. Detailed analysis from sources like mastering model building nippers emphasizes that tool maintenance is as crucial as technique.
How to Start Building Static Aircraft Models Without Spending Over $100?
The path to mastery does not begin with an extravagant expense. A beginner often believes that a high-priced, complex kit will yield a better result. This is a fallacy. An expensive kit in the hands of a builder with poor tools and technique will result in a poorly finished model. Conversely, a simple, inexpensive kit built with excellent tools and disciplined technique can become a masterpiece. Your initial investment should be in capability, not complexity.
Good tools make cheap kits look great; bad tools make expensive kits look cheap.
– FineScale Modeler Community, FineScale Modeler Magazine Forum
Therefore, your first hundred dollars must be allocated with wisdom. The majority should be dedicated to a small set of high-quality essential tools. Prioritize a superb pair of single-blade nippers. Their design, where one blade cuts while the other acts as an anvil, provides an incomparably clean cut that minimizes nub cleanup. This is your single most important investment. Next, acquire a quality hobby knife with a supply of fresh #11 blades. A blade is only useful when it is perfectly sharp; a dull blade tears, not cuts.
For finishing, a set of fine-tipped panel lining markers is more cost-effective and controllable for a beginner than investing in paints, thinners, and washes. For assembly, a bottle of extra-thin cement with a brush applicator provides far more control than tube glue. Finally, choose an inexpensive but well-engineered starter kit from a reputable brand like Airfix or an older Tamiya release. These kits are forgiving and allow you to perfect your technique without the fear of ruining a costly model. You can even create your own gap filler, “sprue goo,” by dissolving leftover sprue pieces in a near-empty jar of liquid cement—the ultimate act of resourcefulness.
How to Identify Quality Injection-Molded Kits Before Opening the Box?
Before you even spend your money, you can learn to “read” a kit and assess its quality. The engineering of a model is often visible through the clear plastic wrapping, if you know what to look for. This skill of pre-purchase assessment separates the discerning modeler from the hopeful consumer and prevents the frustration of battling with an poorly designed kit.
The most telling sign is the design and placement of the gates—the very attachment points we have been discussing. In a modern, high-quality kit from a manufacturer like Bandai or a newer-tooling Tamiya, the gates will be small, delicate, and intelligently placed. Look for attachment points on non-visible mating surfaces, such as the inside edge of a fuselage half or the bottom of a wing. This shows the kit designer has considered the building process and minimized the cleanup work required on visible surfaces. Conversely, large, thick gates attached directly to a curved, highly visible area are a hallmark of older tooling from the 1970s or 80s. These kits will require significantly more skill and effort to achieve a clean finish.
Beyond the box, a moment of research is invaluable. Use websites like Scalemates.com to check the kit’s history. Look for the “New Tool” date; a kit tooled after 2010 will almost certainly feature superior engineering, sharper panel lines, and an absence of “flash” (thin excess plastic). Examine online sprue-shot photos from reviews. Are the clear parts crystal clear and thin, or are they thick and distorted? The quality of the clear sprue is often an indicator of the overall quality of the entire kit. This discipline of research ensures your time is invested in a kit that rewards your skill, rather than one that fights you every step of the way.
Key Takeaways
- The “Path of Two Cuts” is the fundamental technique to prevent stress marks: one cut to isolate, one cut to separate.
- Tool selection is not a preference but a tactical choice: nippers for robust parts, saws or blades for delicate and clear components.
- A dull tool is a liability. Regularly test your nippers for sharpness and replace them when they begin to crush rather than cut.
How to Eliminate Fuselage Seams So They Disappear Under a Coat of Silver Paint?
We arrive at the ultimate test of your foundational skills. A silver or natural metal finish is the most honest and unforgiving coat a model can wear. It will highlight every flaw, every scratch, and most ofall, every poorly-managed seam. Making a fuselage seam disappear under silver paint is a culmination of all the disciplines we have discussed. The process begins not with putty and sanding, but with the perfect preparation of the mating surfaces, which is only possible if you have perfectly removed the parts from the sprue.
First, ensure that every trace of the sprue gate nub has been removed from the joining surfaces of the fuselage halves. They must be perfectly flat. When you apply liquid cement, apply it sparingly and then squeeze the two halves together firmly. This should create a small, controlled bead of melted plastic that oozes out along the seam line. This bead is your friend; it is the ideal filler, made from the kit’s own plastic. Once it has hardened completely, you can carefully scrape and sand it flush, creating a truly monolithic part.
For any remaining gaps, use a black-tinted CA glue (superglue). The dark color provides a stark contrast against the grey plastic, making it incredibly easy to see any remaining imperfections as you sand. You must then engage in progressive sanding along the seam line, moving from 600-grit to at least 1500-grit until the surface is as smooth as glass to the touch. Finally, any panel lines that were lost during the sanding process must be meticulously re-scribed using a scribing tool and guide tape. This final step restores the surface detail, completing the illusion. Only a surface prepared with this level of rigor is worthy of a silver finish.
Begin today. Approach your next model not as an assembly project, but as a practice in discipline. Focus entirely on this first, critical step of separation. Your path to mastery starts with a single, perfect cut.